

Before we even open up Xcode, we should have a good sense of what we plan to develop. We want to know the basics of what kind of data we are going to need to represent and what the user interface is going to be like. We don't yet need pixel perfect designs for every screen, but we should have a good idea of the flow of the app and what features we want to include in our first version.
As we already discussed, we are going to develop a basic camera app. This leaves us with a very clear list of features, which we would want in a first version:
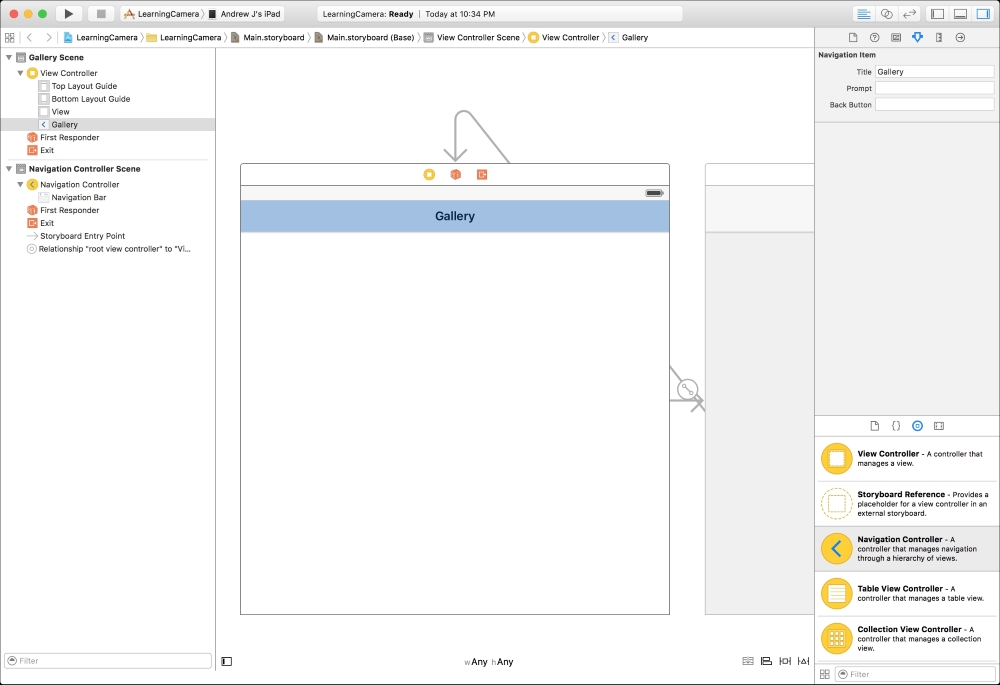
Now that we have a list of features, we can come up with the basic flow of the app, otherwise referred to as a wireframe. The first screen of our app will be a gallery of any picture the user has already taken. There will be a button on the screen, which will allow them to take a new picture. It will also have the ability to activate the editing mode where they can delete photos or change their label:

This interface will allow us to take advantage of the built-in picture-taking interface that we will look at in more detail later. This interface will also allow us to make it flexible to work on all the different phone and tablet screens. It may seem simple, but there are many components that have to fit together to make this application work. On the other hand, once you have a good understanding of the different components, it will start to seem simple again.
Now that we know roughly how the app needs to work for the user, we can come up with at least a high-level concept of how the data should be stored. In this case, we simply have a flat list of images with different labels. The easiest way for us to store these files is in the local file system, with each image named after the user chosen label. The only thing to keep in mind with this system is that we will have to find a way to allow two different images with the same exact label. We will solve that problem in more detail when we get around to implementing it.
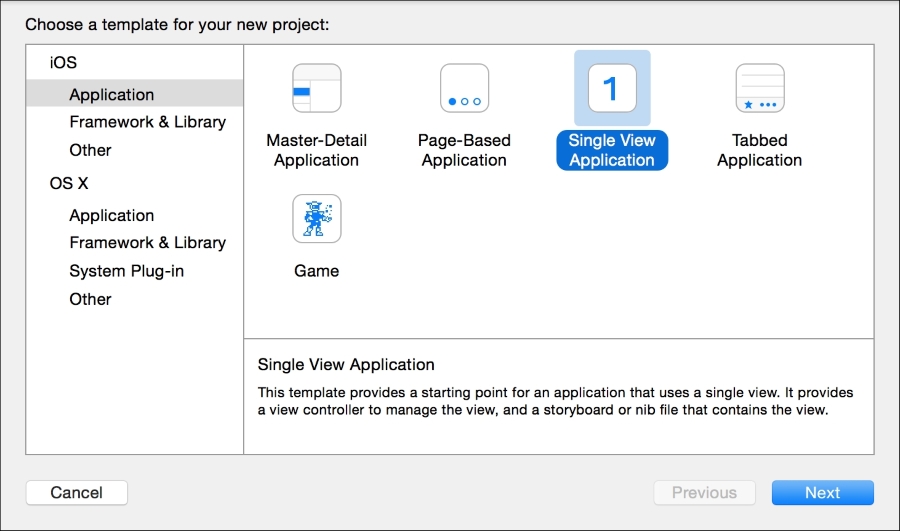
Now that we have finished conceptualizing our app, we are ready to start coding. In Chapter 3, One Piece at a Time – Types, Scopes, and Projects, we created a command-line project. This time, we are going to create an iOS Application. Once again, in Xcode, navigate to File | New | Project…. When a window appears, select the Single View Application from the iOS | Application menu:
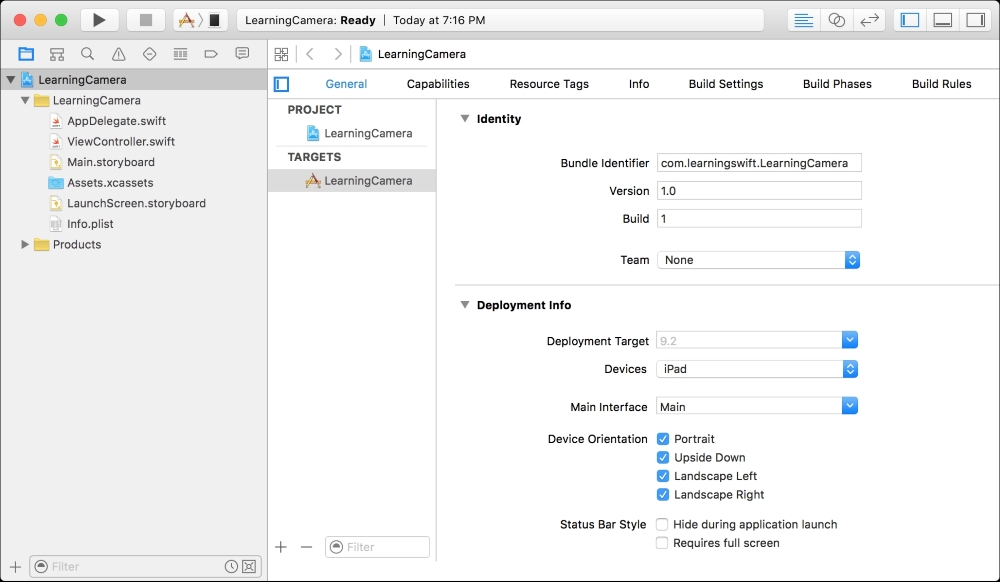
This default screen allows us to configure various attributes of the app including the version number, target devices, and much more. For our purposes, all of the defaults are fine. When you decide to submit an app to the app store, this screen will become much more important.
The fourth file is Assets.xcassets. This is a container for all of the images that we would want to display in our app. Almost every app you make will have at least one image so this is a very important file too.
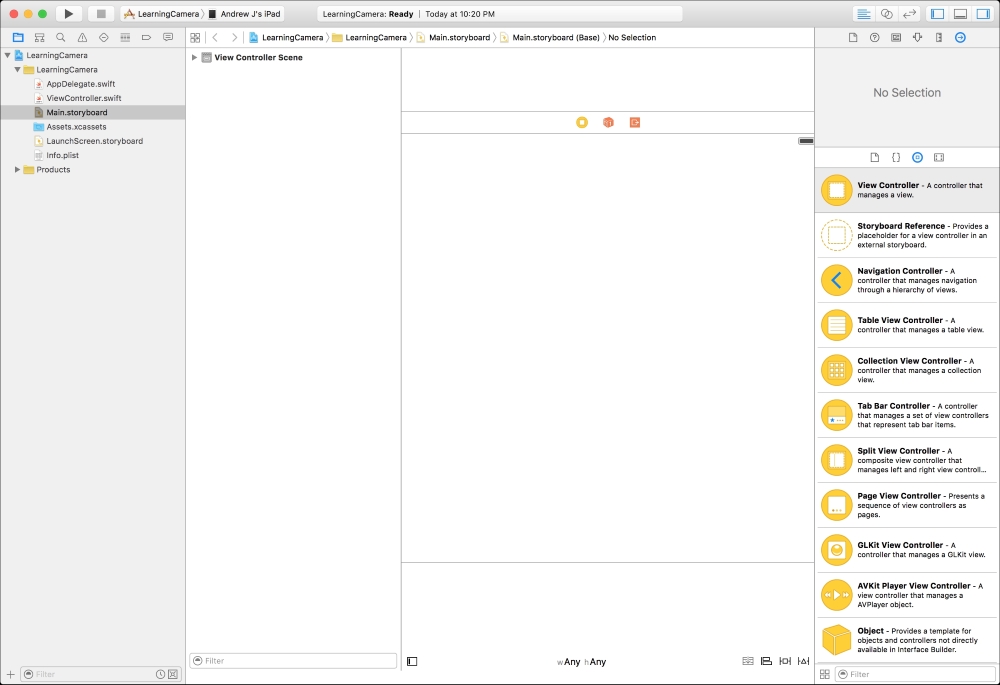
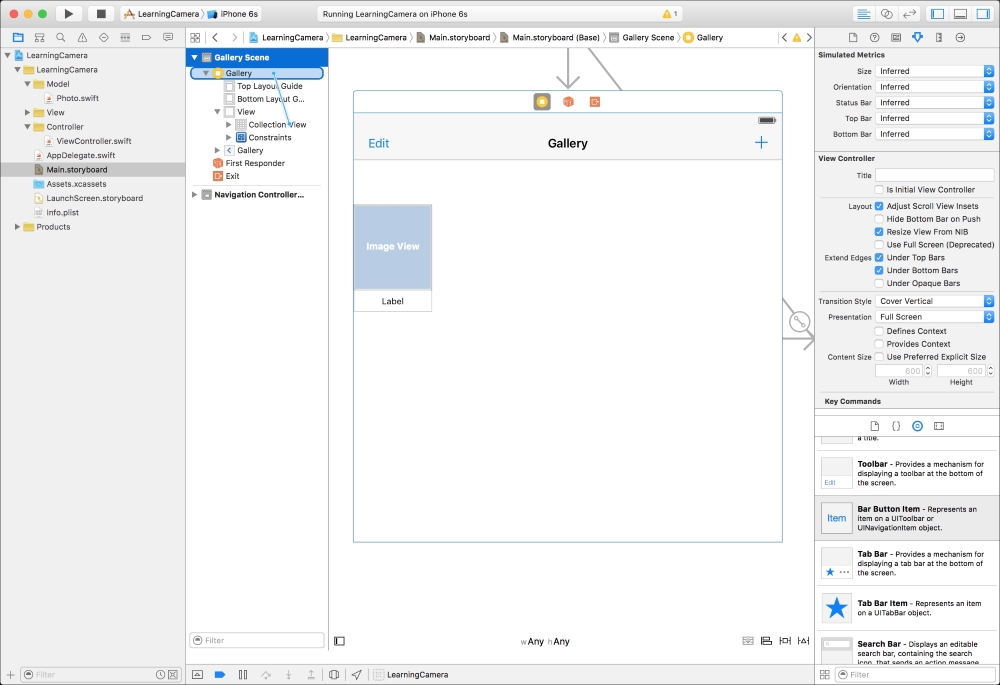
Now that we have our bearings within the project, let's jump into configuring the user interface of our app. As we discussed earlier, this is done within the Main.storyboard file. When we select that file, we are presented with a graphical editing tool, generally referred to as
Interface Builder:
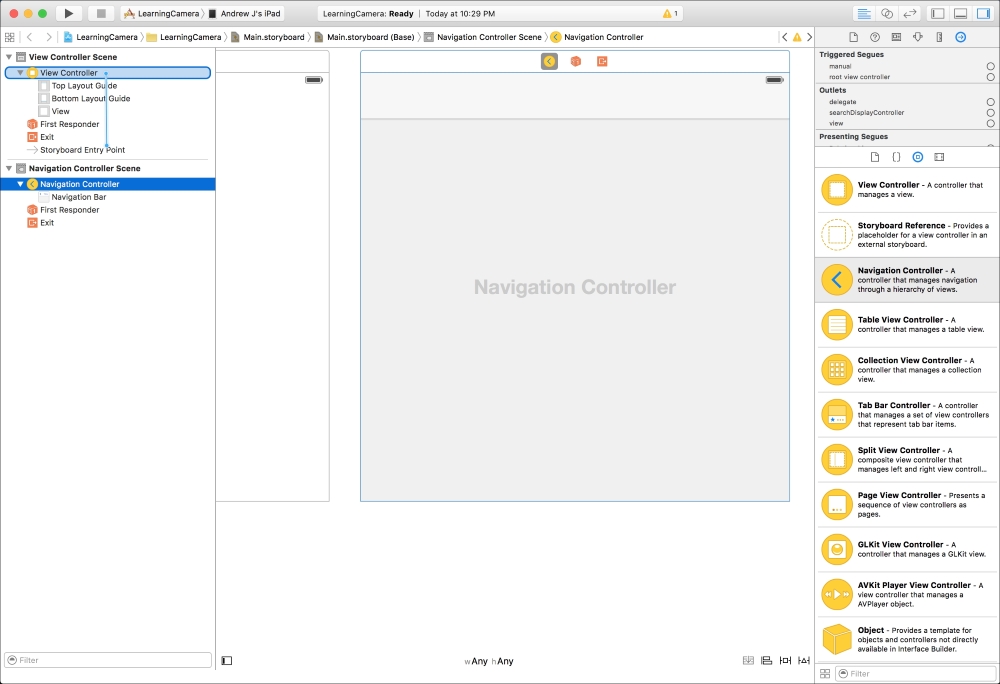
The first thing we want to do is add the bar along the top that is in our wireframes. This bar is called a navigation bar and we can add it directly, as it is one of the elements in our library. However, the frameworks will handle many complications for us if we use a Navigation Controller instead. A Navigation Controller is a view controller that contains other view controllers. Specifically, it adds a navigation bar to the top and allows us to push child view controllers onto it in the future. This controller creates the animation of a view being pushed on from the right in many applications. For example, when you select an e-mail in the Mail app, it animates in the contents of the e-mail; this uses a navigation controller. We will not have to push any view controllers on in this app, but it is good to be set up for the future and this is a superior way of getting a navigation bar at the top.
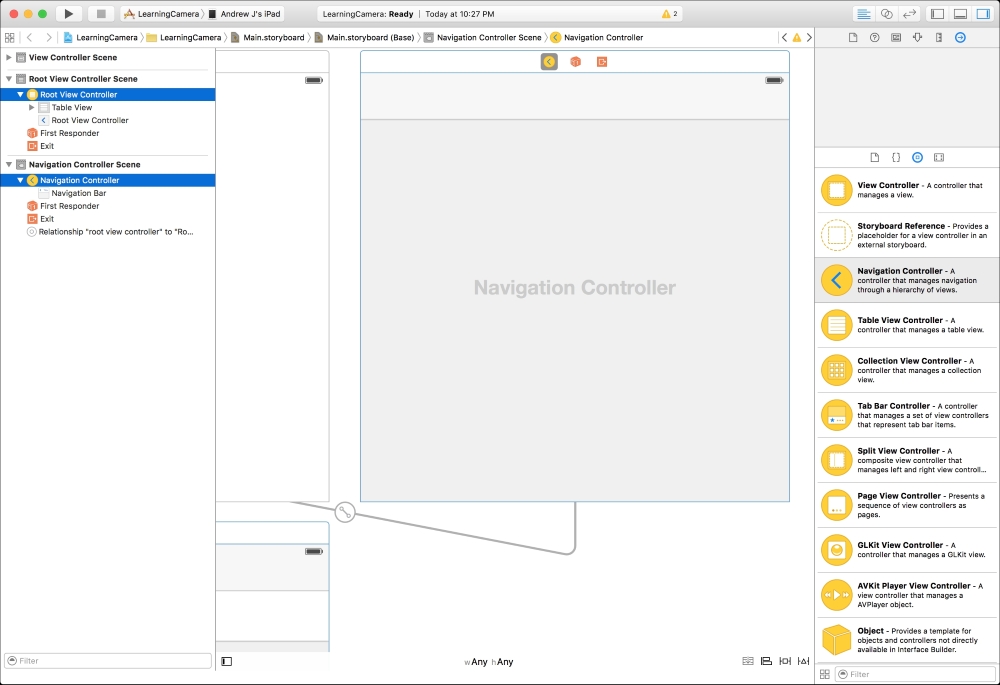
We don't want the new Root View Controller, only the View Controller Scene so let's delete it. To do this, click on the Root View Controller with the yellow icon and press the Delete key. Next, we want to make the View Controller Scene the root view controller. The root view controller is the first controller to be shown within the Navigation Controller. To do this, right-click on the Navigation Controller with the yellow icon and drag it to the View Controller with the yellow icon below. The View Controller will be highlighted blue:
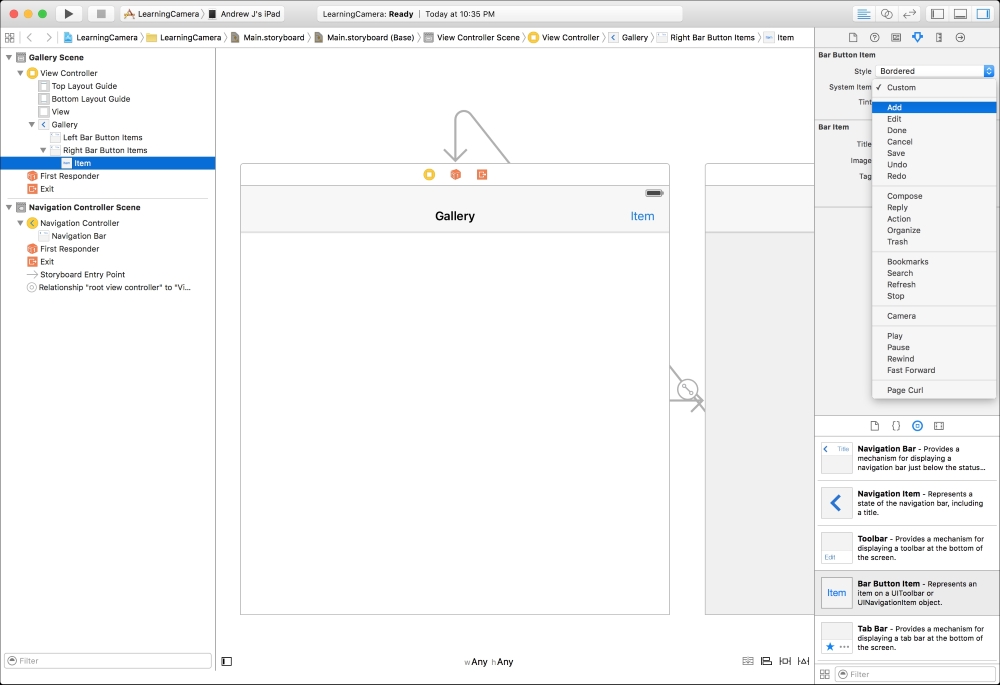
Next, we want to add the "Take a Picture" button to our navigation bar. All buttons in toolbars are called bar button items. Find them in the library and then drag it to the right side of the toolbar (the place where you can drop it will turn blue when you get close to it). By default, the button will say Item, but we want it to be an add button instead. One option would be to change the text to an addition symbol, but there is a better option. After adding the button, you should be able to see it appear in the hierarchy that is to the left of the main view. In there, you will see the navigation bar with the new button item nested inside the Gallery title. If you select that item in the hierarchy, you will see some options we can configure about the item along the right-hand side of the screen. We want to change the System Item to Add:
Now, you can do the same thing for the left-hand side of the navigation bar with the Edit identifier.
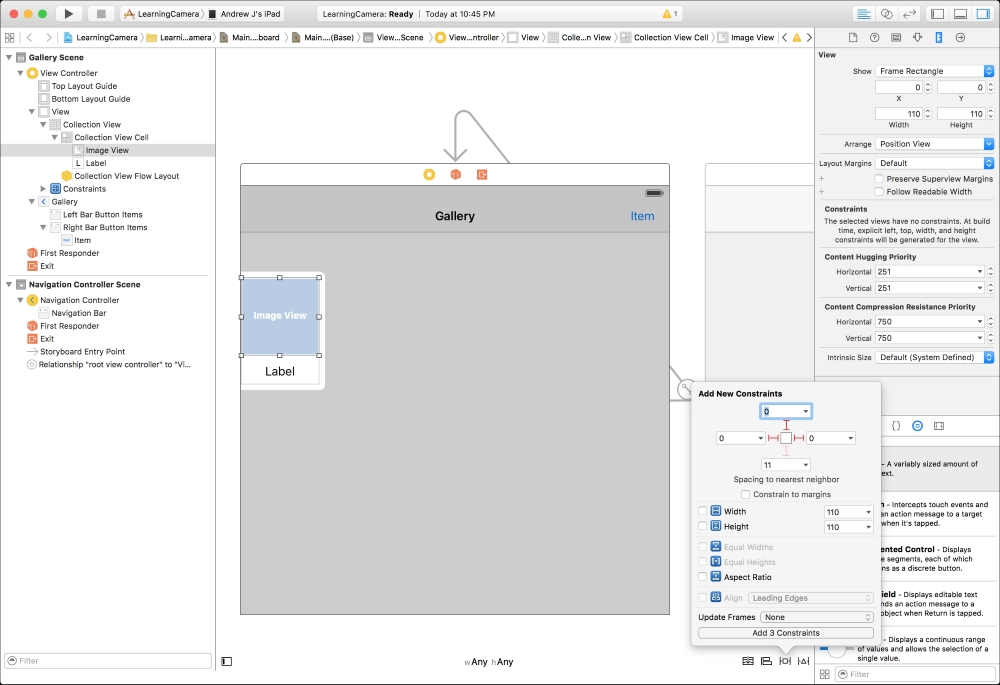
First, we need to define the rules for the sizing of the collection view. This will allow the interface to adapt well to each different screen size. The tool we use to do this is called Auto Layout. Click on the collection view and then select the Pin icon in the lower right of the screen:

Configure this window to match the preceding screenshot. Click on each of the four struts so that they are highlighted red, uncheck Constrain to margins, and change each of the measurements to zero. After everything is configured, click on Add 4 Constraints. This will cause some yellow lines to appear that indicate that the view's placement is not consistent with the rules we just created. We can resize the views ourselves to make it match or we can let Xcode do it for us: there will be a yellow icon next to the Gallery Scene on the left-hand side of the screen. Click on that and you will get a list of misplaced views. In there, you can click on the yellow triangle and click on Fix Misplacement. We also want to make the background white instead of black. Select the collection view and then change its Background to white in the Attributes Inspector.
The last thing we need to configure on this screen is the
collection view cell. This is the box in the upper-left corner of the collection view. We need to change the size and add both an image and a label; let's start by changing the size. Click on the Collection View if it isn't already selected and navigate to View | Utilities | Show Size Inspector from the main menu. Change the Cell Size to be 110 points wide and 150 points tall.
Now, we can drag in our image. In the library, this is called an Image View. Drag it into the cell and then change the height and width in the
Size Inspector to 110 and x and y to 0. Next, we want to drag a Label below the image view. Once it is placed, we want to configure the placement rules within the cell.
It is pinned to the left, top, and right without constraining to margins and values of zero for all three measurements. Click on Add 3 Constraints and we are ready to define the rules for the label. We want the label to be full width and vertically centered. A label is going to automatically center the text, so we want the label to be tall enough to have a reasonable margin above and below the text. Click on the label and configure it as follows:
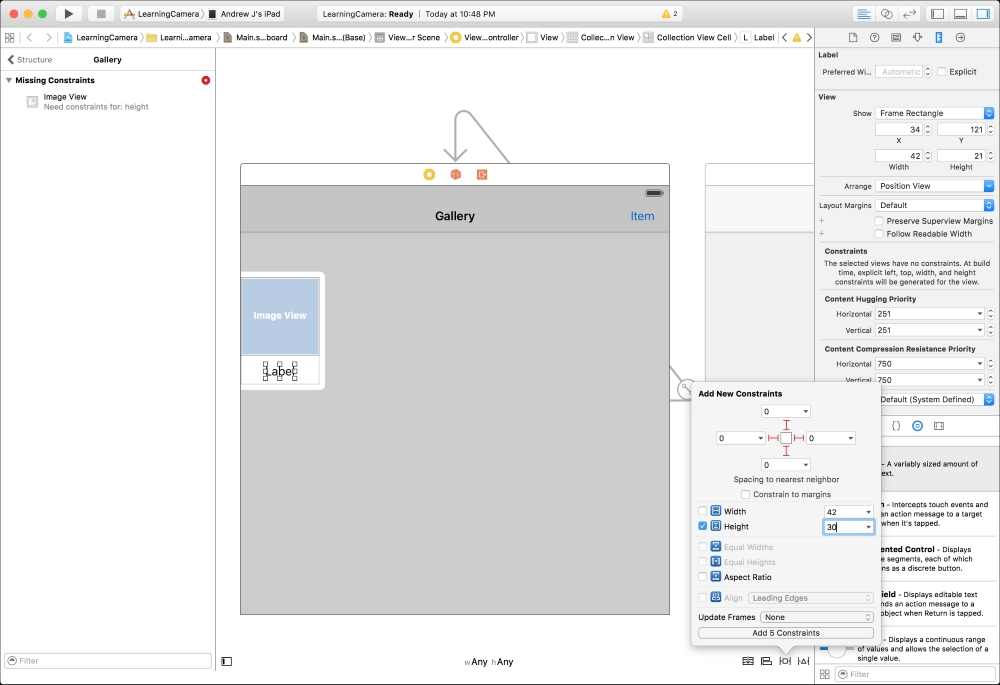
It is pinned in every direction without constraining to the margins and has zero for all measurements. It is also constrained to be 30 points tall by checking the Height checkbox. Click Add 5 Constraints and then have Xcode resize it for you again from the menu on the left. Also, make sure to select the center alignment in the Attributes Inspector and reduce the font size to 12.
Now we have most of our interface configured without writing a single piece of code. We can run the app to see what it looks like. To do this, first select the simulator you want to run it on from the menu in the top bar. Then you can click on the run button, which is the one with the black triangle. This will open up a new simulator window running your app:
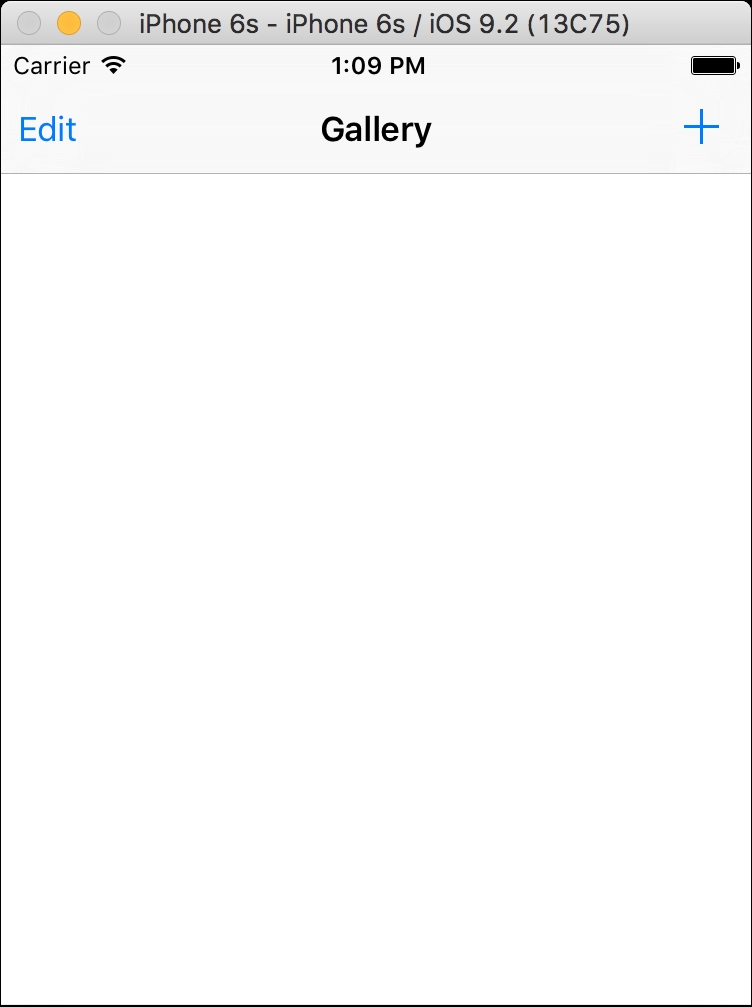
You can rotate the virtual device from the Hardware menu to see what happens when you rotate it and you can try running it on various different simulators. We have configured our view so far to adapt to any screen size.
Now we are ready to move onto the programming. The first thing we need to allow the user to do is to take a new picture. In order to do that, we are going to need some code to run every time the user taps on the add button. We achieve this by connecting the trigger action of the add button to a method on our view controller. Normally we make a connection by right-click dragging from the button to the code; however, we can't do this if we can't see the interface and the code at the same time. The easiest way to do this is to show the Assistant Editor. You can do this by navigating to View | Assistant Editor | Show Assistant Editor. Also, make sure it is configured to be automatic by clicking on the bar at the top of the editor:
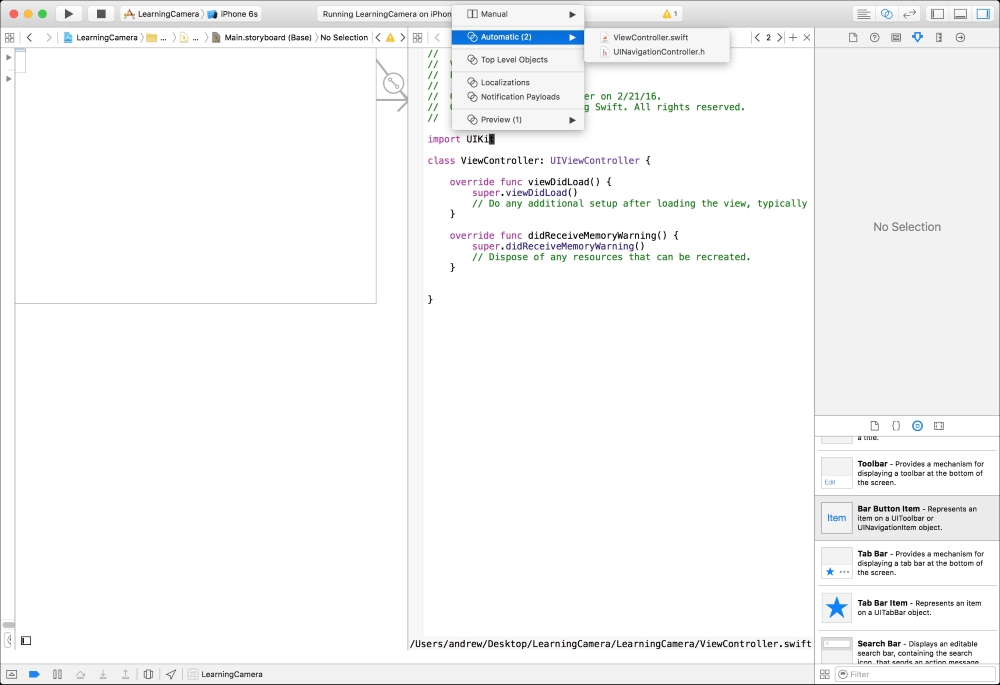
This mode causes the second view to automatically change to the most appropriate file according to what you have selected on the left. In this case, because we are working with the interface of our view controller, it shows the code for the view controller.
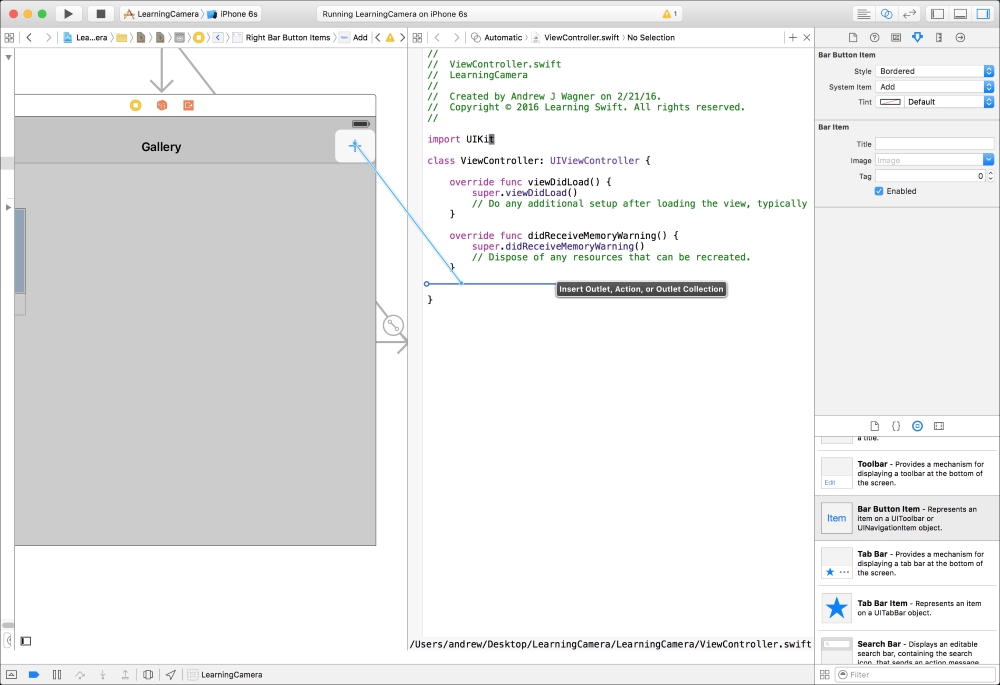
When you release the right mouse button, a little window will appear. There you should select Action from the Connection menu and enter didTapTakePhotoButton. When you click on Connect, Xcode will create a new method for you and connect it to the button. You know it is connected because there is a filled in gray circle to the left of the method. Now, every time the user taps the button, this method will be executed. Note that this method has @IBAction at the beginning of it. This is needed for any method that is connected to an interface element.
Lets break this code down. On the first line, we are creating our image picker. On the second line, we are checking if the current device has a camera by using the isSourceTypeAvailable: class method of UIImagePickerController. If the camera source is available, we set that as the source type for the image picker on line three. Otherwise, by default, an image picker lets the user pick an image from their photo library. Since the simulator doesn't support taking a picture, you are going to be presented with an image picker instead of a camera when simulating the app. Finally, the last line asks our view controller to present our image picker by animating it on the screen. presentViewController:animated:completion: is a method implemented within the UIViewController class, the superclass of our ViewController, to make it easy for us to present new view controllers. If you run the app and click on the add button, you will be asked for permission to access the photos and then it will display the photo picker. You can tap the Cancel button in the upper right and the image picker controller will be dismissed. However, if you select a photo, nothing will happen.
Our implementation for the UINavigationControllerDelegate delegate is empty but we have a simple implementation for the imagePickerController:picker:didFinishPickingImage:editingInfo: method. This is where we are going to add our handling code, but for now, we are just dismissing the presented view controller to return the user to the previous screen. This method does not force us to specify the view controller we are dismissing because the view controller already knows which one it is presenting. Now, if you run the app and select a photo, you will return to the previous screen but nothing else will happen. In order to make something meaningful happen with the photo, we are going to have to put a lot of other code in place. We have to both save the picture and implement our view controller to display the picture inside our collection view.
To start, we are only going to concern ourselves with temporarily storing our pictures in memory. To do this, we can add an image array as a property of our view controller:
You should define your photo structure in that file:
Lets break down this code, as it is somewhat complex. To start, we are using the trailing closure syntax for the dismissViewControllerAnimated:completion: method. This closure is called once the view controller has finished animating off the screen.
Now that we are maintaining a list of photos, we need to display it in our collection view. A collection view is populated by providing it with a data source that implements its UICollectionViewDataSource protocol. Probably the most common thing to do is to have the view controller be the data source. We can do this by opening the Main.storyboard back up and control dragging from the collection view to the view controller:
When you let go, select dataSource from the menu. After that, all we need to do is implement the data source protocol. The two methods we need to implement are collectionView:numberOfItemsInSection: and collectionView:cellForItemAtIndexPath:. The former allows us to specify how many cells should be displayed and the latter allows us to customize each cell for a specific index into our list. It is easy for us to return the number of cells that we want:
All we have to do is return the number of elements in our photos property.
Configuring the cell is going to take a little bit more preparation. First, we need to create our own cell subclass that can reference the image and label we created in the storyboard. All collection view cells must subclass UICollectionViewCell. Let's call ours PhotoCollectionViewCell and create a new file for it in the View group. Like we needed a connection from the storyboard to our code for tapping the add button, we need a connection for both the image and the label. However, this is a different type of connection. Instead of an action, this type of connection is called an outlet, which adds the object as a property to the view controller. We could use the same click and drag technique we used for the action, but this time we will set up the code in advance ourselves:

Once you let go, the connection will be made. Do the same thing with the label connection to the label we created before. We also need to set a reuse identifier for our cell so that we can reference this template in code. You can do this by returning to the Attributes Inspector and entering DefaultCell into the Identifier text field:

We are also going to need a reference to the collection view from within our view controller. This is because we will need to ask the collection view to add a cell each time a photo is saved. You can add this by writing the code first or by right clicking and dragging from the collection view to the code. Either way, you should end up with a property like this on the view controller:
Then we are ready to implement the remaining data source method:
The first line of this implementation asks the collection view for a cell with our DefaultCell identifier. To understand this fully, we have to understand a little bit more about how a collection view works. A collection view is designed to handle virtually any number of cells. We could want to display thousands of cells at once but it would not be possible to have thousands of cells in memory at one time. Instead, the collection view will automatically reuse cells that have been scrolled off the screen to save on memory. We have no way of knowing whether the cell we get back from this call is new or reused, so we must always assume it is being reused. This means that anything we configure on a cell in this method, must always be reset on each call, otherwise, some old configurations may still exist from its previous configuration. We end that call by casting the result to our PhotoCollectionViewCell class so that we can configure our subviews properly.
Only the last two lines of this are new. First, we create an index path for where we want to insert our new item. An index path consists of both an item and a section. All of our items exist in a single section, so we can always set that to zero. We want the item to be one less than the total count of photos because we just added it to the end of the list. The last line is simply making the call to the insert items method that takes an array of index paths.
Now you can run your app and all saved photos will be displayed in the collection view.
We have already made some good progress on the core functionality of our app. However, before we move any further, we should reflect on the code we have written. Ultimately, we haven't actually written that many lines of code, but it can definitely be improved. The biggest shortcoming of our code is that we have put a lot of business logic inside our view controller. This is not a good separation of our different model, view, and controller layers. Let's take this opportunity to refactor this code into a separate type.
First, we will move the photo's property to the photo store class:
We could simply move the code from our view controller to this class, but we do not want our model to deal directly with our view layer. The current implementation creates and configures our collection view cell. Lets allow the view controller to still handle that by providing our own callback for when we need a cell for a given photo. To do that, we will first need to add a callback property:
The second thing we need to add to this class is the ability to save a photo. Let's add a method to take a new image and label that returns the index path that should be added:
This method looks almost identical to our old collectionView:cellForItemAtIndexPath: implementation; the only difference is that we already have a reference to the correct photo.
Lastly, we just have to update the save action to use the photo store:
Our app works pretty well for saving pictures, but as soon as the app quits, all of the photos are lost. We need to add a way to save the photos permanently. Our refactoring of the code allows us to work primarily within the model layer now.
This will ensure that the proper path slash is added, if it is not already there. Now we need to make sure that this directory exists before we try to save a file to it. This is done using a method on NSFileManager:
Here we used string interpolation to add a .jpg extension to the file name.
Finally, we need to save that data to the file path we created:
Lets combine all of this logic into a method on our photo structure that we can use later to save it to disk, which throws an error in case of an error:
If the saving to directory fails, we will skip the rest of the method so we won't add it to our photos list. That means we need to update the view controller code that calls it to handle the error. First, let's add a method to make it easy to display an error with a given title and message:
We expect either the built-in error type of NSError that will come from Apple's APIs or the error type we defined in our photo type. The localized description property of Apple's errors just creates a description in the locale the device is currently configured for. We also handle any other error scenarios by just reporting it as an unknown error.
That leaves us with just needing to update the imagePickerController:didFinishPickingImage:editingInfo: method to use our new save action creating method:
Lastly, we need to have the image store enumerate through the files in the documents directory calling this initializer for each one. To enumerate through a directory, NSFileManager has an enumeratorAtFilePath: method. It returns an enumerator instance that has a nextObject method. Each time it is called, it returns the next file or directory inside the original directory. Note that this will enumerate all children of each subdirectory it finds. This is a great example of the iterator pattern we saw in Chapter 9, Writing Code the Swift Way – Design Patterns and Techniques. We can determine if the current object is a file using the fileAttributes property. All of that lets us write a loadPhotos method like this:
func loadPhotos() throws {
self.photos.removeAll(keepCapacity: true)
let fileManager = NSFileManager.defaultManager()
let saveDirectory = try self.getSaveDirectory()
let enumerator = fileManager.enumeratorAtPath(
saveDirectory.relativePath!
)
while let file = enumerator?.nextObject() as? String {
let fileType = enumerator!.fileAttributes![NSFileType]
as! String
if fileType == NSFileTypeRegular {
let fullPath = saveDirectory
.URLByAppendingPathComponent(file)
if let photo = Photo(filePath: fullPath) {
self.photos.append(photo)
}
}
}
}