
This recipe will cover two installation scenarios:
- Installing DPM using a local SQL Server
- Installing DPM using a remote SQL Server
Before you start installing System Center Data Protection Manager, it is recommended that you read the Planning your DPM deployment and Preparing your DPM deployment recipes in this chapter.
This step will cover the installation process of DPM using a local SQL Server on the same operating system as DPM.
Make sure that your operating system is fully patched and rebooted before you start the installation. Now follow these steps:
- Insert the DPM media and start the setup for System Center Data Protection Manager. When the installation list is presented, click on
Data Protection Managerto start the installation:
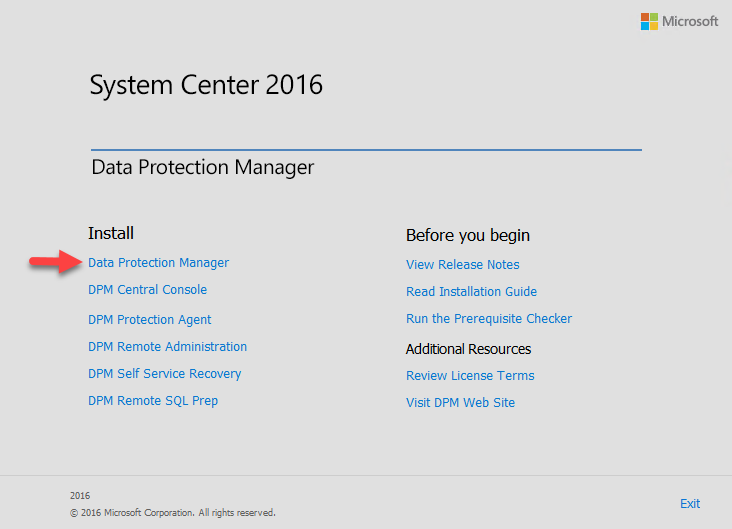
- The installation wizard will now prompt you with eight different installation steps. Currently, you are on the
Welcomestep. To continue with the installation, click onNext. - The next step is the
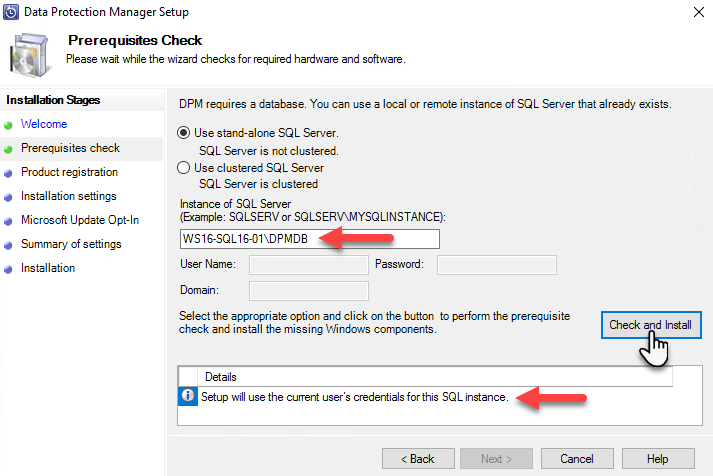
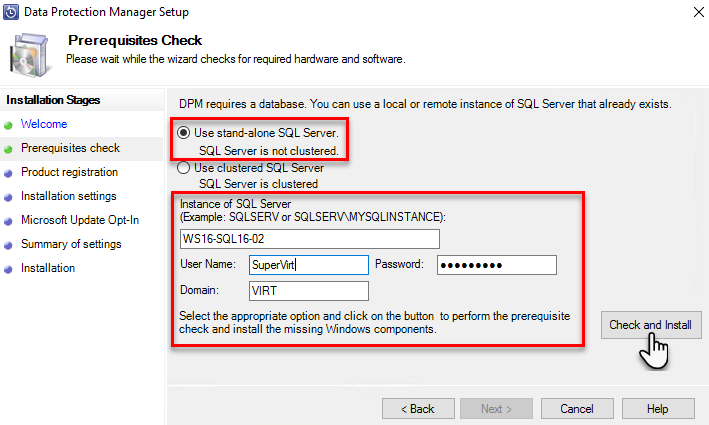
Prerequisites Check, where you can choose to install the DPM database by using a standalone or a clustered SQL Server.
- In the
Instance of SQL Serverbox, type in your server name and the instance name that should host your DPM database. In this example, the server name and SQL instance isWS16-SQL16-01\DPMDB:
Note
Please note that when you install DPM and use a local SQL Server installation, the setup will use the current user's credentials for the SQL Server instance. If the domain account that is logged on and performing the installation is not a member of the DPM Admin group in the Active Directory, the installation will fail.
- Click on the
Check and Installbutton to run a verification that all of the prerequisites have been met before the installation can continue. - In this step, there are some prerequisites that will be installed as part of the required Windows components by DPM. The Hyper-V role and Hyper-V PowerShell module will be installed as well during this step. You will be required to restart afterward.
Note
The Hyper-V role needs to be installed on the DPM server for Item-Level Recovery (ILR) support. Please read Chapter 3, Protecting Hyper-V VMs, for more information on this.
- Simply restart the DPM server and start the installation wizard one more time. When you run the prerequisites checker in the
Prerequisites Checkstep, it will be successful. Click onNext >to continue. - In the
Product Registrationstep, enter theUser name,Company, andProduct keyand click onNext >to continue. - The next step of the installation wizard brings up the
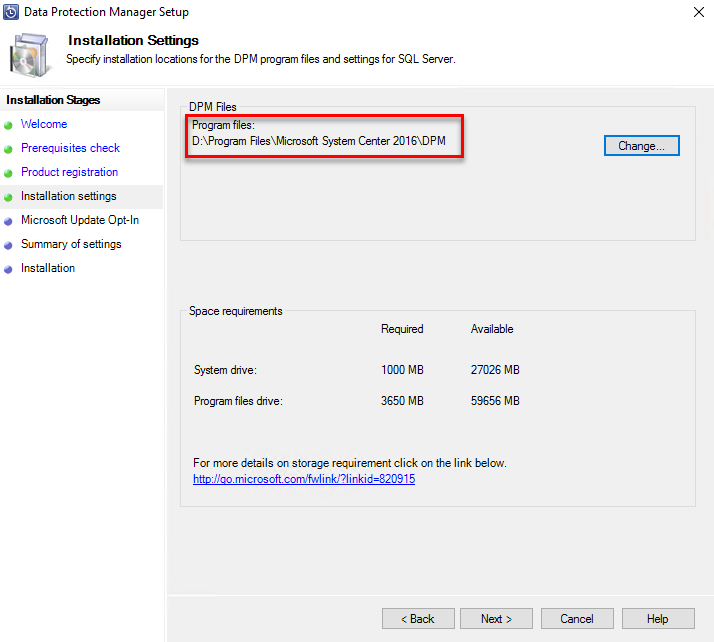
Installation Settings, which is where you specify the location of the DPM files and read the summary of theSpace requirements. If you want to place the DPM files in a specific location, then click on theChange…button and specify the new destination. We recommend that you store theDPM Fileson a separate drive. To continue to the next step, click onNext >:
- You can specify in the
Microsoft Update Opt-Inbox whether the local Windows Update should be redirected so that you can use Microsoft Updates instead. - Choose the most appropriate option for your implementation and click on
Next >to continue. - In the
Summary of settingssection, you can verify your installation's configuration. If everything looks good, click on theInstallbutton to start the installation.
Note
Finally, you need to install and update DPM server to the latest Update Rollup (UR) if you are using the Long-Term Servicing Channel (LTSC). At the time of writing this book, DPM 2016 Update Rollup 6 has been released and is available for download. You can download it at https://www.catalog.update.microsoft.com/Search.aspx?q=4456327. If you are using the Semi-Annual Channel (SAC) for DPM (that is, DPM 1801, 1807, 1901, and so on), then the Semi-Annual Channel, with its more frequent release cycle, will not receive update releases.
This step will cover and explain the configuration needed to complete a DPM installation when you are using a backend, dedicated, standalone server or a SQL cluster for achieving a high-availability scenario.
Before you can start your DPM sever installation, you need to prepare SQL Server so that you can host the DPM database. Please read the Installing SQL Server for DPM Database recipe in this chapter, since it is a prerequisite.
The only difference in the installation wizard when you install the DPM server on a separate machine or on the same server with SQL Server is the Prerequisites Check step. Now, follow these steps:
- Insert the DPM media on a separate machine and start the setup for System Center Data Protection Manager. When the installation list is presented, click on
Data Protection Managerto start the installation. - In the
Prerequisites Checkstep of the installation wizard, you have the option to choose whether you would like to place the DPM database on a remote standalone SQL Server or a SQL cluster.
- For a standalone backend remote SQL Server hosting your DPM database, enter
SQLSERVER\INSTANCEin theInstance of SQL Serverfield:
Note
The account that's used for this configuration must be a member of the DPM Admin group in the Active Directory.
- In the case of a SQL clustered environment, you must specify both the
SQL Server Instancefor the DPM database and also where theInstance of SQL Server Reporting Serviceis located, since the SQL Server Reporting Service does not support being clustered:
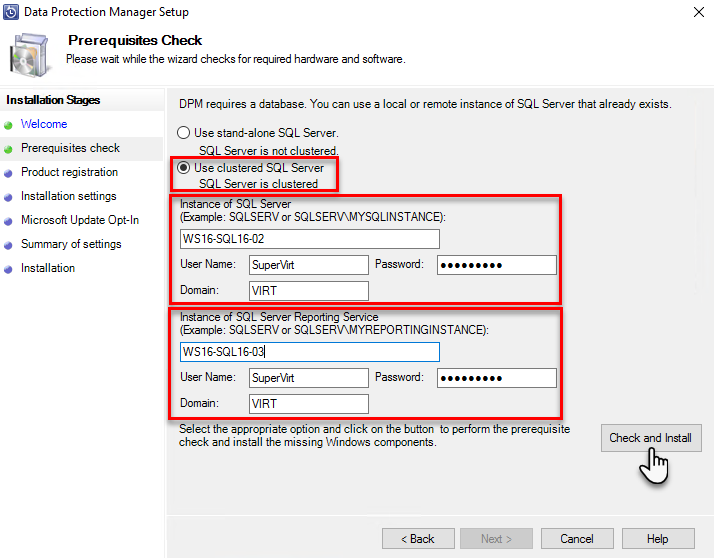
- Enter the
Instance of SQL Serverfor the DPMDB and also provide information for theInstance of SQL Server Reporting Servicethat will host the reporting for the DPM server. - Provide the credentials that have rights in the SQL Server configuration; the accounts should be members of the DPM Admin group in the Active Directory. Click on the
Checkbutton to check the prerequisites. - Click on
Next >to continue with the installation wizard.
The installation media for System Center Data Protection Manager will provide you with the installation bits for the DPM software. Since the 2012 R2 release of DPM, the SQL media is no longer included on the DPM media, so you need to consider how you design and install the SQL Server that will host the DPM server software.
The DPM server installation wizard will provide you with the right configuration that's needed regarding the SQL Server Reporting Services (SSRS) configuration for the DPM reports. The SSRS does not support being clustered.
When System Center Data Protection Manager's installation has completed successfully, DPM's setup will create the following firewall exceptions for you:
- Exception for DCOM communication on port 135 (TCP and UDP) in all profiles
- Exception for
Msdpm.exein all profiles - Exception for
DPMRA.exein all profiles - Exception for
AMSvcHost.exein all profiles - Exception for DPMAM Service communication on port
6075(TCP and UDP) in all profiles