Book Image

Kubernetes on AWS

By : Ed Robinson
Book Image

Kubernetes on AWS

By: Ed Robinson

Overview of this book

Docker containers promise to radicalize the way developers and operations build, deploy, and manage applications running on the cloud. Kubernetes provides the orchestration tools you need to realize that promise in production. Kubernetes on AWS guides you in deploying a production-ready Kubernetes cluster on the AWS platform. You will then discover how to utilize the power of Kubernetes, which is one of the fastest growing platforms for production-based container orchestration, to manage and update your applications. Kubernetes is becoming the go-to choice for production-grade deployments of cloud-native applications. This book covers Kubernetes from first principles. You will start by learning about Kubernetes' powerful abstractions - Pods and Services - that make managing container deployments easy. This will be followed by a guided tour through setting up a production-ready Kubernetes cluster on AWS, while learning the techniques you need to successfully deploy and manage your own applications. By the end of the book, you will have gained plenty of hands-on experience with Kubernetes on Amazon Web Services. You will also have picked up some tips on deploying and managing applications, keeping your cluster and applications secure, and ensuring that your whole system is reliable and resilient to failure.
Table of Contents (12 chapters)

Why do I need a Kubernetes cluster?

At its core, Kubernetes is a container scheduler, but it is a much richer and fully featured toolkit that has many other features. It is possible to extend and augment the functionality that Kubernetes provides, as products such as RedHat's OpenShift have done. Kubernetes also allows you to extend it's core functionality yourself by deploying add-on tools and services to your cluster.

Here are some of the key features that are built into Kubernetes:

  • Self-healing: Kubernetes controller-based orchestration ensures that containers are restarted when they fail, and rescheduled when the nodes they are running on fail. User-defined health checks allow users to make decisions about how and when to recover from failing services, and how to direct traffic when they do.
  • Service discovery: Kubernetes is designed from the ground up to make service discovery simple without needing to make modifications to your applications. Each instance of your application gets its own IP address, and standard discovery mechanisms such as DNS and load balancing let your services communicate.
  • Scaling: Kubernetes makes horizontal scaling possible at the push of a button, and also provides autoscaling facilities.
  • Deployment orchestration: Kubernetes not only helps you to manage running applications, but has tools to roll out changes to your application and its configuration. Its flexibility allows you to build complex deployment patterns for yourself or to use one of a number of add-on tools.
  • Storage management: Kubernetes has built-in support for managing the underlying storage technology on cloud providers, such as AWS Elastic Block Store volumes, as well as other standard networked storage tools, such as NFS.
  • Cluster optimization: The Kubernetes scheduler automatically assigns your workloads to machines based on their requirements, allowing for better utilization of resources.
  • Batch workloads: As well as long-running workloads, Kubernetes can also manage batch jobs, such as CI, batch processing, and cron jobs.

The roots of containers

Ask the average user what a Docker container is and you might get any one of a dozen responses. You might be told something about lightweight virtual machines, or how it is that this hot new disruptive technology is going to revolutionize computing. In reality, Linux containers are certainly not a new idea, nor are they really all that much like a virtual machine.

Back in 1979, the chroot syscall was added to Version 7 of Unix. Calling chroot changes the apparent root directory for the current running process and its subprocesses. Running a program in a so-called chroot jail prevents it from accessing files outside of the specified directory tree.

One of the first uses of chroot was for testing of the BSD build system, something that is inherited by the package build systems of most of our modern Linux distributions, such as Debian, RedHat, and SuSE. By testing packages in a clean chrooted environment, build scripts can detect missing dependency information.

Chroot is also commonly used to sandbox untrusted processes-for example, shell processes on shared FTP or SFTP servers. Systems designed specifically with security in mind, such as the Postfix mail transfer agent, utilize chroot to isolate individual components of a pipeline in order to prevent a security issue in one component from rippling across the system.

Chroot is in fact a very simple isolation tool that was never intended to provide either security or control over anything other than the filesystem access of the processes. For its intended purpose of providing filesystem isolation for the likes of build tools, it is perfect. But for isolating applications in a production environment, we need a little more control.

Enter the container

Trying to understand what a Linux container is can be a little difficult. As far as the Linux kernel is concerned, there is no such thing as a container. The kernel has a number of features that allow a process to be isolated, but these features are much lower-level and granular than what we now think of as a container. Container engines such as Docker use two main kernel features to isolate processes:

Cgroups

Cgroups, or control groups, provide an interface for controlling one or a group of processes, hence the name. They allow the control of several aspects of the group's use of resources. Resource utilization can be controlled using a limit (for example, by limiting memory usage). Cgroups also allow priorities to be set to give processes a greater or lesser share of time-bound resources, such as CPU utilization or I/O. Cgroups can also be used to snapshot (and restore) the state of running processes.

Namespaces

The other part of the container puzzle is kernel namespaces. They operate in a manner that is somewhat similar to our use of the chroot syscall in that a container engine instructs the kernel to only allow the process a particular view of the system's resources.

Instead of just limiting access to the filesystem kernel, namespaces limit access to a number of different resources.

Each process can be assigned to a namespace and can then only see the resources connected to that namespace. The kinds of resources that can be namespaced are as follows:

  • Mount: Mount namespaces control access to the filesystem.
  • Users: Each namespace has its own set of user IDs. User ID namespaces are nested, and thus a user in a higher-level namespace can be mapped to another in a lower level. This is what allows a container to run processes as root, without giving that process full permission to the root system.
  • PID: The process ID namespace, like the users namespace, is nested. This is why the host can see the processes running inside of the containers when inspecting the process list on a system that is running containers. However, inside of the namespace the numbers are different; this means that the first process created inside a PID namespace, can be assigned PID 1, and can inherit zombie processes if required.
  • Network: A network namespace contains one or more network interfaces. The namespace has its own private network resources, such as addresses, the routing table, and firewall.
There are also namespaces for IPC, UTS, and for the Cgroups interface itself.

Putting the pieces together

It is the job of the container engine (software such as Docker or rkt) to put these pieces together and make something usable and understandable for us mere mortals.

While a system that directly exposed all of the details of Cgroups and namespaces would be very flexible, it would be far harder to understand and manage. Using a system such as Docker gives us a simple-to-understand abstraction over these low-level concepts, but necessarily makes many decisions for us about how these low-level concepts are used.

The fundamental breakthrough that Docker made over previous container technologies was to take great defaults for isolating a single process and combine them with an image format that allows developers to provide all the dependencies that the process requires to run correctly.

This is an incredibly good thing because it allows anyone to install Docker and quickly understand what is going on. It also makes this kind of Linux container the perfect building block to build larger and more complex systems, such as Kubernetes.

Here, schedule this...

At its heart, Kubernetes is a system for scheduling work to a cluster of computers—a scheduler. But why would you want a scheduler?

If you think about your own systems, then you'll realize that you probably already have a scheduler, but unless you are already using something like Kubernetes, it might look very different.

Perhaps your scheduler is a team of people, with spreadsheets and documentation about which services run on each server in your data center. Perhaps that team of people looks at past traffic statistics to try and guess when there will be a heavy load in the future. Perhaps your scheduler relies on your users alerting members of your team at any time of the night if your applications stop functioning.

This book is about these problems, about how we can move on from a world of manual processes and making guesses about the future usage of our systems. It is about harnessing the skill and experience of the humans that administer the systems to encode our operational knowledge into systems that can make decisions about your running system second by second, seamlessly responding to crashed processes, failed machines, and increased load without any human intervention.

Kubernetes chooses to model its scheduler as a control loop so that the system is constantly discovering the current state of the cluster, comparing it to a desired state, and then taking actions to reduce the difference between the desired and the actual state. This is summarized in the following diagram:

A typical control loop

Being able to declare the state that we want the system to be in, and then have the system itself take the actions needed to manifest that desired state, is very powerful.

You may previously have used an imperative tool or a script to manage a system, or you may even have used a written playbook of the manual steps to take. This sort of approach is very much like a recipe: you take a set of actions one after another and hopefully end up in the state that you desire.

This works well when describing how to install and bootstrap a system for the first time, but when you need to run your script against a system that is already running, your logic needs to become more complicated as, for each stage in your recipe, you have to stop and check what needs to be done before you do it.

When using a declarative tool such as Kubernetes to manage your system, your configuration is simplified and becomes much easier to reason about. One important side effect of this approach is that Kubernetes will repair your configuration if an underlying failure causes it to drift away from your desired state.

By combining control loops and declarative configuration, Kubernetes allows you to tell it what to do for you, not how to do it. Kubernetes gives you, the operator, the role of the architect and Kubernetes takes the role of the builder. An architect provides a builder with detailed plans for a building, but doesn't need to explain how to build the walls with bricks and mortar. Your responsibility is to provide Kubernetes with a specification of your application and the resources it needs, but you don't need to worry about the details of exactly how and where it will run.

The basics of Kubernetes

Let's begin our look at Kubernetes by looking at some of the fundamental concepts that most of Kubernetes is built upon. Getting a clear understanding of how these core building blocks fit together will serve you well as we explore the multitude of features and tools that comprise Kubernetes.

It can be a little confusing to use Kubernetes without a clear understanding of these core building blocks so, if you don't have any experience with Kubernetes, you should take your time to understand how these pieces fit together before moving on.

The pod

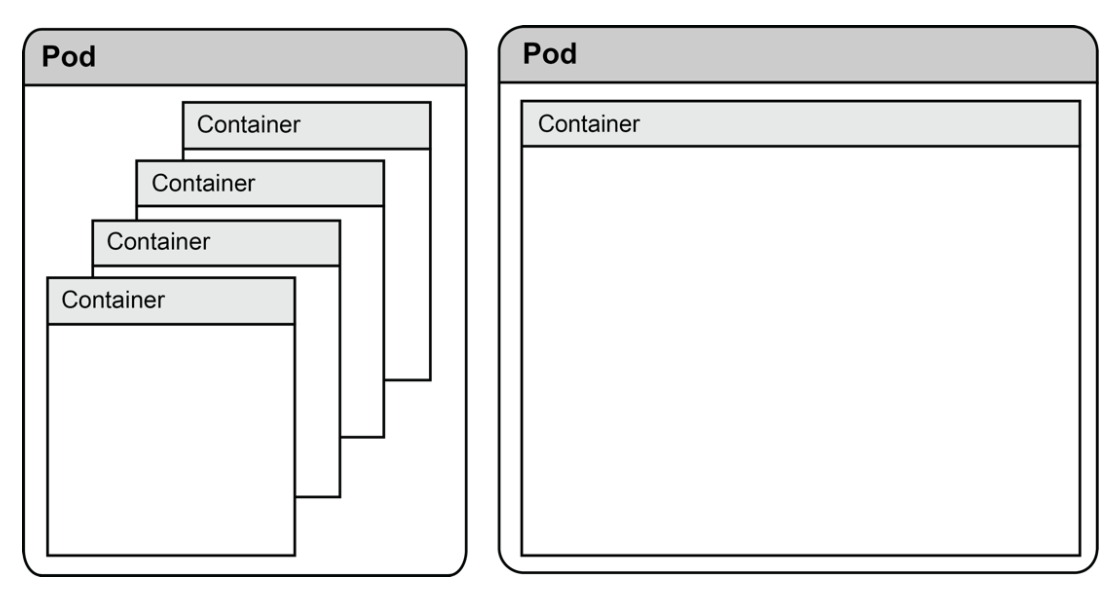
Like a group of whales, or perhaps a pea pod, a Kubernetes pod is a group of linked containers. As the following diagram shows, a pod can be made up of one or more containers; often a pod might just be a single container:

Pods are a logical grouping of one or more containers

Each pod that Kubernetes schedules is allocated its own unique IP address. The network namespace (and thus the pod's IP address) is shared by each container in the pod.

This means that it is convenient to deploy several containers together that closely collaborate over the network. For example, you might deploy a reverse proxy alongside a web application to add SSL or caching capabilities to an application that does not natively support them. In the following example, we achieve this by deploying a typical web application server-for example, Ruby on Rails—alongside a reverse proxy—for example, NGINX. This additional container provides further capabilities that might not be provided by the native application. This pattern of composing functionality together from smaller isolated containers means that you are able to reuse components more easily, and makes it simple to add additional functionality to existing tools. The setup is shown in the following diagram:

Providing additional capabilities by composing multiple containers

As well as sharing the network namespace, Kubernetes also allows very flexible sharing of volume mounts between any number of containers in a pod. This allows for a number of scenarios where several components may collaborate to perform a particular task.

In this example, we are using three containers that coordinate to serve a website built with a static-site generator using the NGINX webserver.

The first container uses Git to pull and update the source code from a remote Git repository. This repository is cloned into a volume that is shared with the second container. This second container uses the Jekyll framework to build the static files that will be served by our webserver. Jekyll watches the shared directory for changes on the filesystem and regenerates any files that need to be updated.

The directory that Jekyll writes the generated files to is shared with a container running NGINX that serves HTTP requests for our website, as shown in the following diagram:

We are using Jekyll here as an example, but there are many tools you can use to build static websites, such as Hugo, Hexo, and Gatsby. Splitting your application into separate containers like this means that it is simple to upgrade a single component, or even try an alternative tool.

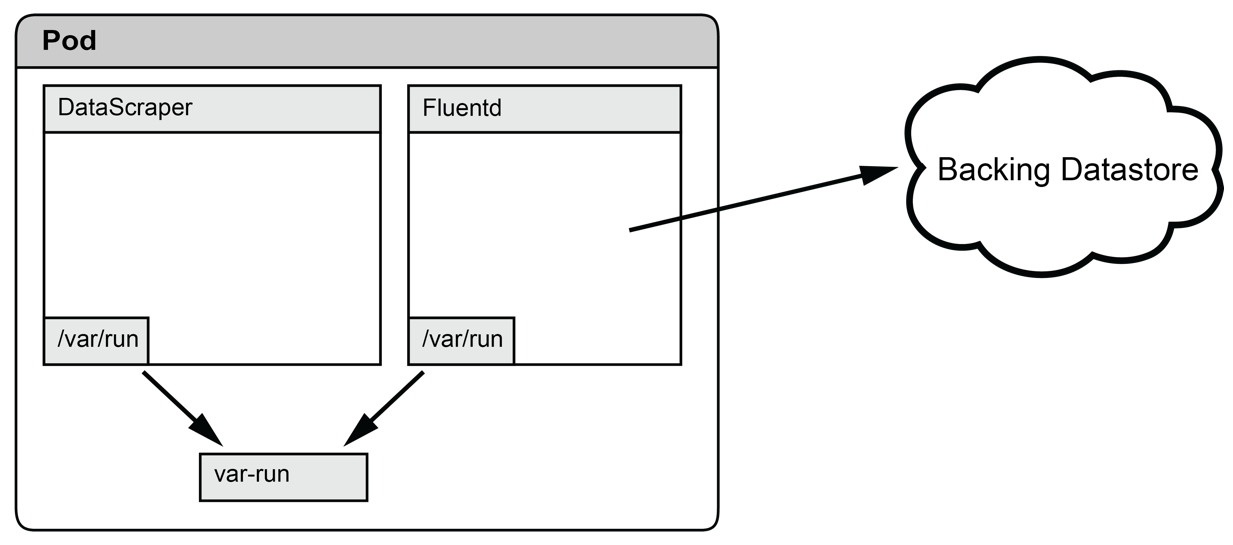
Another use for pods that share volume mounts is to support applications that communicate using Unix sockets, as shown in the following diagram. For example, an extract transform load (ETL) system could be modeled as several independent processes that communicate with UNIX sockets. This might be beneficial if you are able to make use of third-party tools for some or all of your pipeline, or reuse tools that you may have built for internal use in a variety of situations:

In this example, a custom application designed to scrape data from webpages communicates with an instance of Fluentd over a Unix domain socket located in a shared volume. The pattern of using a third-party tool such as Fluentd to push data to a backing datastore not only simplifies the implementation of the custom tool, but also provides compatibility with any store that Fluentd chooses to support.

Kubernetes gives you some strong guarantees that the containers in your pod have a shared lifecycle. This means that when you launch a pod, you can be sure that each container will be scheduled to the same node; this is important because it means that you can depend on the fact that other containers in your pod will exist and will be local. Pods are often a convenient way to glue the functionality of several different containers together, enabling the reuse of common components. You might, for example, use a sidecar container to enhance the networking abilities of your application, or provide additional log management or monitoring facilities.

Labeling all the things

Labels are key-value pairs that are attached to resources, such as pods. They are intended to contain information that helps you to identify a particular resource.

You might add labels to your pods to identify the application that is being run, as well as other metadata, such as a version number, an environment name, or other labels that pertain to your application.

Labels are very flexible, as Kubernetes leaves it up to you to label your own resources as you see fit.

Once you begin working with Kubernetes, you will discover that you are able to add labels to almost every resource that you create.

The power of being able to add labels that reflect the architecture of your own application is that you are able to use selectors to query the resources using any combination of the labels that you have given your resources. This setup is shown in the following diagram:

You can add labels to many of the resources that you will create in Kubernetes and then query them with selectors.

Kubernetes doesn't enforce any particular schema or layout for the labels you give to objects in your cluster; and you are free to label your applications however you choose. If you want a little more structure however. Kubernetes does make some suggestions for labels you might want to apply to objects that can be grouped together into a logical Application. You can read more about this in the Kubernetes documentation: https://kubernetes.io/docs/concepts/overview/working-with-objects/common-labels/.

Replica sets

In Kubernetes, a ReplicaSet is a resource that templates the creation of pods. The definition of a replica set contains a template definition of the pods that it creates, a desired count of replicas, and a selector to discover the pods under its management.

The ReplicaSet is used to ensure that the desired number of pods is always running. If the count of pods matching the selector drops below the desired count, then Kubernetes will schedule another.

Because the life of a pod is tied to that of the node that it is running on, a pod can be considered ephemeral. There are a number of reasons why the life of a particular pod could come to an end. Perhaps it was removed by the operator or an automated process. Kubernetes could have evicted the pod to better utilize the resources of the cluster or prepare the node for shutdown or restart. Or perhaps the underlying node failed.

A ReplicaSet allows us to manage our application by asking the cluster to ensure that the correct number of replicas is running across the cluster as a whole. This is a strategy that Kubernetes embraces across many of its APIs.

As a cluster operator, Kubernetes takes some of the complexity of running applications away from the user. When I decide that I need three instances of my application running, I no longer need to think about the underlying infrastructure: I can just tell Kubernetes to carry out my wishes. And if the worst happens and one of the underlying machines that my application is running on fails, Kubernetes will know how to self-heal my application and launch a new pod. No more pager calls and trying to recover or replace failed instances in the middle of the night.

ReplicaSet replaces the ReplicationController that you might have read about in older tutorials and documentation. They are almost entirely identical, but differ in a few small ways.

Often, we want to update the software we run on our cluster. Because of this, we don't normally directly use ReplicaSet but, instead, manage them with a Deployment object. Deployments are used in Kubernetes to gracefully roll out new versions of a ReplicaSet. You will learn more about deployments in Chapter 4, Managing Change in Your Applications.

Services

The final basic tool that Kubernetes gives us to manage our applications is the service. Services give us a convenient way of accessing our services within our cluster, something often referred to as service discovery.

In practice, a service allows us to define a label selector to refer to a group of pods and then map that to something that our application can consume, without having to be modified to query the Kubernetes API to gather this information. Typically, a service will provide a stable IP address or DNS name that can be used to access the underlying pods that it refers to in a round robin fashion.

By using a service, our applications don't need to know that they are running on Kubernetes-we just need to configure them correctly with the DNS name or IP address of a service that they depend on.

A service provides a way for other applications in the cluster to discover pods that match a particular label selector. It does this by providing a stable IP address and, optionally, a DNS name. This setup is shown in the following diagram: