

Congratulations! You've built your own Kubernetes cluster in the previous recipes. Now, let's get on with running your very first container, nginx (http://nginx.org/), which is an open source reverse proxy server, load balancer, and web server. Along with this recipe, you will create a simple nginx application and expose it to the outside world.
Running your first container in Kubernetes
Getting ready
Before you start to run your first container in Kubernetes, it's better to check if your cluster is in a healthy mode. A checklist showing the following items would make your kubectl sub commands stable and successful, without unknown errors caused by background services:
- Checking the master daemons. Check whether the Kubernetes components are running:
// get the components status
$ kubectl get cs
NAME                 STATUS    MESSAGE              ERROR
controller-manager   Healthy   ok
scheduler            Healthy   ok
etcd-0               Healthy   {"health": "true"}
- Check the status of the Kubernetes master:
// check if the master is running
$ kubectl cluster-info
Kubernetes master is running at https://192.168.122.101:6443
KubeDNS is running at https://192.168.122.101:6443/api/v1/namespaces/kube-system/services/kube-dns/proxy

To further debug and diagnose cluster problems, use 'kubectl cluster-info dump'.
- Check whether all the nodes are ready:
$ kubectl get nodes
NAME       STATUS    ROLES     AGE       VERSION
ubuntu01   Ready     master    20m       v1.10.2
ubuntu02   Ready     <none>    2m        v1.10.2
Ideal results should look like the preceding outputs. You can successfully fire the kubectl command and get the response without errors. If any one of the checked items failed to meet the expectation, check out the settings in the previous recipes based on the management tool you used.
- Check the access permission of the Docker registry, as we will use the official free image as an example. If you want to run your own application, be sure to dockerize it first! What you need to do for your custom application is to write a Dockerfile (https://docs.docker.com/engine/reference/builder/), and build and push it into the public or private Docker registry.
Test your node connectivity with the public/private Docker registry
On your node, try the Docker pull nginx command to test whether you can pull the image from the Docker Hub. If you're behind a proxy, please add HTTP_PROXY into your Docker configuration file(https://docs.docker.com/engine/admin/systemd/#httphttps-proxy). If you want to run the image from the private repository in the Docker Hub, or the image from the private Docker registry, a Kubernetes secret is required. Please check Working with secrets, in Chapter 2, Working through Kubernetes Concepts, for the instructions.
How to do it...
We will use the official Docker image of nginx as an example. The image is provided in the Docker Hub (https://store.docker.com/images/nginx), and also the Docker Store (https://hub.docker.com/_/nginx/).
Many of the official and public images are available on the Docker Hub or Docker Store so that you do not need to build them from scratch. Just pull them and set up your custom setting on top of them.
Docker Store versus Docker Hub
As you may be aware, there is a more familiar official repository, Docker Hub, which was launched for the community for sharing the based image. Compared with the Docker Hub, the Docker Store is focused on enterprise applications. It provides a place for enterprise-level Docker images, which could be free or paid for software. You may feel more confident in using a more reliable image on the Docker Store.
Running a HTTP server (nginx)
On the Kubernetes master, we can use kubectl run to create a certain number of containers. The Kubernetes master will then schedule the pods for the nodes to run, with general command formatting, as follows:
$ kubectl run <replication controller name> --image=<image name> --replicas=<number of replicas> [--port=<exposing port>]
The following example will create two replicas with the name my-first-nginx from the nginx image and expose port 80. We can deploy one or more containers in what is referred to as a pod. In this case, we will deploy one container per pod. Just like a normal Docker behavior, if the nginx image doesn't exist locally, it will pull it from the Docker Hub by default:
// run a deployment with 2 replicas for the image nginx and expose the container port 80
$ kubectl run my-first-nginx --image=nginx --replicas=2 --port=80
deployment "my-first-nginx" created
The name of deployment <my-first-nginx> cannot be duplicated
The resource (pods, services, deployment, and so on) in one Kubernetes namespace cannot be duplicated. If you run the preceding command twice, the following error will pop up:
Error from server (AlreadyExists): deployments.extensions "my-first-nginx" already exists
Let's move on and see the current status of all the pods by kubectl get pods. Normally the status of the pods will hold on Pending for a while, since it takes some time for the nodes to pull the image from the registry:
// get all pods
$ kubectl get pods
NAME                              READY     STATUS    RESTARTS   AGE
my-first-nginx-7dcd87d4bf-jp572   1/1       Running   0          7m
my-first-nginx-7dcd87d4bf-ns7h4   1/1       Running   0          7m
If the pod status is not running for a long time
You could always use kubectl get pods to check the current status of the pods, and kubectl describe pods $pod_name to check the detailed information in a pod. If you make a typo of the image name, you might get the ErrImagePull error message, and if you are pulling the images from a private repository or registry without proper credentials, you might get the ImagePullBackOff message. If you get the Pending status for a long time and check out the node capacity, make sure you don't run too many replicas that exceed the node capacity. If there are other unexpected error messages, you could either stop the pods or the entire replication controller to force the master to schedule the tasks again.
You can also check the details about the deployment to see whether all the pods are ready:
// check the status of your deployment
$ kubectl get deployment
NAME             DESIRED   CURRENT   UP-TO-DATE   AVAILABLE   AGE
my-first-nginx   2         2         2            2           2m
Exposing the port for external access
We might also want to create an external IP address for the nginx deployment. On cloud providers that support an external load balancer (such as Google compute engine), using the LoadBalancer type will provision a load balancer for external access. On the other hand, you can still expose the port by creating a Kubernetes service as follows, even though you're not running on platforms that support an external load balancer. We'll describe how to access this externally later:
// expose port 80 for replication controller named my-first-nginx
$ kubectl expose deployment my-first-nginx --port=80 --type=LoadBalancer
service "my-first-nginx" exposed
We can see the service status we just created:
// get all services
$ kubectl get service
NAME             TYPE           CLUSTER-IP      EXTERNAL-IP   PORT(S)        AGE
kubernetes       ClusterIP      10.96.0.1       <none>        443/TCP        2h
my-first-nginx   LoadBalancer   10.102.141.22   <pending>     80:31620/TCP   3m
You may find an additional service named kubernetes if the service daemon run as a container (for example, using kubeadm as a management tool). It is for exposing the REST API of the Kubernetes API server internally. The pending state of my-first-nginx service's external IP indicates that it is waiting for a specific public IP from cloud provider. Take a look at Chapter 6, Building Kubernetes on AWS, and Chapter 7, Building Kubernetes on GCP, for more details.
Congratulations! You just ran your first container with a Kubernetes pod and exposed port 80 with the Kubernetes service.
Stopping the application
We can stop the application using commands such as the delete deployment and service. Before this, we suggest you read through the following code first to understand more about how it works:
// stop deployment named my-first-nginx
$ kubectl delete deployment my-first-nginx
deployment.extensions "my-first-nginx" deleted

// stop service named my-first-nginx
$ kubectl delete service my-first-nginx
service "my-first-nginx" deleted
How it works...
Let's take a look at the insight of the service using describe in the kubectl command. We will create one Kubernetes service with the type LoadBalancer, which will dispatch the traffic into two endpoints, 192.168.79.9 and 192.168.79.10 with port 80:
$ kubectl describe service my-first-nginx
Name:                     my-first-nginx
Namespace:                default
Labels:                   run=my-first-nginx
Annotations:              <none>
Selector:                 run=my-first-nginx
Type:                     LoadBalancer
IP:                       10.103.85.175
Port:                     <unset>  80/TCP
TargetPort:               80/TCP
NodePort:                 <unset>  31723/TCP
Endpoints:                192.168.79.10:80,192.168.79.9:80
Session Affinity:         None
External Traffic Policy:  Cluster
Events:                   <none>
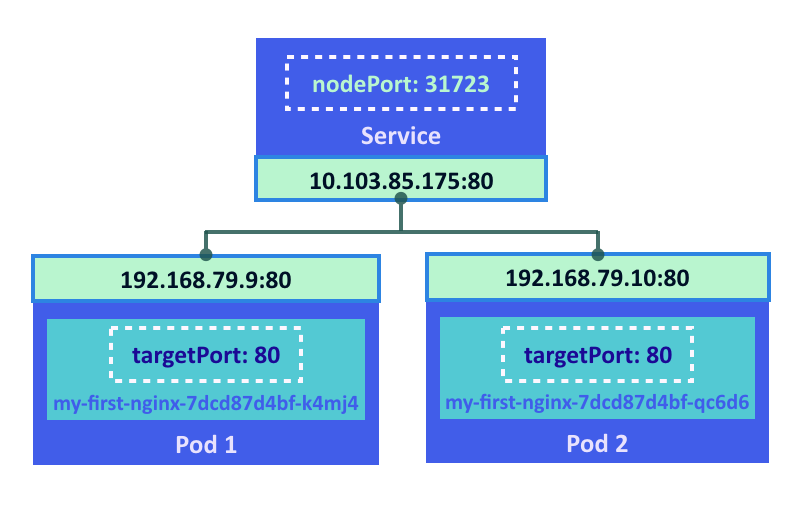
The port here is an abstract service port, which will allow any other resources to access the service within the cluster. The nodePort will be indicating the external port to allow external access. The targetPort is the port the container allows traffic into; by default, it will be the same port.
In the following diagram, external access will access the service with nodePort. The service acts as a load balancer to dispatch the traffic to the pod using port 80. The pod will then pass through the traffic into the corresponding container using targetPort 80:
In any nodes or master, once the inter-connection network is set up, you should be able to access the nginx service using ClusterIP 192.168.61.150 with port 80:
// curl from service IP
$ curl 10.103.85.175:80
<!DOCTYPE html>
<html>
<head>
<title>Welcome to nginx!</title>
<style>
    body {
        width: 35em;
        margin: 0 auto;
        font-family: Tahoma, Verdana, Arial, sans-serif;
    }
</style>
</head>
<body>
<h1>Welcome to nginx!</h1>
<p>If you see this page, the nginx web server is successfully installed and
working. Further configuration is required.</p>
<p>For online documentation and support please refer to
<a href="http://nginx.org/">nginx.org</a>.<br/>
Commercial support is available at
<a href="http://nginx.com/">nginx.com</a>.</p>
<p><em>Thank you for using nginx.</em></p>
</body>
</html>
It will be the same result if we curl to the target port of the pod directly:
// curl from endpoint, the content is the same as previous nginx html
$ curl 192.168.79.10:80
<!DOCTYPE html>
<html>
...
If you'd like to try out external access, use your browser to access the external IP address. Please note that the external IP address depends on which environment you're running in.
In the Google compute engine, you could access it via a ClusterIP with a proper rewall rules setting:
$ curl http://<clusterIP>
In a custom environment, such as on-premise data center, you could go through the IP address of nodes to access :
$ curl http://<nodeIP>:<nodePort>
You should be able to see the following page using a web browser:
See also
We have run our very first container in this section. Go ahead and read the next chapter to aquire more knowledge about Kubernetes:
- Chapter 2, Walking through Kubernetes Concepts