Book Image

Hands-On Networking with Azure

By : Mohamed Waly
Book Image

Hands-On Networking with Azure

By: Mohamed Waly

Overview of this book

Microsoft Azure networking is one of the most valuable and important offerings in Azure. No matter what solution you are building for the cloud, you'll fi nd a compelling use for it. This book will get you up to speed quickly on Microsoft Azure Networking by teaching you how to use different networking services. By reading this book, you will develop a strong networking foundation for Azure virtual machines and for expanding your on-premise environment to Azure. Hands-On Networking with Azure starts with an introduction to Microsoft Azure networking and creating Azure Virtual Networks with subnets of different types within them. The book helps you understand the architecture of Azure networks. You will then learn the best practices for designing both Windows- and Linux-based Azure VM networks. You will also learn to expand your networks into Azure and how to use Azure DNS. Moreover, you will master best practices for dealing with Azure Load Balancer and the solutions they offer in different scenarios. Finally, we will demonstrate how the Azure Application Gateway works, offering various layer-7 load balancing capabilities for applications. By the end of this book, you will be able to architect your networking solutions for Azure.
Table of Contents (15 chapters)
Title Page
Dedication
Packt Upsell
Contributors
Preface
Index

Creating and configuring Azure VMs


Creating an Azure VM is a very straightforward process – all you have to do is follow the given steps:

  1. Navigate to the Azure portal and search for Virtual Machines, as shown in the following screenshot:

Figure 3.1: Searching for Virtual Machines

  1. Once the VM blade is opened, you can click on +Add to create a new VM, as shown in the following screenshot:

Figure 3.2: Virtual Machines blade

  1. Once you have clicked on +Add, a new blade will pop up where you have to search for and select the desired OS for the VM, as shown in the following screenshot:

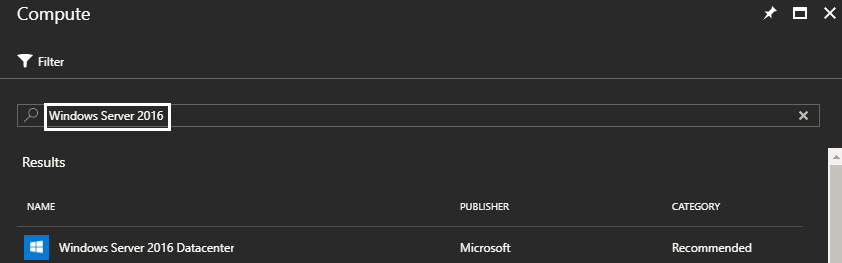
Figure 3.3: Searching for Windows Server 2016 OS for the VM

  1. Once the OS is selected, you need to select the deployment model, whether that be Resource Manager or Classic, as shown in the following screenshot:

Figure 3.4: Selecting the deployment model

  1. Once the deployment model is selected, a new blade will pop up where you have to specify the following:
    • Name: Specify the name of the VM.
    • VM disk type: Specify whether the disk...