
After vCenter Server is upgraded to 5.1, the next step is to upgrade the ESX servers to Version 5.1. There are five different methods to upgrade the ESX server:
Use VMware Update Manager
Use the ESXi installation CD/DVD
Scripted upgrade
Use the vSphere Auto Deploy server
Use the
esxclicommands
Although there are different methods, I will be discussing the method using the ESXi Installer ISO or disk in this chapter. For information on how to perform a host upgrade using the Update Manager read Chapter 12, Upgrading and Patching using VMware Update Manager.
And for information on using the vSphere Auto Deploy server read Chapter 3, vSphere Auto Deploy, and Chapter 4, ESXi Image Builder.
Before you decide to upgrade the ESX server to Version 5.1, it is recommended that you verify whether the host hardware is compatible with ESX 5.1. Use the VMware Compatibility Guide web page to verify (www.vmware.com/go/hcl).
Similar to the vCenter upgrade, the ESX upgrade also requires a few pre-checks:
The server hardware should support 64-bit and Intel VT (Virtualization Technology) should be enabled in the BIOS.
The upgrade requires 50 MB of free space on the local VMFS volume.
It is recommended to disconnect the SAN LUNs hosting VMFS volumes prior to the upgrade. This is to prevent the possibility of you unintentionally selecting one of the SAN LUNs for ESX installation. This recommendation, however, made more sense with the older versions of ESX server. With the newer versions, the installer will categorize the storage devices detected as
localorremote. So the chance that you might choose a remote SAN volume is reduced.Make sure that the server's hardware clock in the BIOS is set to UTC.
Boot the ESX server with the ESXi 5.1 CD/DVD, choose the ESXi standard installer, and press Enter.

This will load the ESXi 5.1 installer and take you to the installer's welcome screen prompting for a confirmation. Press Enter to continue.

The next screen will prompt you to accept the EULA. Press F11 to accept and continue. It will then scan for devices and prompt for a storage device selection:

Select Local or Remote (if booted from SAN) disk and press F1 to verify the details of the selected disk.

Hit on OK and then press Enter to continue. Because the machine already has an older version of ESX running, the installer will detect the same and will by default suggest an upgrade.

Since we are doing an upgrade, select the first option to upgrade ESXi and preserve the VMFS datastore.
The installer then will prompt you to confirm the upgrade. Press F11 to confirm and initiate the upgrade.

The installer now will begin the upgrade and proceed to completion.

Once the upgrade is complete, press Enter to reboot the server.

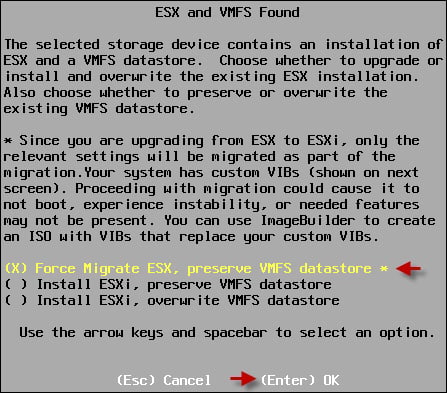
During the installation, the installer will detect the presence of an existing installation and provide the following options:
Upgrade ESX, preserve VMFS datastore
Install ESXi, preserve VMFS datastore
Install ESXi, overwrite VMFS datastore
If you were upgrading an ESX/ESXi 4.x server instead of 5.x, and if it had custom VIBs that are not included in the installer ISO, then the Upgrade ESX, preserve VMFS datastore option will be replaced by Force Migrate ESX, preserve VMFS datastore.
Unless you choose to overwrite the VMFS datastore, you are not forming a VMFS 5 volume. The Install ESXi, preserve VMFS datastore option will also retain the VMFS 3 filesystem structure.
You will also receive a warning message listing the custom VIBs.
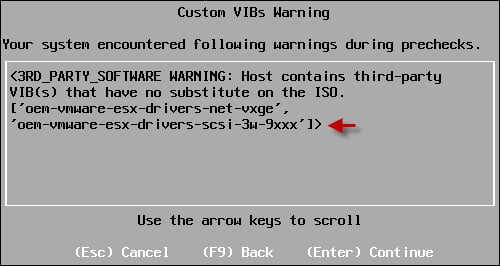
This is not the case when you migrate from ESXi 5.0, because the custom VIB will also be migrated.
Install ESXi, preserve VMFS datastore will do a fresh install of the ESXi 5.1 server but will retain the data in the VMFS datastore.
Install ESXi, overwrite VMFS datastore will do a fresh install of ESXi 5.1 and will also overwrite the contents of the VMFS volume.
The following is a list of configuration files that will be migrated:
/etc/sfcb/sfcb.cfg/var/lib/sfcb/registration/repository/root/interop/*/etc/ntp.conf/etc/ntp.drift/etc/ntp.keys/etc/syslog.conf(This is migrated only for ESXi)/etc/security/access.conf/etc/sysconfig/network(vswifsare converted tovmknics)/etc/sysconfig/static-routes/etc/sysconfig/static-routes-ipv6/etc/sysconfig/network-scripts/route-$device/etc/nsswitch.conf/etc/krb.conf/etc/krb.realms/etc/krb5.conf/etc/krb5.acl/etc/krb5.keytab/etc/krb5.log/etc/krb5.mkey/etc/snmp/snmpd.conf(Migrated to/etc/vmware/snmp.xml)/etc/motd(Migrated, appends a note mentioning that it was upgraded to ESX 5.1)/etc/vmware/vmiscsid/*/etc/vmware/esx.conf/etc/vmware/hostd/*/etc/vmware/vmauth/authentication.conf/etc/hosts/etc/resolv.conf/etc/fstab(Only NFS entries will be migrated)/etc/passwd(Only root password will be saved)/etc/shadow