Before you can install PowerCLI, you have to download the PowerCLI installer from the VMware website. You will need a My VMware account to do this.
Perform the following steps to download PowerCLI:
Visit http://www.vmware.com/go/powercli. On this page, you will find a Resources section.

Click on the vSphere PowerCLI 5.5 link in the Resources section to go to the download page.
Click on the Download button to download PowerCLI.
You have to log in with a My VMware account. If you don't have a My VMware account, you can register for free.

After you log in, you will be taken to the vSphere PowerCLI 5.5 download page. Click on the Download Now button to start downloading PowerCLI.
You have to agree to and accept the terms and conditions outlined in the VMware End User License Agreement. Check the tick box in front of I agree to the terms and conditions outlined in the End User License Agreement and click on Accept to download the PowerCLI installer.

Save the PowerCLI installation file on your local hard disk.
Perform the following steps to install PowerCLI:
Run the PowerCLI installer that you just downloaded.
Click on Yes in the User Account Control window to accept the Do you want to allow the following program to make changes to this computer? option.
PowerCLI requires VMware Remote Console Plug-In and VMware VIX to be installed on your computer. Click on Install to install these products.

Click on Next on the Welcome to the InstallShield Wizard for VMware vSphere PowerCLI window.

Select I accept the terms in the license agreement and click on Next.

If you are using VMware vCloud Director, you can select This feature will be installed on local hard drive for vCloud Director PowerCLI. (If you want, you can change the installation directory by clicking on Change....) Click on Next.

Click on Install to begin the installation.

Click on Finish to exit the installation wizard.

After installing PowerCLI, you will have a VMware vSphere PowerCLI icon on your desktop. If you installed PowerCLI on a 64-bit computer, you will also have a VMware vSphere PowerCLI (32-Bit) icon. Some PowerCLI commands only work in the 32-bit version of PowerCLI. So install both versions.
Besides starting PowerCLI from the icon on your desktop, you can also start PowerCLI from the Start menu. Go to All Programs | VMware | VMware vSphere PowerCLI to launch VMware vSphere PowerCLI or VMware vSphere PowerCLI (32-Bit).
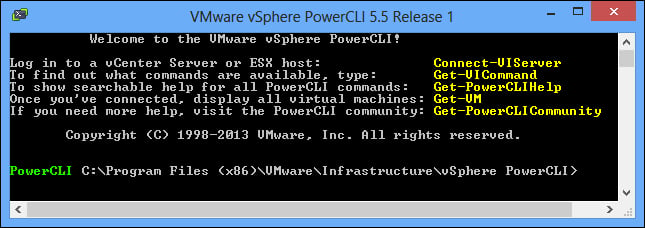
When you start PowerCLI, you will get the following screen:
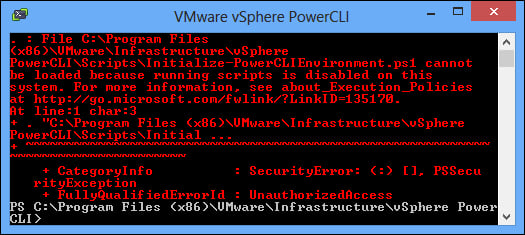
If you didn't get the text from the screenshot but got some red error messages saying that files cannot be loaded because running scripts is disabled on this system , read the following section to solve this problem. The following screenshot shows the error message that will be displayed: