
Even before you start the installation of the vCloud, you should remember that this is a complex system and thus requires proper planning for the installation. If you choose the correct steps and choices, you can save a lot of time during the installation.
For installing vCloud Director, there are lots of prerequisites that have to be in place before you can proceed further. Let us look at those:
vCenter Server for the resource cluster should set HA, DRS, and Storage DRS.
vCenter Server should trust their ESXi hosts.
Use proper vSphere licenses. If you use vSphere Distributed Switch, the Enterprise Plus license is necessary. If not, you need to use the Enterprise license for DRS. For the private or public cloud, the Enterprise Plus license is a must to provide cloud-level scaling.
vCloud Networking and Security Manager needs to be installed before installing vCloud. The vCloud Networking and Security Manager can be downloaded as an OVF appliance and can be easily deployed as a VM in your management network. The vCloud Networking and Security Manager manages the vCloud Networking and Security Edge appliances and Virtual Extensible LAN (VXLAN) (software-defined Layer 2 networking) for providing redundancy and isolation of the network inside your cluster. In other components, vShield also provides the Endpoint and Data Security components for your VMs. vCloud Networking and Security Manager should be properly licensed. A basic license for the vCloud Networking and Security is included with vCloud Director 5.1, but it does not include advanced features. If you would like to know more, take a look at this article: http://kb.vmware.com/kb/2042799.
VMware strongly recommends that vCenter Server 5.1 and ESXi 5.1 be used with vCloud Director 5.1. Although earlier versions are supported, some features are not available if these earlier versions are used.
Check the supported operating system for the vCloud Director cell. vCloud Director Server requires Linux OS. Red Hat Enterprise Linux 5 (64 bit), update 4, 5, or 6 is supported. In addition, Red Hat Enterprise Linux 6 (64 bit), update 1 or 2 is supported.
The minimum hardware requirement for a vCloud Director cell requires 950 MB free on disk and 1 GB of memory (RAM). For better performance, 2 GB of RAM is recommended as with 1 GB RAM, it sometimes becomes irresponsive.
The minimum Java version required for the cell is Java Runtime Environment (JRE) 1.6.0 update 10 or later. Only the 32-bit version is supported.
vCloud Director requires Adobe Flash Player version.
The database that will be used by vCloud Director must be created before installing the first vCloud Director cell.
Before configuring vCloud Director, you must install security certificates.
You must use the JRE
keytoolcommand to create your certificate requests.Transfer Server Storage is used as a temporary storage for uploads and downloads. It must be mounted at
$VCLOUD_HOME/data/transfer.On the internal networks, only a few ports should be open for vCloud Director servers. See the VMware knowledge base article 1030816 at http://kb.vmware.com/kb/1030816.
For more information, please see the VMware vCloud Director 5.1 Documentation Center at http://pubs.vmware.com/vcd-51/index.jsp.
vCloud Director uses both Microsoft SQL Server and Oracle Database. In this section, we will consider SQL Server only. VMware suggests that a database server configured with 16 GB of memory, 100 GB of storage, and four CPUs should be adequate for most vCloud Director clusters.
SQL Server databases have specific configuration requirements when you use them with vCloud Director. Install and configure a database instance, and create the vCloud Director database user account before you install vCloud Director.
The vCloud Director database performance is an important factor in the overall vCloud Director performance and scalability. vCloud Director uses the SQL Server tempdb file when storing large result sets, sorting data, and managing data that is being concurrently read and modified. This file can grow significantly when vCloud Director experiences a heavy concurrent load. It is a good practice to create the tempdb file on a dedicated volume that has fast read/write performance. To do so, follow the given steps:
Create the master instance.
The following script creates the database and log files, specifying the proper collation sequence:
USE [master]
GO
CREATE DATABASE [vcloud] ON PRIMARY
(NAME = N'vcloud', FILENAME = N'C:\vcloud.mdf', SIZE =
100MB, FILEGROWTH = 10%)
LOG ON
(NAME = N'vcdb_log', FILENAME = N'C:\vcloud.ldf', SIZE =
1MB, FILEGROWTH = 10%)
COLLATE Latin1_General_CS_AS
GO
The values shown for
SIZEare suggestions. You might need to use larger values.
Set the transaction isolation level.
The following script sets the database isolation level to
READ_COMMITTED_SNAPSHOT:USE [vcloud] GO ALTER DATABASE [vcloud] SET SINGLE_USER WITH ROLLBACK IMMEDIATE; ALTER DATABASE [vcloud] SET ALLOW_SNAPSHOT_ISOLATION ON; ALTER DATABASE [vcloud] SET READ_COMMITTED_SNAPSHOT ON WITH NO_WAIT; ALTER DATABASE [vcloud] SET MULTI_USER; GO
Create the vCloud Director database user account.
The following script creates the database username
vcloudwith the passwordvcloudpas:USE [vcloud] GO CREATE LOGIN [vcloud] WITH PASSWORD = 'vcloudpass', DEFAULT_DATABASE =[vcloud], DEFAULT_LANGUAGE =[us_english], CHECK_POLICY=OFF GO CREATE USER [vcloud] for LOGIN [vcloud] GO
Assign permissions to the vCloud Director database user account.
The following script assigns the
db_ownerrole to the database user created in step 3:USE [vcloud] GO sp_addrolemember [db_owner], [vcloud] GO
The vCloud Director installer verifies that the target server meets all the platform prerequisites and installs the vCloud Director software on it. The vCloud Director software is distributed as a digitally signed Linux-executable file named vmware-vcloud-director-5.1.0-nnnnnn.bin, where nnnnnn represents a build number. You should first upload this bin file to the vCloud Director VM. Let's get started:
Log in to the target server using SSH as the root user.
Change the folder where you have uploaded the bin file with the following command:
# cd <Path>Enable the installation file for execution as this installation file requires permission to execute:
# chmod u + x installation-file
Run the installation file:
# ./vmware-vcloud-director-5.1.0-810718.bin
After the software is installed, the installer prompts you to run the configuration script, which configures the server's network and database connections.
For the question Would you like to run the script now (y/n)?, answer
n. We will first need to create the SSL certificates for vCloud Director 5.1.
At this time, we need to create the SSL/TLSv1 certificates. Cloud computing has become one of the hottest technologies today. It is being used by service providers and enterprises alike. As more and more people have been accessing cloud services via the Internet or within their corporate environments, traffic passing through the cloud has multiplied. Along with this growth and proliferation have come heightened security risks and resulting attacks to the information being shared. Security has become a paramount concern, because authenticity, confidentiality, and integrity of the information are vital and must be guaranteed.
Network security leverages numerous techniques to aid in the protection of transmitted information. Traditionally, it relies on the principles of cryptology to provide the foundation of security. This involves the conversion of information into an incomprehensible form factor that is usable only to selected recipients capable of transforming the information back into a usable form. Transport Layer Security (TLS) and its predecessor Secure Sockets Layer (SSL) are cryptographic protocols commonly used today to aid in network security.
Complex infrastructures such as cloud computing involve multiple connections between various hosts and external communication channels. The use of TLSv1/SSL certificates is an important tool to encrypt those connections to provide data privacy.
TLSv1/SSL certificates also provide for two-way authentication. This enables a host to validate that it is connected to the intended recipient. This decreases the ability of an imposter to intercept the information transmitted.
vCloud Director requires SSL to secure communications between clients and servers. Before you install and configure a vCloud Director Server group, you must create two certificates for each member of the group and import the certificates into the host keystores. This certificate installation requires that you create a Java keystore file using the keytool utility for certificate installation. The resulting keystore file will contain two SSL certificates along with the necessary certificates.
Each vCloud Director Server that you intend to use in a vCloud Director cluster requires two SSL certificates we just mentioned, one for each of its IP addresses. Self-signed certificates can provide a convenient way to configure SSL for vCloud Director in environments where trust concerns are minimal.
Note
Each vCloud Director Server requires two SSL certificates, one for each of its IP addresses, in a Java keystore file. The vCloud Director installer places a copy of a keytool in /opt/vmware/vcloud-director/jre/bin/keytool.
The console proxy and the HTTP alias use the same hierarchy of certificates. Because this one keystore file contains both certificates, you can use this single file wherever it is needed after it has been created.
Note
Because this file contains private keys and is protected by a single password, it is strongly recommended that you do not keep copies of this file in unsecured locations. You should maintain a copy of a keystore file only where absolutely needed.
Before beginning the procedures, the following prerequisites must be fulfilled:
Obtain the IP addresses for the vCloud Director Server and the fully qualified domain name (FQDN) for each. The configured IP addresses on the vCloud Director host can be identified through the use of the
ifconfig –acommand. The FQDN for the IP addresses can be displayed using thenslookup_<ip address>command, where<ip address>equates to a configured IP address.Note the FQDN names for each IP address because this name will be used for the HTTP server and console proxy service SSL certificates. Noting the IP addresses will assist in the installation of the SSL certificate.
Access the keytool utility. This utility is installed with vCloud Director by default. It is possible to use the keytool utility on another computer that has the Java Runtime Environment (JRE) version 6 or later installed, and then import the created Java keystore file onto your vCloud Director Server.
This assumes you are using the keytool installed on your vCloud Director Server as in the following example:
Create an untrusted certificate for the HTTP service:
# /opt/vmware/vcloud-director/jre/bin/keytool -keystore certificates.ks -storetype JCEKS -storepass vmware123 -genkey -keyalg RSA -alias httpCreate an untrusted certificate for the proxy service console:
# /opt/vmware/vcloud-director/jre/bin/keytool -keystore certificates.ks -storetype JCEKS -storepass vmware123 -genkey -keyalg RSA -alias consoleproxyAt this time, we can go back and configure vCloud Director. To run the configuration script, we now need to run the following script:
# /opt/vmware/vcloud-director/bin/configureThe required information is as follows:
HTTP service IP Address:
Remote Console Proxy IP Address:
Java Keystore path:
Java Keystore password:
Now you will be asked to configure the Syslog server. Specify the IP address and press Enter.
Enter
2for a Microsoft SQL Server database type.The required database information is as follows:
Database host:
Database Port:
Database Name:
Database Instance:
Database Username:
Database Password:

It will connect to the database through JDBC and database script will run.
Once the scripts have been completed, you will be presented with the link to the vCloud Director cell. You will also be asked to start the vCloud Director service; answer Y to start the service, and the vCloud Director service will be started.
Once you have completed with the vCloud Director configuration, you can use the vCloud Director Web Console to complete the initial provisioning of your cloud. However, before you use the vCloud Director Web Console, you have to go through the setup wizard. The setup wizard gathers the information that the Web Console requires before it can start. Thus, once the wizard is finished, the web console starts and displays the login screen. The vCloud Director Web Console provides a set of tools for provisioning and managing a cloud environment. It includes a quickstart feature as well that guides you through steps such as attaching vCloud Director to vCenter and creating an organization.
Open a web browser and connect to https://<FQDN>/cloud. (This is the web IP address.)
Follow the prompts to complete the setup:
Accept the terms of the license agreement.
Enter the license key.
Enter the administrative account username, password, full name, and e-mail address.
Specify the system name and the installation ID. A vCloud Director installation ID is used to ensure the network addressing uniqueness and network traffic separation between distinct vCloud Director instances that happen to utilize the same Layer 2 network.
At this time, you will get a login prompt. Log in to this vCloud Director using the system admin credentials just created.
You will see the first screen asking you to attach a vCenter Server as shown in the following screenshot:

Click on Attach a vCenter.
You will be presented with the following screen where you have to input the vCenter Server information:
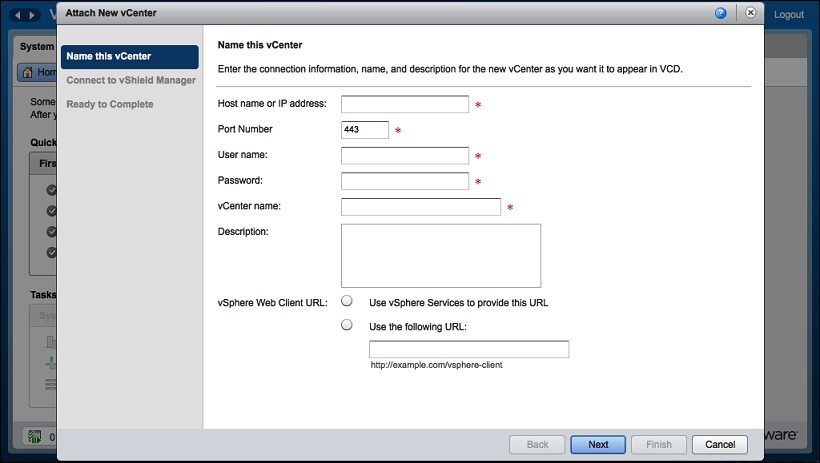
Specify the vCenter connection information and click on Next.
You will be presented with the following screen where you have to put the vCloud Networking and Security Manager information:

Specify the vCloud Networking and Security Manager server connection information and click on Next.
On the final screen, click on Finish.
Once you add the vCenter Server, you can see it under the Manage & Monitor tab.
Go to the Manage & Monitor tab and under the vSphere Resources section, click on vCenters. You will see a similar screen as follows:

Note
As a prerequisite, vCenter Server has to be registered with your vCloud Networking and Security Manager. If not, you will see an error, vShield Manager is not registered with the VC <VC Name>. Perform VC registration in vShield Manager and retry. Open the vCloud Networking and Security Manager URL in a supported browser.
If you get this error, follow the given steps to register your vCenter Server with the vCloud Networking and Security Manager:
Log in to the cloud as the administrator. This should have been done as part of the initial configuration.
In the main Settings and Reports section, find the vCenter Server section, and you will see there is no vCenter Server registered with the vCloud Networking and Security Manager.
Click on the Edit button.
Specify the vCenter Server information and its credentials.
Click on OK.
Click on Yes on the security warning.