Book Image

Proxmox Cookbook

By : Wasim Ahmed, Ravi K Jangid
Book Image

Proxmox Cookbook

By: Wasim Ahmed, Ravi K Jangid

Overview of this book

Proxmox VE's intuitive interface, high availability, and unique central management system puts it on par with the world’s best virtualization platforms. Its simplicity and high quality of service is what makes it the foremost choice for most system administrators. Starting with a step-by-step installation of Proxmox nodes along with an illustrated tour of Proxmox graphical user interface where you will spend most of your time managing a cluster, this book will get you up and running with the mechanisms of Proxmox VE. Various entities such as Cluster, Storage, and Firewall are also covered in an easy to understand format. You will then explore various backup solutions and restore mechanisms, thus learning to keep your applications and servers safe. Next, you will see how to upgrade a Proxmox node with a new release and apply update patches through GUI or CLI. Monitoring resources and virtual machines is required on an enterprise level, to maintain performance and uptime; to achieve this, we learn how to monitor host machine resources and troubleshoot common issues in the setup. Finally, we will walk through some advanced configurations for VM followed by a list of commands used for Proxmox and Ceph cluster through CLI. With this focused and detailed guide you will learn to work your way around with Proxmox VE quickly and add to your skillset.
Table of Contents (18 chapters)
Proxmox Cookbook
Credits
About the Author
About the Reviewers
www.PacktPub.com
Preface
Index

Applying a Proxmox subscription


If you choose to get a Proxmox subscription of any type, a subscription key must be uploaded into the Proxmox node to activate it. The subscription key is sent by e-mail after successful payment. The key can be uploaded through the Proxmox GUI.

Getting ready

Login to the Proxmox GUI by accessing the link through a browser and enter the admin login credentials. The default username is root and the password is the same as was entered during installation: https://<pmx_node_IP>:8006.

How to do it…

  1. After logging into the Proxmox GUI, click on the node that the subscription is going to be applied to.

  2. Click on the Subscription tab.

  3. Click on the Upload Subscription Key button to open the key dialog box, as shown in the following screenshot:

  4. Copy/paste the subscription key from the e-mail received from Proxmox in the key box, then click on Ok.

  5. Click on Check. At this moment, the key will be verified with Proxmox to check the validity. After the activation is completed, it should look like the following screenshot:

There's more…

If a wrong subscription key has been entered, then the display should resemble the following screenshot:

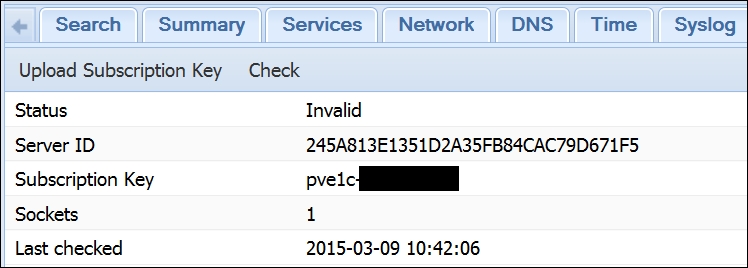
In such cases, simply upload the correct key to activate again. You may also see the key invalid notice when the key has already been activated for another node, which is no longer in service. In such cases, contact Proxmox or other third-party license providers that the license was purchased from to request reissuing of the same license. Then, simply click on the Check button to reactivate the key. Each key is hard coded to each server ID. The key needs to be reissued by Proxmox in order to use it.

Tip

Please keep in mind that once a key is reissued, it will no longer work on the previous node it was activated for. If you have asked for reissue a license by mistake, request to reissue again and click on the Check button on the previous node.