
ServiceNow, Inc. offers developers a free instance of their cloud-based platform. To be able to develop a custom application, you first need to have your own instance of the ServiceNow platform. You can create a developer account and request a free instance by visiting the ServiceNow developer portal site at: https://developer.servicenow.com:
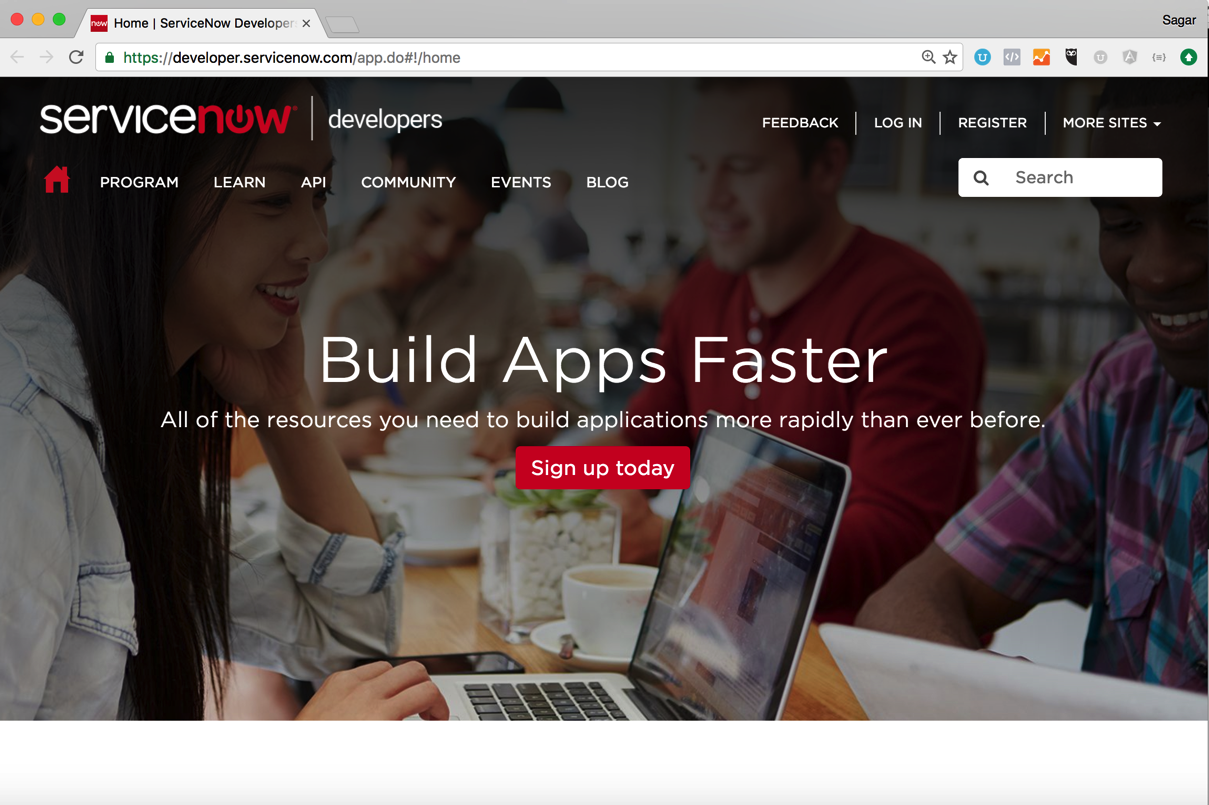
The registration process for the ServiceNow developer portal is fairly simple. You can click on the REGISTER link in the upper-right, if you are not already registered, and fill in your name, e-mail, and choose a password to complete your registration. Once you verify your email and are registered, you can log in to the ServiceNow developer portal and request an instance by clicking on the Request Instance button, as shown in the following screenshot:
Note
The link to request a new instance is visible on the left side of the dashboard page and is also accessible from the MANAGE | Instance menu link once you log in to the developer portal. You can only launch one instance per developer portal account.
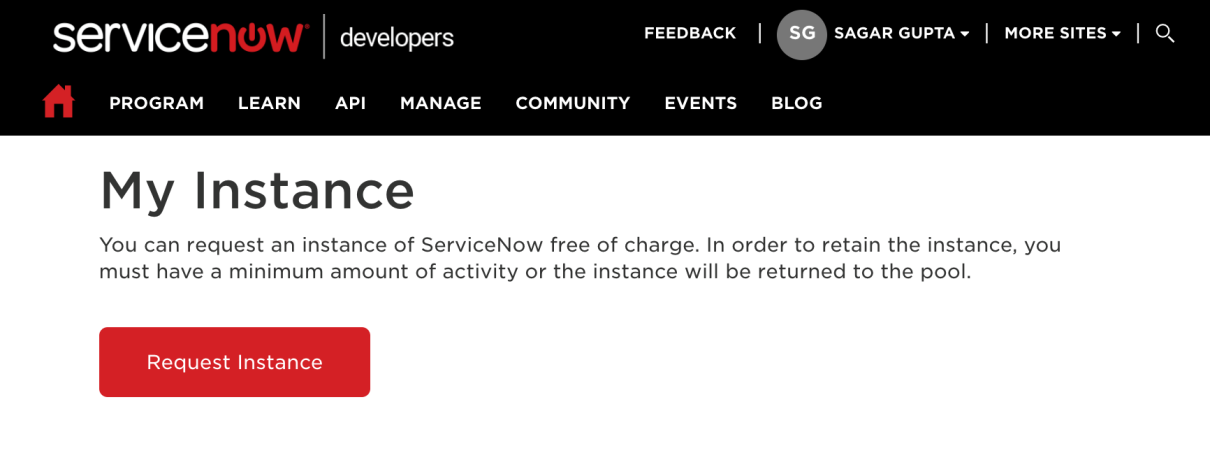
You will be presented with a modal window, like the one shown in the following screenshot, to select a version of the ServiceNow instance you wish to launch. For the purpose of this book, we will be launching an instance running the Istanbul version of the ServiceNow platform. You can also select the latest version of the ServiceNow platform, which is Jakarta:
Note
Release notes on the Istanbul version can be found at: https://docs.servicenow.com/bundle/istanbul-release-notes/. Release notes on the Jakarta version can be found at: https://docs.servicenow.com/bundle/jakarta-release-notes/page/release-notes/jakarta-release-notes.html.
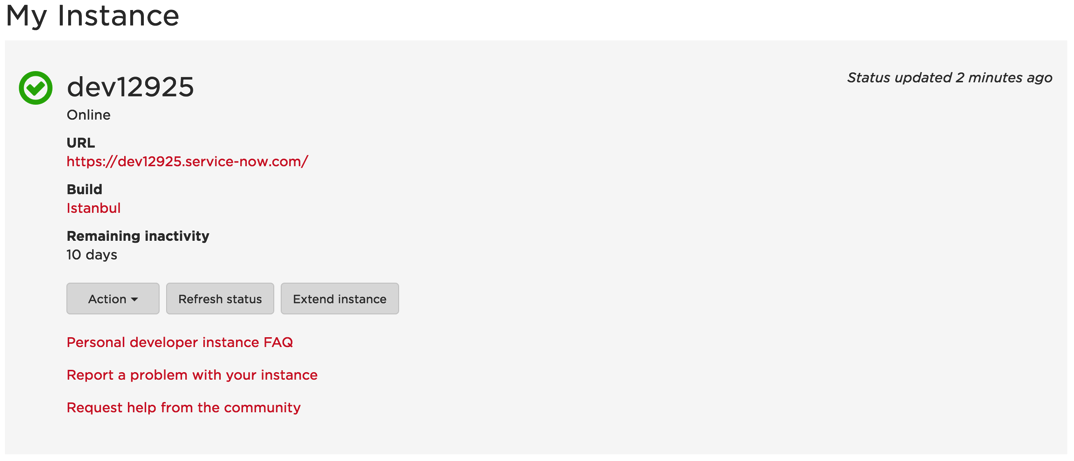
It may take a few minutes for the developer portal to assign you an instance. Once the instance is available, you will be presented with details of your instance - such as the URL of the instance, the System Administrator's username (by default admin), and an alphanumeric password. Make sure to save this information for future reference:
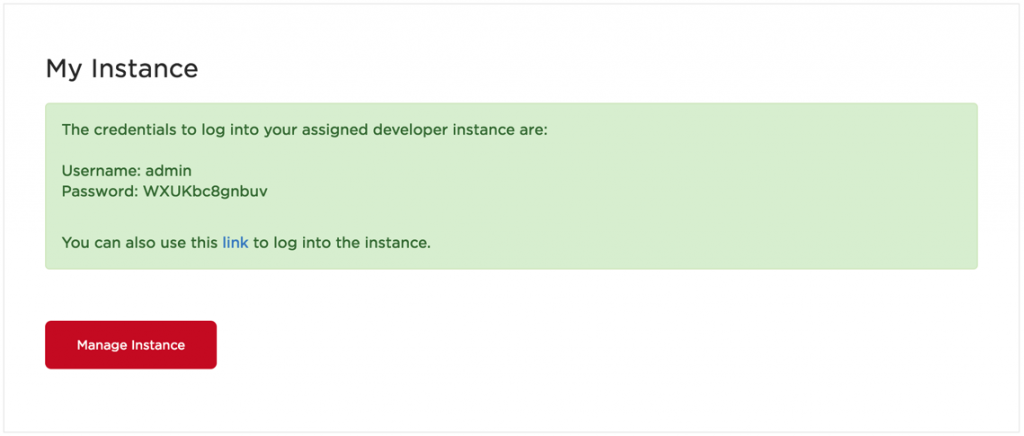
You will also be presented with the credentials to log in to your instance, as shown in the following screenshot:
Note
It may take up to 60 seconds to launch your instance, so be patient. Your instance may sleep or be reclaimed if there's no activity/usage for a few days. However, it is always easy to wake or request a new instance by visiting the MANAGE | Instance page in the ServiceNow developer portal. Each developer instance URL is different, but always has the dev prefix, and uses the service-now.com domain instead of servicenow.com. In case you forget your admin user's password, you can always reset it from the MANAGE | Instance page.
Now that you have your own personal developer instance, in the ServiceNow developer portal, you can click on the instance URL link to open and log in to your instance using the admin user credentials, as shown in the following screenshot:
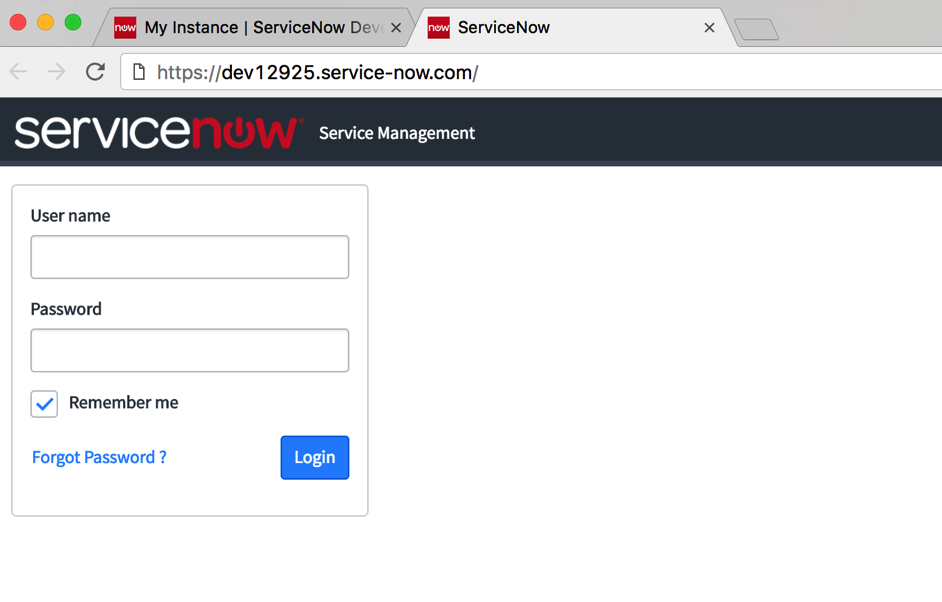
Enter your User name and Password to log in to your instance, and leave the Rememberme checkbox checked only if you trust others who share your computer. If you are logging in to your instance for the very first time, it will prompt you to change your password. Every ServiceNow instance's URL is different. Instance settings, users, passwords, roles, applications, modules, tables, UIs, scripts, and so on available for one instance are unique to that instance. They can, however, be copied from one instance to another.
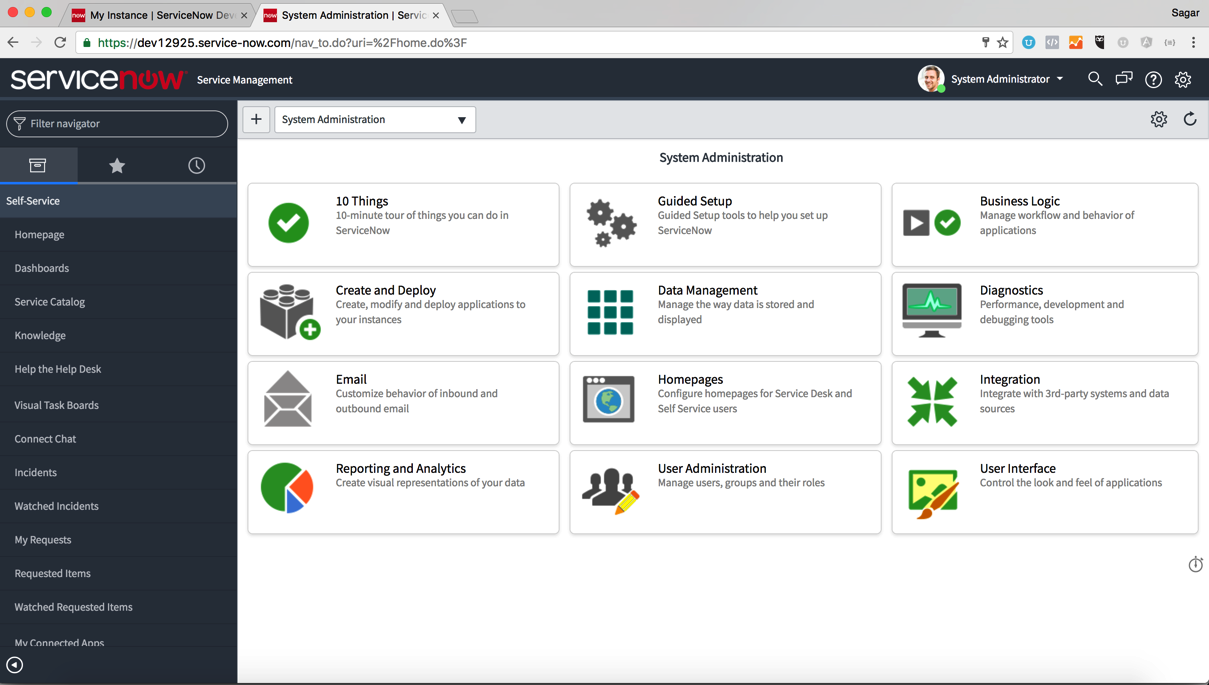
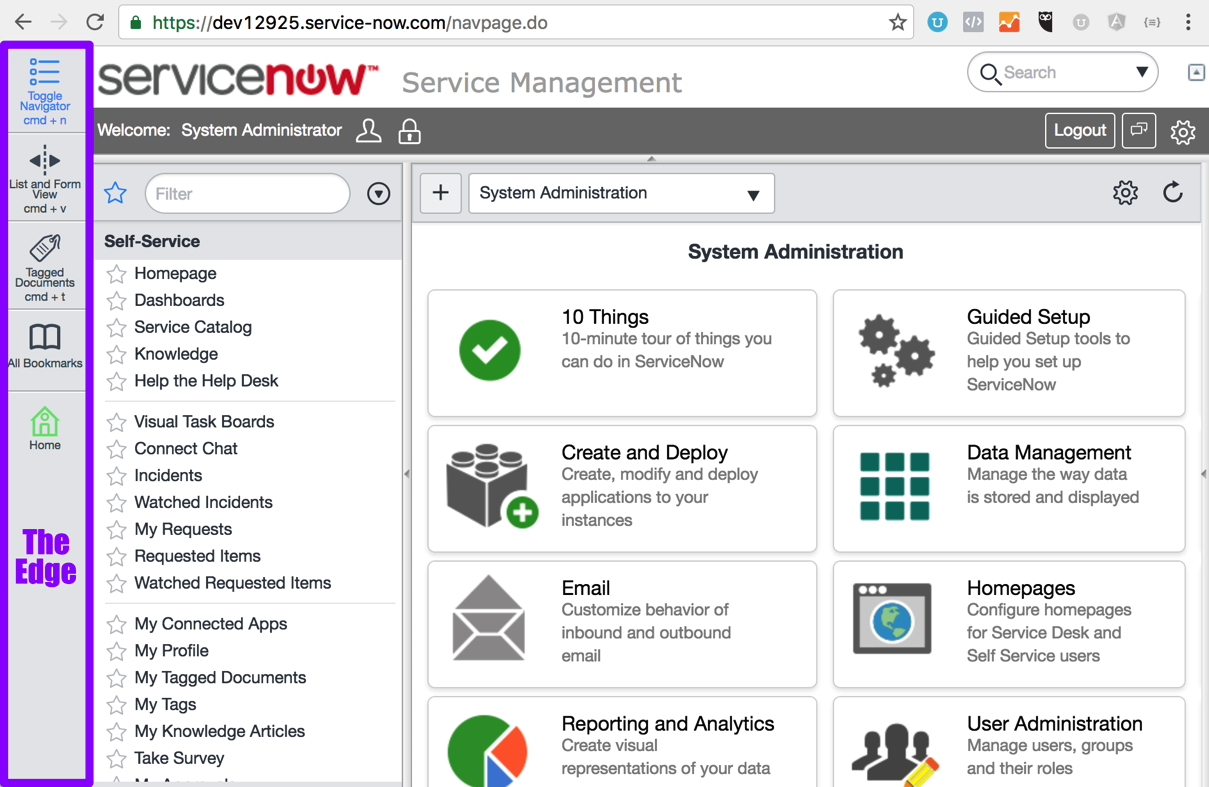
The first time you log in as admin, you are taken to the System Administrator homepage (Dashboards), like the one shown in the following screenshot:
Just like any web-based application, we interact with the ServiceNow platform's application and modules through the user interface using a web browser. The version of UI that comes with the Istanbul release of ServiceNow is referred to as UI16. There are three main components of UI16: Banner Frame, Application Navigator, and Content Frame.
The various components of the user interface are explained here:
- Banner Frame (top header): The banner frame appears at the top of the interface. This is where you see the logo, global navigation, logged-in user's info, search and other tools, and a settings (gear/cog) icon at the extreme right. This settings gear icon is extremely useful for developers as it is used quite frequently during development:

- Application navigator (left navigation bar): This is where navigation links to different ServiceNow platform applications and modules are visible. It has a text filter box at the top, which allows us to filter through available navigation links. There are three tabs available in the left navigation bar:
- The Applications tab contains a list of all of the applications and modules the logged in user has access to. Based on the user's role, each link has an edit icon and inactive star icon to its right. The edit link can be used to navigate to the edit module page, and the star icon can be clicked on to add or remove navigation entries to user favorites.
- The Favorites tab lists all navigation links and items the logged in user has added to their favorites.
- The History tab lists navigation links and items the logged in user has recently accessed.
- Content Frame: This is the main section of the user interface where pages, forms, list of records, dashboards,
Homepagesof all applications, and modules are loaded. It is possible to switch back to an earlier version of the user interface (UI15) by clicking on the settings gear icon in the far right of the Banner Frame, which will open up the
System Settingsmodal window (more on this on next page), and then clicking on theSwitch to U15button in the upper-right of the modal window. To switch back to U16, again click on the settings gear icon, and click on theSwitch to U16button:

Version 15 of the UI features The Edge, which has been replaced by the Favorites (left-navigation) tab in version 16 of the UI, as shown in the following screenshot:
The System Settings modal window is accessible (in UI16) by clicking on the settings gear icon in the Banner Frame. When you are logged in as System Administrator or a delegated developer, you will have the following settings available:
General: Here you can change your time zone, view a printable version of the content frame, and change a few accessibility-related settings.Theme: Allows you to select and change your UI's theme color.Lists: Here you can change settings related to a list of records module pages:Wrap longer text in list columns: If enabled, breaks long text into lines in order to minimize horizontal scrolling in the list of records module pages.
Forms: This tab allows you to change how your Form UI loads and work:Tabbed forms: If enabled, all related lists and sections on the form show up in tabs in all forms.Related list loading: Allows changing how related lists load in the form. We can choose to load related listsWith the Form,After the Form,orOn-Demand.
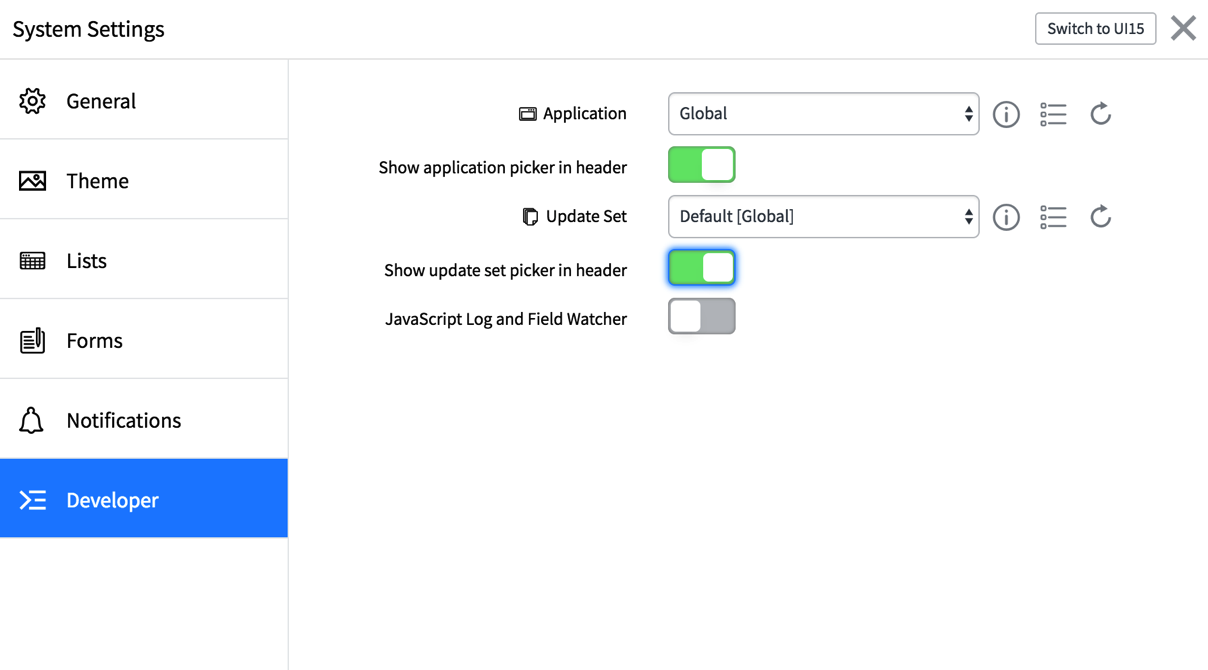
Notifications: This tab allows users to enable or disable mobile, desktop (web), e-mail, and audio notifications.Developer: This tab is only available to users with an admin role or a delegated developer. This tab allows developers to select their currentApplicationand workingUpdate Set. The following settings are available under theDevelopertab:Application picker drop-down: Allows selecting an application scope and marking it as active. This prevents developers from making modifications to any other application other than the one that is currently selected. One ServiceNow instance can have more than one application scope defined but a user can work only on one of the scopes at any given time.Show application picker in header: If enabled, shows application picker drop-down in the banner frame. We will keep this setting enabled for the rest of our chapters.Update Set picker drop-down: Allows selecting anUpdate Setand marking it as active.Update Setsare like containers, which record changes to the selectedApplicationscope and allows easy migration of changes to other instances and rollbacks. One application scope can have more than oneUpdate Setsdefined but only one marked as active.Show update set picker in header: If enabled, shows theUpdate Setpicker drop-down in the banner frame. Keep it enabled for the rest of our chapters.JavaScript Log and Field Watcher: If enabled, shows the JavaScript Log and Field Watcher frame within the Content Frame.
After enabling Show Application and the Update Set picker in the header settings, both drop-down fields will appear in the banner frame, which will enable us to quickly change the active Application scope and Update Set:

The ServiceNow platform comes with a default Application scope named Global and a default Update Set under the global application scope named Default [Global]. We will be covering how the Application scope and the Update Set works in detail later in the book. One key thing to remember is that the Application scope is different to application menu links, which are visible in the left navigator and explained here:
The Application Navigator on the left of the user interface lists all applications menu and modules. An application menu is a set of related modules grouped together as a section, which can be expanded on click, and is denoted by an application label. Once expanded, it lists all modules (navigation links) available under it.
One of the most important aspects of the ServiceNow Application is that it can comprise of one or more modules of different types. Modules types are also referred to as navigation link types.
The administrator can easily customize the order and label of all Applications and Modules, as shown in the following screenshot:
Even though we will be covering Modules in upcoming chapters, to completely understand different types of user interfaces available, we must go through some key types of modules available in ServiceNow.
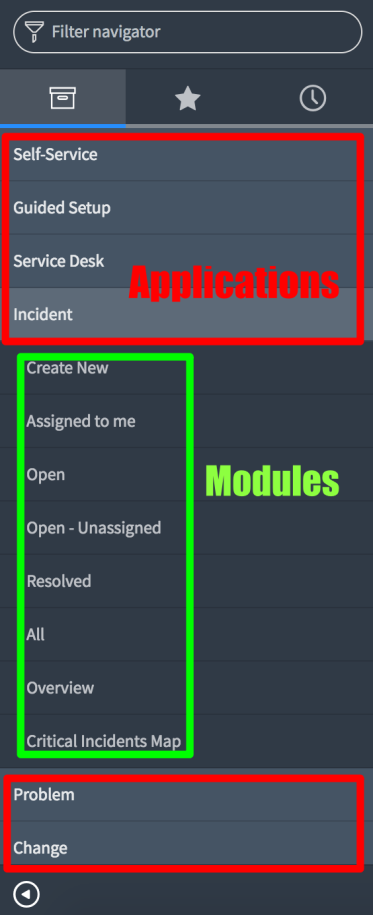
In the preceding image, Self-Service, Guided Setup, Service Desk, Incident, Problem, and Change (marked in red) are all Application menus. The Incident application menu section is expanded and navigation links under it, including Create New, Assigned to me, Open, Open - Unassigned, Resolved, All, Overview, and Critical Incidents Map (marked in green), are visible and these navigation links are called Modules.
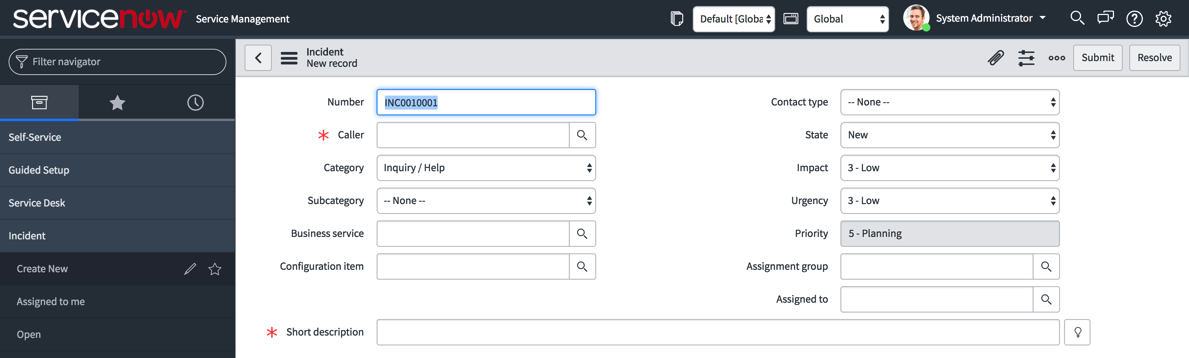
New record: A module that opens up a web form is referred to as aNew recordmodule. Clicking on many modules in ServiceNow, including theCreate Newnavigation link under theIncidentapplication, opens up a form like the one shown in the following screenshot, which allows you to insert a new record to a specified table. EveryNew recordmodule is linked to a table in to which new and existing records are either inserted or updated. For example, theNew recordform of theIncidenttable, as shown in the following screenshot, can be used to insert new records into theIncidenttable:
- List of records: Any navigation link that points to a page that lists records from a table or view is referred to as a list of record modules. A list of record modules can also be used to drill down into records using the search filters visible at the top of the page and can have pre-defined filters set during the creation of the module. Modules under the
Incidentapplication menu includingAssigned to Me,Open,Open - Unassigned,Resolved, andAllnavigation links lists records from theIncidenttable and displays items in a grid format:
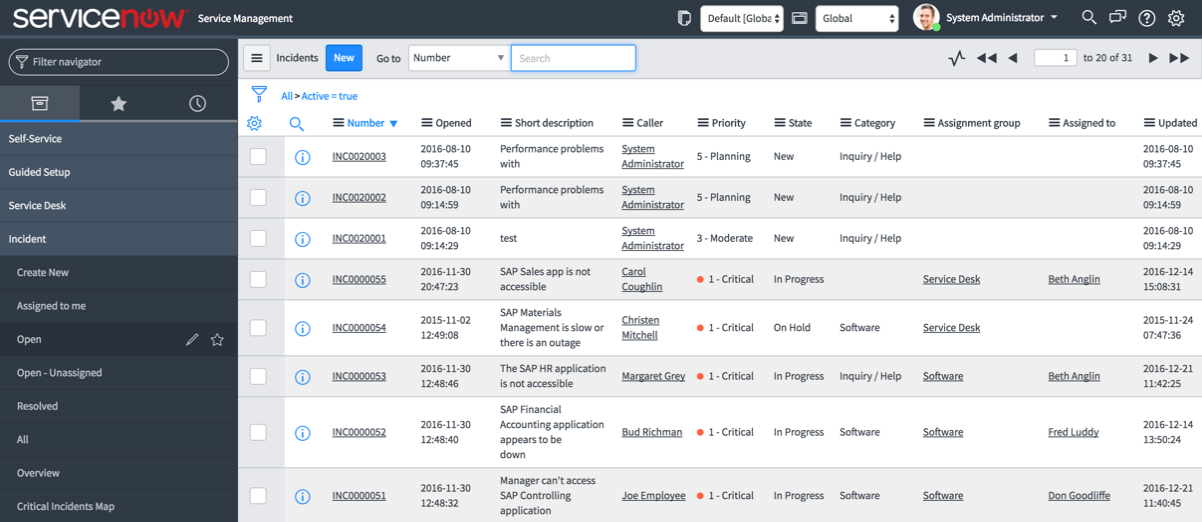
Lists of record modules usually have a New button in the upper-left, which allows you to insert a new record into the table list of records that the module is fetching its data from. Moreover, you will also find a filter icon, which can be clicked to open a query builder known as the Filter UI, as shown in the following screenshot:

The list of records also features a quick search feature at the top section but unlike Filter UI, it can be perform a search only on one of the visible columns:

It also features a simple to use pagination UI in the upper- and lower-right, which allows you to quickly jump through records from one page to another:

Apart from the Filter UI, quick search, and pagination UIs, the list of records module also features UI actions such as list choice and context menu, which are visible when we right-click on the list's column header. It also provides an efficient way to change the sorting order of the list, simply by clicking on the column name on the list's header.
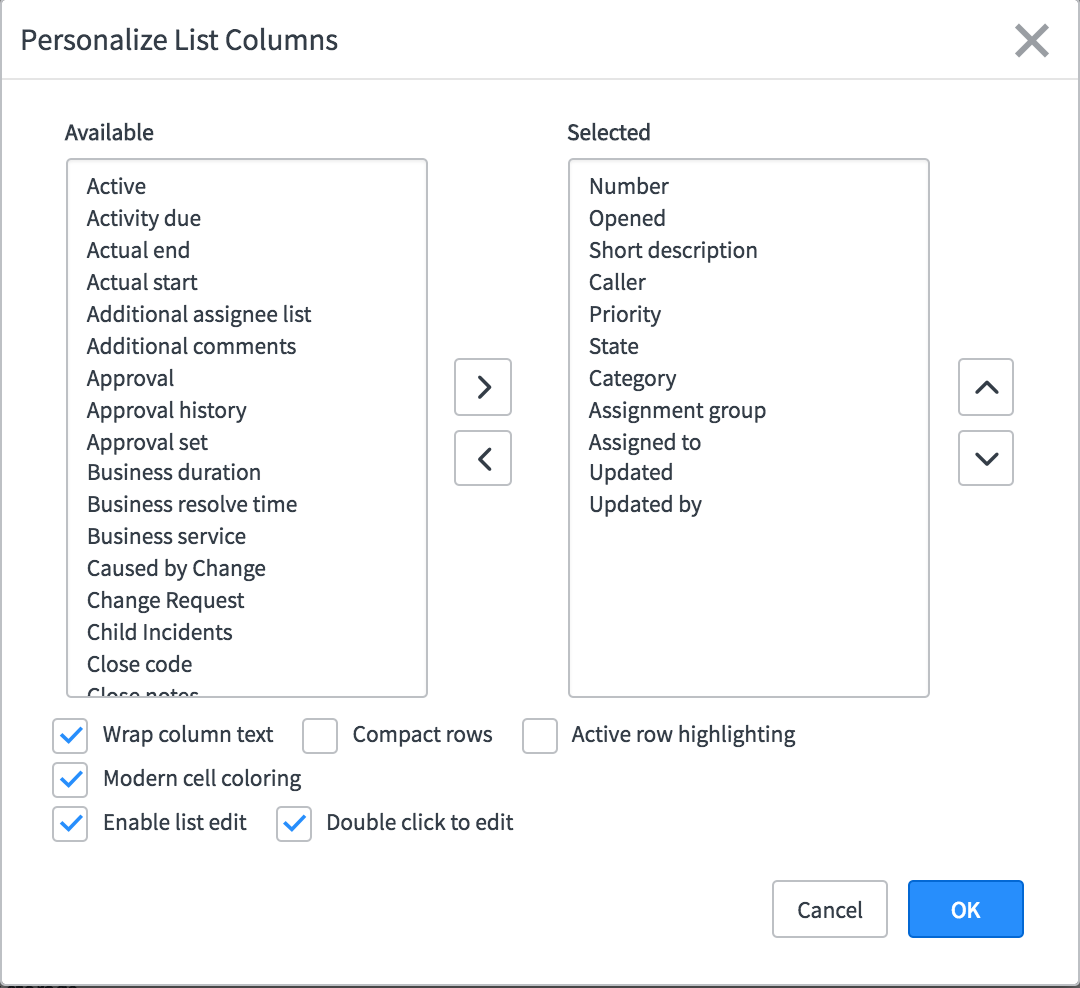
Clicking on the gear icon at the upper-left of the list header brings up the Personalize List Columns modal window, allowing logged-in users to customize columns available to them in the list's grid. You can bring in the columns you want visible to the Selected list from the Available list of columns and click on the OK button to confirm your changes, as shown in the following screenshot:
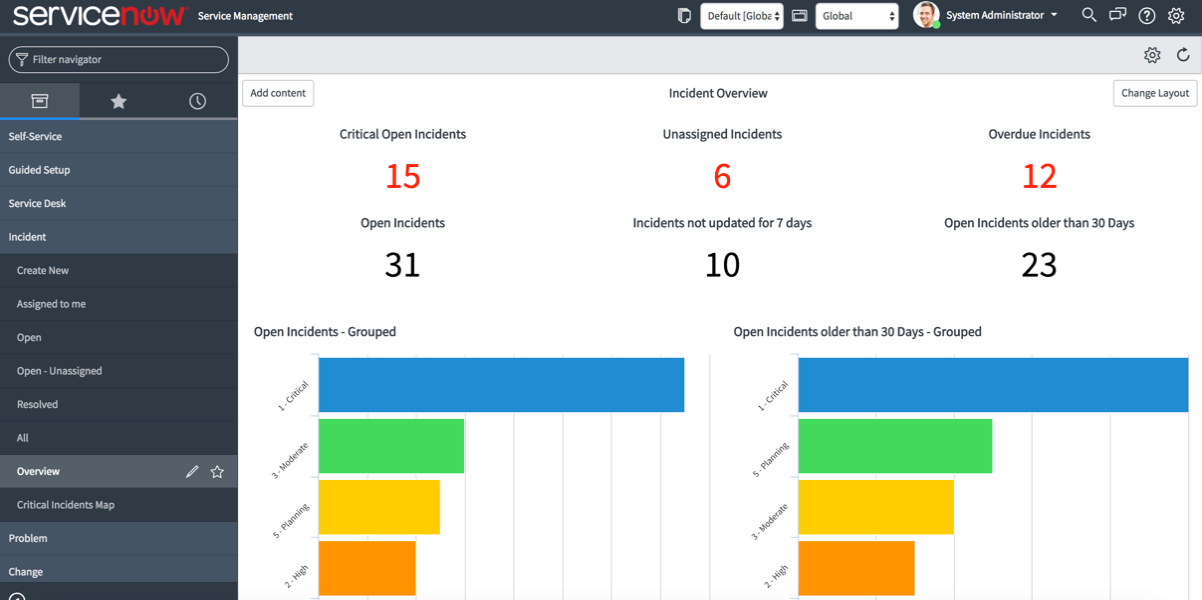
- Homepage: A navigation links (or module) that point to any dashboard-like page filled with graphs and widgets is referred to as a homepage. For example, the
Overviewnavigation link under theIncidentapplication menu loads a homepage like the one shown in the following screenshot:
- Other available module/link types:
- Map page
- Content page
- Run a report
- Separator
- Single record
- Survey
- Timeline page
- URL
ServiceNow offers many different form UI elements , such as choice (drop-down), simple text, numeric, price, date, reference field, journal field, and so on, which can be used in forms and catalog pages. Different form UI types can be used to create one form. For example, the New record form of the Incident application, as shown in the following screenshot, can comprise text fields, reference fields, form buttons, header context menus, drop downs, form sections, list fields, and journal fields. Some of these fields can be marked as mandatory:
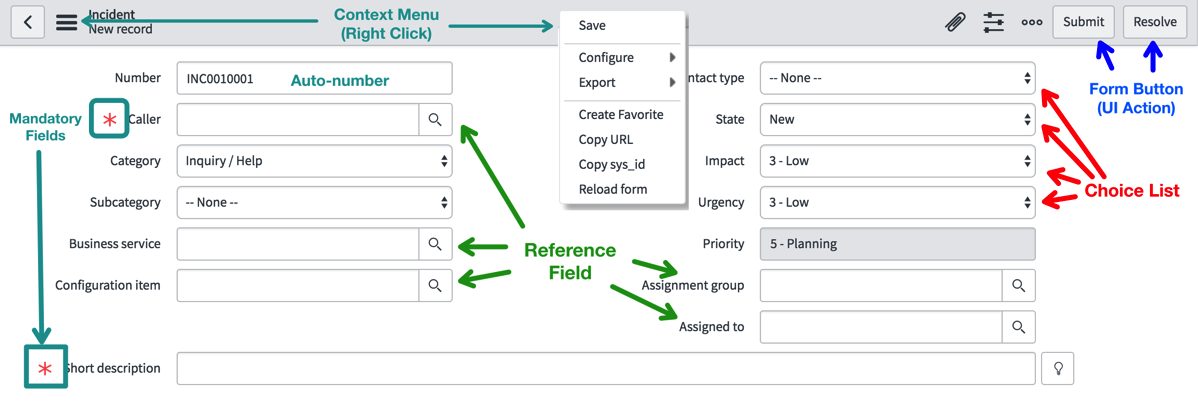
Some sections of the form are accessible via a tabbed interface as shown here:
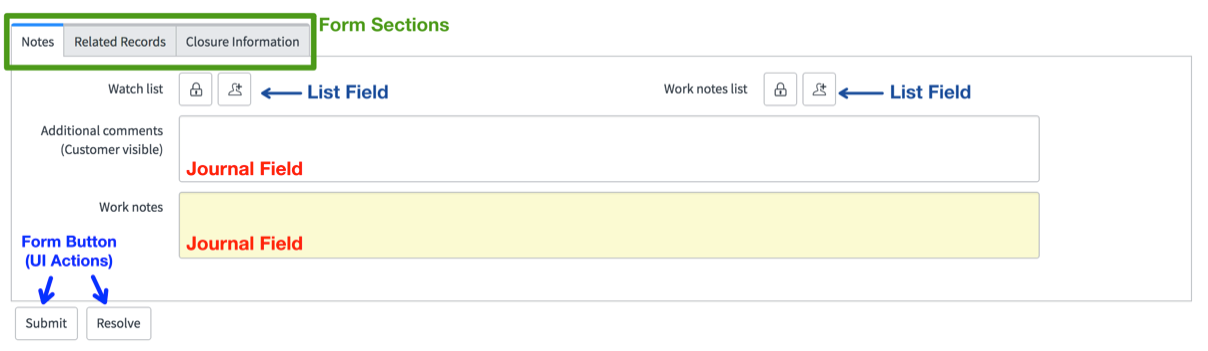
- Fields marked with
*are mandatory fields. - Reference Fields refer to a record in a separate table. It can also refer to a record in the same table. Example: In the previous screenshot, the
AssignedtoandCallerfields refer to records in the users table, whereas theAssignmentgroupfield refers to a record in the user groups table. - Form Sections are used to remove the clutter from the page and arrange fields into meaningful tabs or sections.
We will be covering how to create different form fields and customize form layout in later chapters.
Related lists are one of the most important UI elements available in form pages. A related list can be used to show lists of related records from either, the same or a different table. While we will be covering related lists in detail in later chapters, let us quickly understand how the related list UI works and how it can help augment the information available in any form:
- Open one of the existing records in update (edit) mode in the
IncidentManagementapplication by clicking on theIncident Number:

- Once you are in update mode, right-click on the form header to bring up the form context menu UI actions. From the list of options available, select
Configure|Related Lists:
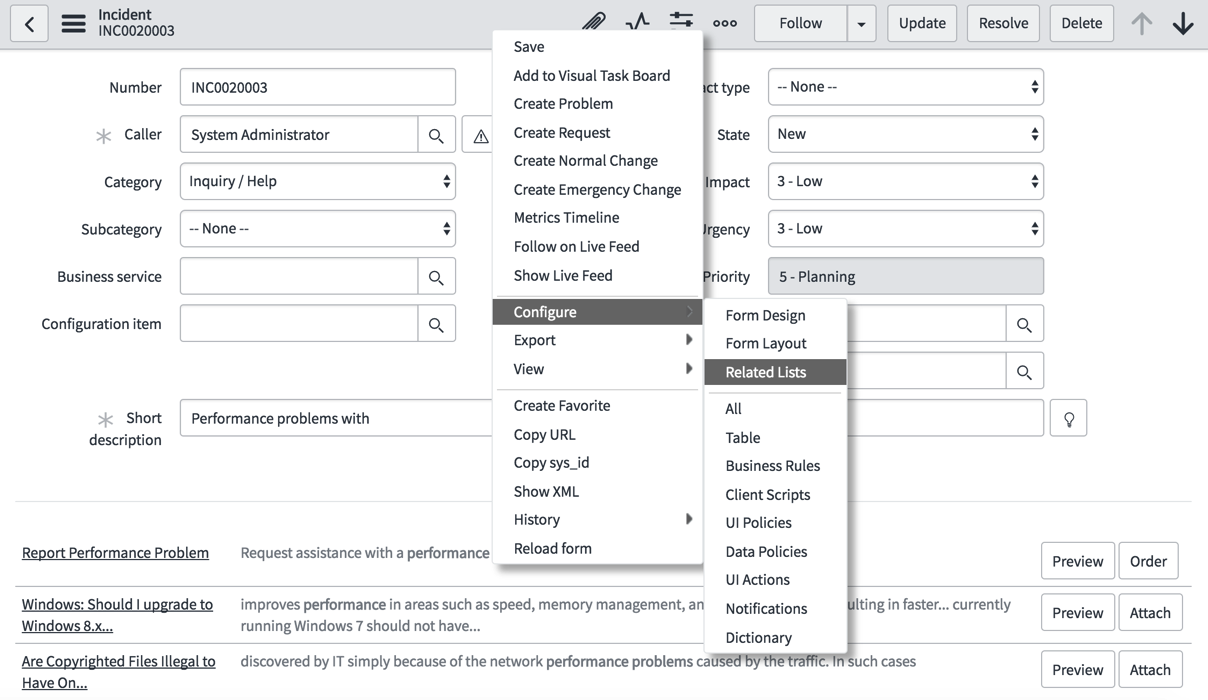
- It will take you to a page with a special UI referred to as slush-bucket.
Note
The slush-bucket UI is used on multiple pages in the ServiceNow platform. It allows you to select one or more records from a list of available records either by double-clicking or selecting a record and clicking on the > icon to add and < icon to remove.
- From the list of
Availablerelated lists in theIncidenttable, bringIncidents by Same Callerto theSelectedbucket:
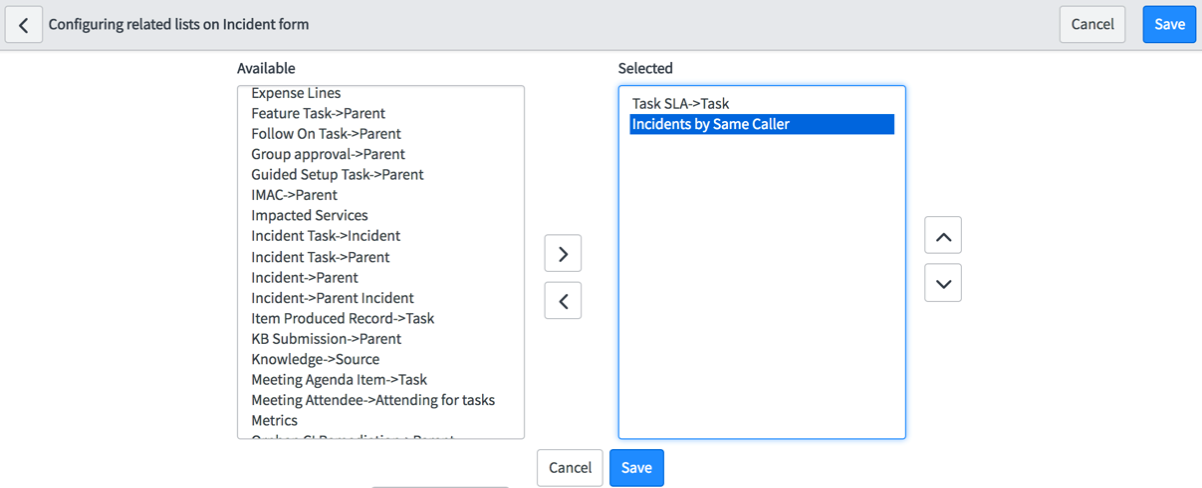
- Then, click on the
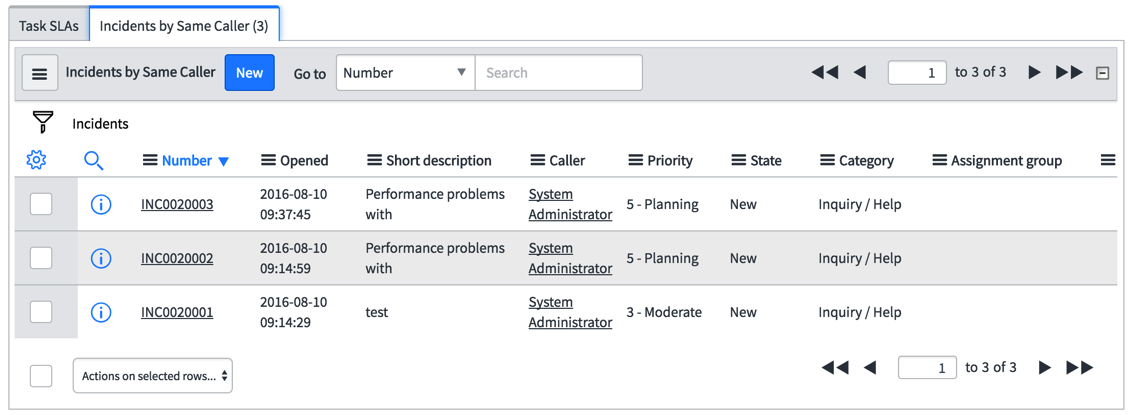
Savebutton and the system will take you to theIncidentform again, where you can scroll to the bottom of the page to see theIncidents by Same Callerrelated list added to the form:
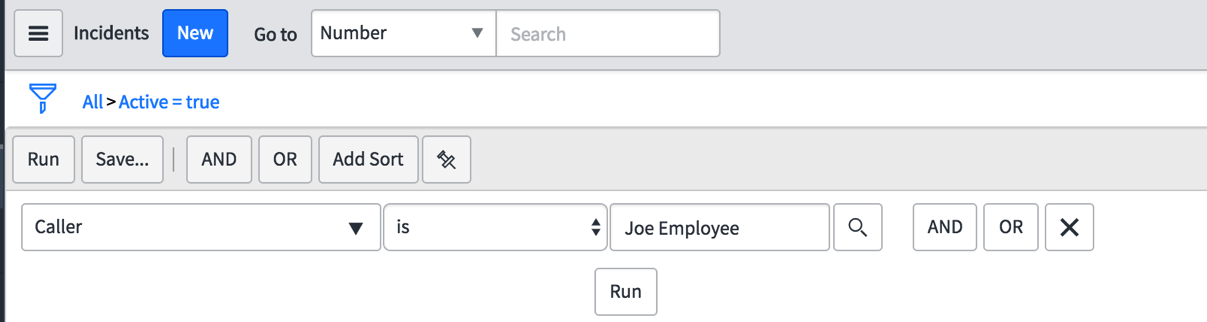
Dot-walking is a concept within ServiceNow that enables you to drill down to records, as in the Filter UI. When you are in the List of Records modules page, you usually end up using the Filter UI. The Filter UI lists all columns in the table. Like the Incident table, it lists Number, short description, created date, caller, and so on. Suppose we want to list all incidents by a Caller named Joe Employee. Using the Filter UI, it is quite easy to do this - simply select the Caller field as one of the filters and set the search value as Joe Employee:
But what if we want to list records based on Callers who are from the sales department? We do not have a department field in the Incident table but we do have such a field in the user table. As we have learnt before in this chapter, the Caller field is of type reference and it is referring to a record in the users table. So, in order to list all Incidents of Callers who are from sales, we will employ a feature available in all Filter UIs called dot-walking:

ServiceNow instance comes with many Service Management applications, which follow the ITIL v3 framework and allow you to manage processes such as incident management, change management, problem management, knowledge management along with configuration and assets management and service-level management.
These processes help in managing the life cycle of a ticket and are used in almost all IT service organizations. When you call your IT service desk and tell them that your Microsoft Outlook or some other software on your computer is not working properly, you are actually reporting an incident.
The Service Desk member (agent) will log an incident (ticket) on your behalf (IT customer) - provide you with an incident (ticket) number, and mention you as the caller, so that they can easily identify who reported the incident. People working with the Incident Management team are responsible for working on incidents. They will update the ticket as and when some work is done on the ticket so as to keep you informed about the progress. The service desk agents can quickly resolve the incident by looking for any existing relevant knowledge articles stored in the knowledge management database.
If the Incident Management team is able to resolve the incident, they will mark the ticket as resolved and you (the customer who reported the incident), can close the ticket. If you are unsatisfied with the work done, re-open the ticket or the ticket will auto close in about 3 days (default) if you do not take any action.
If the Incident Management team cannot resolve an incident, it is then assigned to the Problem Management team and a problem ticket is created, which is usually linked to the original Incident ticket. The task of the Problem Management team is to find the root cause of the issue and try to fix it permanently. They are usually senior level team members working with the IT Support Desk.
In cases where the Incident or Problem Management team cannot resolve the ticket or a change is required to close the ticket, a change request is initiated and the Change Management team is assigned to work on it. A change request goes through multiple levels of workflow and approvals. Approvals may be required in order to change or procure new software or hardware. Also, changing critical hardware like a router, email server, web server, or upgrading to a newer version may affect one or more client/customers. It is the duty of the Change Management team to ensure a smooth transition while lowering the effect on normal business functions.
Tickets (incident, problem, and change requests) are usually affected by Service Level Agreements. An SLA is an agreement between the customer and your IT support desk. ServiceNow allows administrators to define any number of SLAs based on any condition using the SLA definitions modules. If a ticket is resolved within a specified amount of time in the SLA, the ticket is said to have achieved the SLA, and if it fails to be resolved within the specified time, it is said to have breached the SLA. The Service Level Management application within the platform allows administrators to easily define multiple scenarios when Service Level Agreements (SLA), Operation Level Agreements (OLA), and under-pinning contracts get attached to a ticket.
ServiceNow also offers a means to automatically calculate priority of a ticket based on Priority Lookup Rules. If impact (for example, number of components depending on an item) is high and urgency is high, then we assume that priority is critical. Similarly, ServiceNow also offers a means to auto-assign tickets based on any condition using the Assignment Rules. Example: Suppose the category of an incident ticket is Network, in such cases, we can always automatically assign such tickets to a network group.
Another important application under Service Management is configuration and asset management. Configuration Management allows you to maintain a record for all configuration items in your organization like computers, laptops, routers, servers, racks, hard disk, network attached storage, printers, along with software component records like Apache, IIS, JBoss, SAP, MySQL, Oracle database instances, and so on.
Asset management, on the other hand, allows you to store software licenses and agreements and a list of hardware consumables like keyboard, mouse, and computers along with details like the user it has been assigned to.
In ServiceNow, applications represent packaged solutions designed to deliver and manage a business process like Incident Management, Change Management, Problem Management, and Knowledge Management:
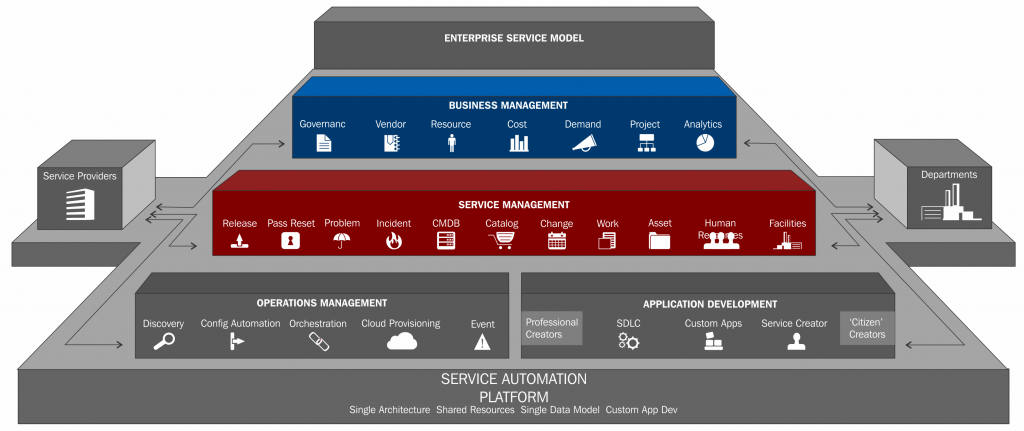
The ServiceNow platform has four major constituents - often referred to as a single source of truth by leaders at ServiceNow, Inc:
- Single architecture
- Shared resources
- Single data model
- Custom app development
Every application in ServiceNow follows the same architecture consisting of one or more modules and pages accessing data from various sources and tables. ServiceNow offers several out-of-the-box standard applications such as incident, change, problem, and knowledge management - and all of these standard applications share the same common architecture. Each application in ServiceNow has one of more of these components: application record, tables, UI elements, application files, and integration services. We will be digging deep into these components in Chapter 4, Application Scopes.
ServiceNow applications utilize system resources that are shared by all applications. These include user interface, security access control, workflow engines, reporting, and notification handlers along with system resources such as database, storage, and memory.
Each ServiceNow instance has its own database and is used to store data in tables comprised of various columns. While each application has their specific set of tables and columns, there are some tables like users, cmdb_ci, and tasks shared by many different applications. All records stored in tables are structured quite similarly with the column sys_id as the unique primary key thus enabling a single system of records that correlates all business services and processes throughout the enterprise.
While working on the ServiceNow platform, developers do not have to worry about how the database is set up or how tables are structured. On the other hand, administrators have access to many data management tools, giving them enough control over tables and data stored in them Chapter 3, Data Management.
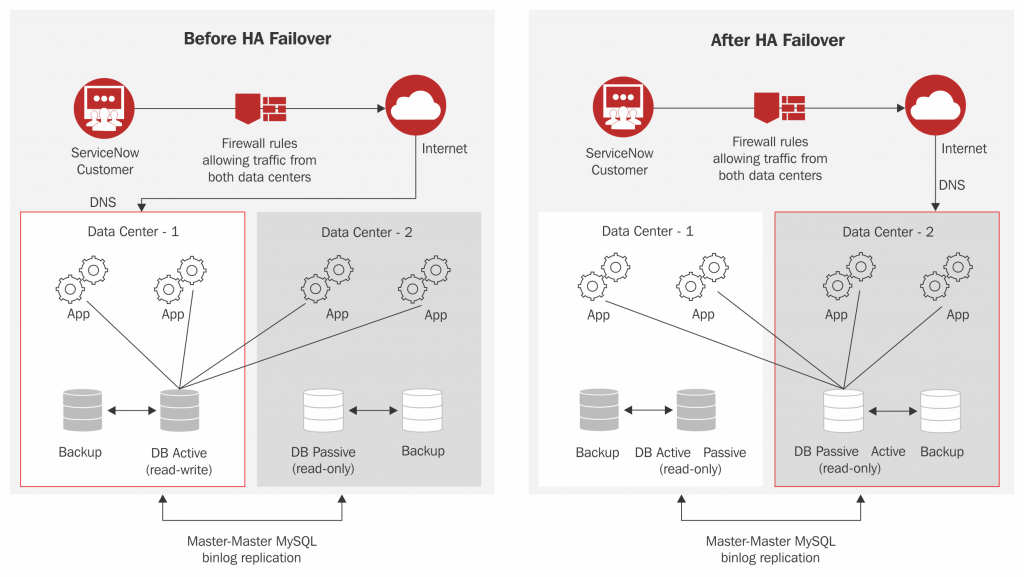
One of the most important contributing factors to the success of ServiceNow and reasons why enterprises trust it, is their Advanced High Availability (AHA) architecture. It is one of the key elements of ServiceNow; being able to offer a true enterprise cloud. Their multi-instance architecture along with Advanced High Availability is designed exclusively by ServiceNow to meet and exceed their enterprise customer's stringent requirements surrounding data security, availability, and performance.
ServiceNow's datacenters are designed to be available 24/7, 365 days a year and all data center components like servers and network devices are redundant and have multiple network paths to avoid a single point of failure. They back customer's production instances with multiple connections to the internet and load balance them within each data center. Furthermore, database servers in one data center are asynchronously replicated in real time to a peer data center within the same geographic region:
As of writing this book, ServiceNow operates a total of 16 data centers (eight pairs) in the following geographic locations:
- Asia Pacific Japan (APJ)
- Australia
- Europe
- Swiss (country-specific)
- Middle East and Africa (EMEA)
- North America:
- America
- Canada
- South America
Furthermore, to ensure data is never lost, ServiceNow conducts regular backups. The backup cycle consists of four weekly full backups and the past 6 days of daily, differential backups that provide 28 days of backups. ServiceNow doesn't rely on tapes and stores backup data to disk. Also, no backups are sent off site.