

Now you are perfectly familiarized with the Facebook login process and Graph API usage. But to allow for a safer approach to get user authorization to retrieve contacts (or friends) from Facebook, this chapter presents how to use the server side approach which maps directly to the Authorization Code grant type from the OAuth 2.0 specifications.
For this recipe, we need to create a simple web application in the same way we did for client-implicit. As we will develop an application which interacts with Facebook at the server side, we are supposed to write a lot of code. But instead of writing too much code, let's use the Spring Social Facebook project.
There is an important step to perform, similar to what we did for client-implicit; as the application is a Facebook client we need to register a new application.
Follow the steps below to create a client application to integrate with Facebook using the server-side flow from OAuth 2.0:
- Go to https://developers.facebook.com/apps/ and add a new application by clicking on
Add a New App. - Register a new client application on Facebook with the
Display Namesocial-authcode.
- You will be guided to select one Facebook product. So, choose
Facebook Loginby clicking onSet Upand then chooseWebas a platform. - You will be asked to enter the site URL, which might be
http://socialauthcode.test/. - After creating the application on Facebook, click on
Facebook Loginon the left panel to configure a valid redirect URI, which should behttp://localhost:8080/connect/facebook. - Click on
Dashboardon the left panel so you can retrieve the App ID and App Secret which map toclient_idandclient_secret, as you may already know, and grab the credentials to use later when implementing the client application. - Now let's create the initial project using Spring Initializr, as we did for other recipes in this book. Go to https://start.spring.io/ and define the following data:
- Set up the
Groupascom.packt.example - Define the
Artifactassocial-authcode - Add
WebandThymeleafas the dependencies for this project
- Set up the
- Import the project to your IDE. When using Eclipse, just import it as a Maven project.
- Now add the following dependencies into the
pom.xmlfile to add support for Spring Social Facebook:
 <dependency>
   <groupId>org.springframework.social</groupId>
   <artifactId>spring-social-config</artifactId>
</dependency>
<dependency>
   <groupId>org.springframework.social</groupId>
   <artifactId>spring-social-core</artifactId>
</dependency>
<dependency>
   <groupId>org.springframework.social</groupId>
   <artifactId>spring-social-web</artifactId>
</dependency>
<dependency>
   <groupId>org.springframework.social</groupId>
   <artifactId>spring-social-facebook</artifactId>
</dependency>
- Create an HTML file named
friends.htmlinside the templates directory located withinsrc/main/resources, as follows:

- Open the file
friends.htmland add the following content:
<!DOCTYPE html>
<html xmlns:th="http://www.thymeleaf.org">
<head>
   <title>Friends</title>
</head>
<body>
   <h3>Hello, <span th:text="${facebookProfile.name}">User</span>!</h3>
   <h4>Your friends which also allowed social-authcode:</h4>
   <div th:each="friend:${friends}">
         <b th:text="${friend.id}">[id]</b> - <b th:text="${friend.name}">[name]</b>
         <hr/>
   </div>
</body>
</html>- Now, we need URL mapping so the previous HTML file can be rendered. To do this, create a new Java class named
FriendsController.javainside the packagecom.packt.example.socialauthcode, with the following content:
@Controller @RequestMapping("/")
public class FriendsController {
    @GetMapping
    public String friends(Model model) { return "friends"; }
} - As you may realize, the template
friends.htmlrelies on an object namedfacebookProfileand another namedfriends. The objectfacebookProfilemust have the name attribute and thefriendsobject must be a list of objects which haveidandnameproperties. The good news is that we don't have to declare classes for these objects because Spring Social already provides them. We just need to have a valid user connection to start using these objects, so add the following attributes inside theFriendsControllerclass:
@Autowired
private Facebook facebook;
@Autowired
private ConnectionRepository connectionRepository;
- With the class
ConnectionRepositorywe can save or retrieve user connections with any provider (only Facebook matters now). Let's take advantage of this class to know if there is any user connected with Facebook and if not, we must redirect the user so she can authorize thesocial-authcodeof the application to retrieve protected resources (her friends). Replace the code fromfriendsmethod of theFriendsControllerclass with the code presented in the following code:
@GetMapping
public String friends(Model model) {
    if (connectionRepository.findPrimaryConnection(Facebook.class) == null) {
        return "redirect:/connect/facebook";
    }
    return "friends";
}- Now, add the following source code after the if block, that checks for a connection. This new block of code will be executed when there is a user connected to Facebook (when importing
UserandReferenceclasses, make sure to import fromorg.springframework.social.facebook.apipackage):
String [] fields = { "id", "email", "name" };
User userProfile = facebook.fetchObject("me", User.class, fields);

model.addAttribute("facebookProfile", userProfile);
PagedList<Reference> friends = facebook.friendOperations().getFriends();
model.addAttribute("friends", friends); - Although this short method executes all that's needed to retrieve the user's profile and contacts using the Authorization Code grant type, you must create some configuration classes. To better group the configuration classes, create a new package called
facebookinsidecom.packt.example.socialauthcode, which will accommodate the following classes: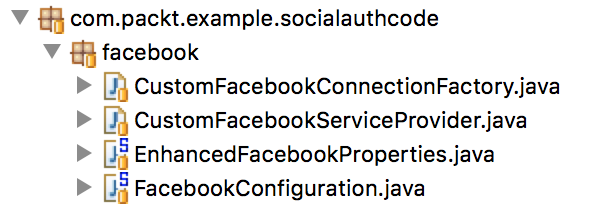
- Create the class
EnhancedFacebookProperties, as presented in the following code, inside the inner packagefacebook, so we can configure the application properties asclient_idandclient_secret(don't forget to create the respective getters and setters for each attribute):
@Component
@ConfigurationProperties(prefix = "facebook")
public class EnhancedFacebookProperties {
   private String appId;
   private String appSecret;
   private String apiVersion;
   // getters and setters omitted for brevity
}- Before continuing creating the other classes, you must configure the
appSecretandapiVersionvalues so the applicationsocial-authcodeis able to request anaccess_token. As you may realize, the classEnhancedFacebookPropertiesis annotated with@ConfigurationPropertieswhich allows for defining the properties inside theapplication.propertiesfile, as follows:
facebook.app-id=1948923582021549
facebook.app-secret=1b4b0f882b185094a903e76a661c7c7c
facebook.api-version=2.9
- Now create the class
CustomFacebookServiceProvider, as follows. This class is responsible for creating a custom instance ofOAuth2Templateallowing us to effectively configure the Facebook API version which at the time of this writing was 2.9:
public class CustomFacebookServiceProvider extends
         AbstractOAuth2ServiceProvider<Facebook> {

   private String appNamespace;
   private String apiVersion;

   public CustomFacebookServiceProvider(
         String appId, String appSecret, String apiVersion) {
         super(getOAuth2Template(appId, appSecret, apiVersion));
         this.apiVersion = apiVersion;
   }

   private static OAuth2Template getOAuth2Template(
         String appId, String appSecret, String apiVersion) {
         String graphApiURL =
               "https://graph.facebook.com/v" + apiVersion + "/";

         OAuth2Template template = new OAuth2Template(
               appId, appSecret, "https://www.facebook.com/v" + apiVersion + "/dialog/oauth", graphApiURL + "oauth/access_token");

         template.setUseParametersForClientAuthentication(true);
         return template;
   }

   @Override
   public Facebook getApi(String accessToken) {
         FacebookTemplate template = new FacebookTemplate(
               accessToken, appNamespace);
         template.setApiVersion(apiVersion);
         return template;
   }

} - So that the
CustomFacebookServiceProvidercan be properly created, create the classCustomFacebookConnectionFactoryas presented in the following code:
public class CustomFacebookConnectionFactory extends
   OAuth2ConnectionFactory<Facebook> {
   public CustomFacebookConnectionFactory(String appId, String appSecret, String apiVersion) {
      super("facebook",
           new CustomFacebookServiceProvider(appId, appSecret, apiVersion),
           new FacebookAdapter());
   }
} - And finally create the class
FacebookConfigurationwith the following content:
@Configuration @EnableSocial
@EnableConfigurationProperties(FacebookProperties.class)
public class FacebookConfiguration extends SocialAutoConfigurerAdapter {
   @Autowired
   private EnhancedFacebookProperties properties;

   @Override
   protected ConnectionFactory<?> createConnectionFactory() {
         return new CustomFacebookConnectionFactory(this.properties.getAppId(),
             this.properties.getAppSecret(), this.properties.getApiVersion());
   }
}- If you look at the content of
FriendsController, you should see that this class is using an instance ofFacebookwhich provides the API to interact with Facebook Graph API. The instance ofFacebookmust be created through a Spring bean declared as follows inside theFacebookConfiguration(When importing theConnectionclass, make sure you import fromorg.springframework.social.connectpackage):
@Bean
@ConditionalOnMissingBean(Facebook.class)
@Scope(value = "request", proxyMode = ScopedProxyMode.INTERFACES)
public Facebook facebook(ConnectionRepository repository) {
   Connection<Facebook> connection = repository
         .findPrimaryConnection(Facebook.class);
   return connection != null ? connection.getApi() : null;
} - As we are using Spring Social, most redirection will be handled by the
ConnectControllerclass which is declared by Spring Social. But how does Spring Social know to build the redirect URI? We have not provided the application's domain. By default, Spring Social uses request data to build the redirect URL automatically. But as the application might be deployed behind a proxy, the provider won't be capable of redirecting the user back to the callback URL defined insideConnectController. To overcome this issue, declare the following method inside theFacebookConfigurationclass:
@Bean
public ConnectController connectController(
         ConnectionFactoryLocator factoryLocator,
         ConnectionRepository repository) {
   ConnectController controller = new ConnectController(factoryLocator, repository);
   controller.setApplicationUrl("http://localhost:8080");
   return controller;
}- This controller provides all we need to handle OAuth 2.0's authorization flow. It also allows the rendering of two views which by default are named
{provider}Connectand{provider}Connectedwhere the provider in this case isfacebook. To satisfy both views, create the following HTML files inside the foldertemplates/connectwithin thesrc/main/resourcesproject's directory, as follows:

- Now add the following content to
facebookConnect.html:
<html>
<head>
   <title>Social Authcode</title>
</head>
<body>
   <h2>Connect to Facebook to see your contacts</h2>

   <form action="/connect/facebook" method="POST">
         <input type="hidden" name="scope"
               value="public_profile user_friends" />
         <input type="hidden" name="response_type"
               value="code" />
          <div class="formInfo">
               Click the button to share your contacts
               with <b>social-authcode</b>
         </div>
         <p><button type="submit">Connect to Facebook</button></p>
   </form>

</body>
</html>- And now add the following content to
facebookConnected.html:
<html>
   <head><title>Social Authcode</title></head>
   <body>
         <h2>Connected to Facebook</h2>
         <p>Click <a href="/">here</a> to see your friends.</p>
   </body>
</html> - That's it. Now you can start the application by running the class
SocialAuthcodeApplication.
This chapter presented you with how to register your application and how to connect with Facebook through the use of the Authorization Code grant type. Because it's a server side flow, it is supposed to be more secure than using the client-side approach (that is, to use the Implicit grant type). But instead of writing the code to handle all the conversations between social-authcode and Facebook (the OAuth 2.0 dance) we are using Spring Social, which provides the ConnectController class which has the capability of starting the authorization flow as well as receiving all callbacks that must be mapped when registering the application.
To better understand how this application works, run the class SocialAuthcodeApplication as Java code and go to http://localhost:8080/ to see the page that will present you with the possibility of connecting to Facebook. Click on Connect to Facebook and you will be redirected to the Facebook authentication page (as per OAuth 2.0's specifications).
After authenticating the user, Facebook presents the user consent page presenting the scope the client application is asking for. Click on continue to grant the requested permission.
After granting permission for public_profile and friend_list scopes, the user must be redirected back to localhost:8080/connect with the authorization code embedded (which will be extracted and validated by ConnectController automatically).
Note that ConnectController will render the facebookConnected view by presenting the following page:
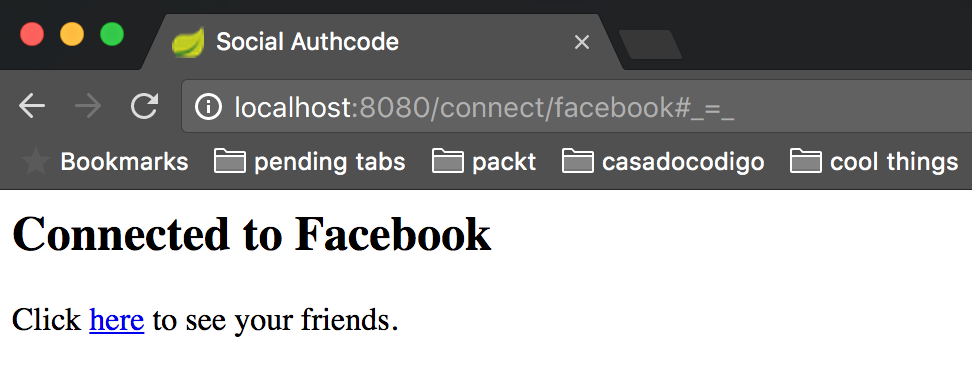
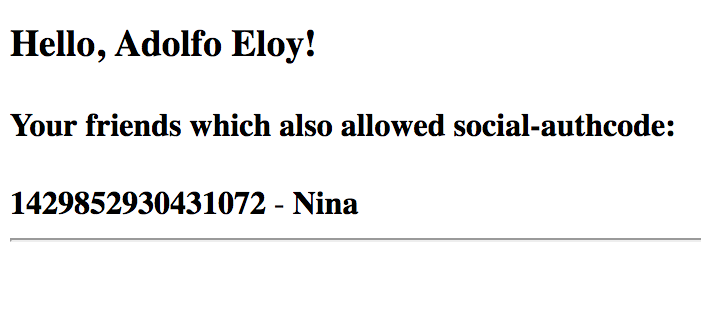
Click on the link here so the application can retrieve the friends which have also authorized social-authcode. You are supposed to see the following page with different content:
When registering the application on Facebook, we also configured the redirect URI to be http://localhost:8080/connect. Why not use http://localhost:8080/callback? By using the /connect endpoint, we take advantage of the endpoints defined by ConnectController. If you do not want to use Spring Social, you are supposed to validate the authorization code through the use of state parameters by yourself. When using Spring Social, we also take advantage of callbacks which are particular to the Facebook provider as De-authorize Callback URL's which might be set up in the settings from the Facebook Login product.
Even though we are using Spring Social Facebook we are still creating some classes that are also provided by Spring Social Facebook. As you could realize, the name of some classes begin with Custom. That's because we can customize how to create an instance of OAuth2Template as well as the FacebookTemplate class. It's important because the version supported at the time of this writing was 2.5, which was to be deprecated soon, and that's the version defined inside the Facebook provider for Spring Social.
There is an important thing to be mentioned about the interactions between the client and the OAuth 2.0 Provider, which in this case is Facebook. As you may realize, we are registering the redirect URI without using TLS/SSL. The URI we've registered is HTTP instead of HTTPS. All the recipes in this book are using such an approach just to ease the creation of the examples. Be sure to use HTTPS in production to protect the integrity and confidentiality of data transferred between your application and any other provider.
Another valuable improvement which might be done is to use a Relational Database Management System (RDBMS) to persist connections with providers. As the application does not explicitly define the strategy for connection persistence, Spring Social provides the in-memory version, so whenever you restart your server the user's connections will be lost. If you want to try using a database, you might declare a bean of type JdbcUsersConnectionRepository, and create the following table within the database of your choice:
create table UserConnection (userId varchar(255) not null,
    providerId varchar(255) not null,
    providerUserId varchar(255),
    rank int not null,
    displayName varchar(255),
    profileUrl varchar(512),
    imageUrl varchar(512),
    accessToken varchar(512) not null,
    secret varchar(512),
    refreshToken varchar(512),
    expireTime bigint,
    primary key (userId, providerId, providerUserId));
create unique index UserConnectionRank on UserConnection(userId, providerId, rank);
To get more details about this, look at Spring Social's official documentation at http://docs.spring.io/spring-social/docs/1.1.4.RELEASE/reference/htmlsingle/#section_establishingConnections.