

Installation of OpenStack using an orchestration and configuration tool such as Ansible performs a lot of tasks that would otherwise have to be undertaken manually. However, we can only use an orchestration tool if the servers we are deploying to are configured in a consistent way and described to Ansible.
The following section will describe a typical server setup that uses two sets of active/passive bonded interfaces for use by OpenStack. Ensure that these are cabled appropriately.
We assume that the following physical network cards are installed in each of the servers; adjust them to suit your environment:
p2p1andp2p2p4p1andp4p2
We assume that the host network is currently using p2p1. The host network is the basic network that each of the servers currently resides on, and it allows you to access each one over SSH. It is assumed that this network also has a default gateway configured, and allows internet access. There should be no other networks required at this point as the servers are currently unconfigured and are not running OpenStack services.
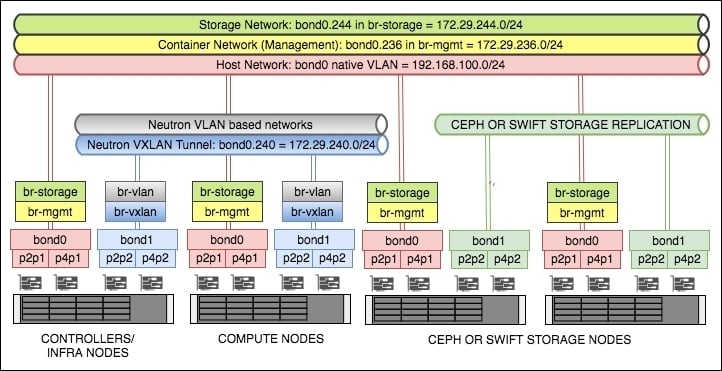
At the end of this section, we will have created the following bonded interfaces:
bond0: This consists of the physical interfacesp2p1andp4p1. Thebond0interface will be used for host, OpenStack management, and storage traffic.bond1: This consists of the physical interfacesp2p2andp4p2. Thebond1interface will be used for Neutron networking within OpenStack.
We will have created the following VLAN tagged interfaces:
bond0.236: This will be used for the container networkbond0.244: This will be used for the storage networkbond1.240: This will be used for the VXLAN tunnel network
And the following bridges:
br-mgmt: This will use thebond0.236VLAN interface, and will be configured with an IP address from the172.29.236.0/24range.br-storage: This will use thebond0.244VLAN interface, and will be configured with an IP address from the172.29.244.0/24range.br-vxlan: This will use thebond1.240 VLANinterface, and will be configured with an IP address from the172.29.240.0/24range.br-vlan: This will use the untaggedbond1interface, and will not have an IP address configured.
Note
Tip: Ensure that your subnets are large enough to support your current requirements as well as future growth!
The following diagram shows the networks, interfaces, and bridges set up before we begin our installation of OpenStack:
We assume that each server has Ubuntu 16.04 installed.
Log in, as root, onto each server that will have OpenStack installed.
Configuration of the host's networking, on a Ubuntu system, is performed by editing the /etc/network/interfaces file.
First of all, ensure that we have the right network packages installed on each server. As we are using VLANs and Bridges, the following packages must be installed:
        apt update
        apt install vlan bridge-utils
Now edit the
/etc/network/interfacesfile on the first server using your preferred editor:vi /etc/network/interfacesWe will first configure the bonded interfaces. The first part of the file will describe this. Edit this file so that it looks like the following to begin with:
    # p2p1 + p4p1 = bond0 (used for host, container and storage)
    auto p2p1
    iface p2p1 inet manual
      bond-master bond0
      bond-primary p2p1
    auto p4p1
    iface p4p1 inet manual
      bond-master bond0
    # p2p2 + p4p2 = bond1 (used for Neutron and Storage Replication)
    auto p2p2
    iface p2p2 inet manual
      bond-master bond1
      bond-primary p2p2
    auto p4p2
    iface p4p2 inet manual
      bond-master bond1
Now we will configure the VLAN interfaces that are tagged against these bonds. Continue editing the file to add in the following tagged interfaces. Note that we are not assigning IP addresses to the OpenStack bonds just yet:
    # We're using bond0 on a native VLAN for the 'host' network.
    # This bonded interface is likely to replace the address you
    # are currently using to connect to this host.
    auto bond0
    iface bond0 inet static
      address 192.168.100.11
      netmask 255.255.255.0
      gateway 192.168.100.1
      dns-nameserver 192.168.100.1 # Update to suit/ensure you can resolve DNS
    auto bond0.236  # Container VLAN
    iface bond0.236  inet manual
    auto bond1.240  # VXLAN Tunnel VLAN
    iface bond1.240  inet manual
    auto bond0.244  # Storage (Instance to Storage) VLAN
    iface bond0.244  inet manual
Note
Tip: Use appropriate VLANs as required in your own environment. The VLAN tags used here are for reference only.
Ensure that the correct VLAN tag is configured against the correct bonded interface.
bond0is for host-type traffic,bond1is predominantly for Neutron-based traffic, except for storage nodes, where it is then used for storage replication.We will now create the bridges, and place IP addresses on here as necessary (note that
br-vlandoes not have an IP address assigned). Continue editing the same file and add in the following lines:# Container bridge (br-mgmt) auto br-mgmt iface br-mgmt inet static address 172.29.236.11 netmask 255.255.255.0 bridge_ports bond0.236 bridge_stp off # Neutron's VXLAN bridge (br-vxlan) auto br-vxlan iface br-vxlan inet static address 172.29.240.11 netmask 255.255.255.0 bridge_ports bond1.240 bridge_stp off # Neutron's VLAN bridge (br-vlan) auto br-vlan iface br-vlan inet manual bridge_ports bond1 bridge_stp off # Storage Bridge (br-storage) auto br-storage iface br-storage inet static address 172.29.244.11 netmask 255.255.255.0 bridge_ports bond0.244 bridge_stp off
Save and exit the file, then issue the following command:
restart networkingAs we are configuring our OpenStack environment to be as highly available as possible, it is suggested that you also reboot your server at this point to ensure the basic server, with redundant networking in place, comes back up as expected:
rebootOnce all the servers are done, ensure that your servers can communicate with each other over these newly created interfaces and subnets. A test like the following might be convenient:
apt install fping
fping -a -g 172.29.236.0/24
fping -a -g 172.29.240.0/24
fping -a -g 172.29.244.0/24
We have configured the physical networking of our hosts to ensure a good known state and configuration for running OpenStack. Each of the interfaces configured here is specific to OpenStack—either directly managed by OpenStack (for example, br-vlan) or used for inter-service communication (for example, br-mgmt). In the former case, OpenStack utilizes the br-vlan bridge and configures tagged interfaces on bond1 directly.
Note that the convention used here, of VLAN tag ID using a portion of the subnet, is only to highlight a separation of VLANs to specific subnets (for example, bond0.236 is used by the 172.29.236.0/24 subnet). This VLAN tag ID is arbitrary, but must be set up in accordance with your specific networking requirements.
Finally, we performed a fairly rudimentary test of the network. This gives you the confidence that the network configuration that will be used throughout the life of your OpenStack cloud is fit for purpose and gives assurances in the event of a failure of a cable or network card.