

By default, Windows Server does not come with Hyper-V installed. In order to start using the virtual environment, Hyper-V needs to be enabled. Even with its straightforward steps, it is important to understand how it works after the setup and what has changed in Windows architecture.
There are different methods to install Hyper-V. The most common one is through the graphical interface.
To get ready to enable Hyper-V you must be logged on with administrative privileges.
The following steps will demonstrate how to enable the Hyper-V Role for Windows Server and what is changed in the Windows architecture after its installation.
On the Start Screen select Server Manager.
In the Server Manager Dashboard, click on Add roles and features.
In the Add Roles and Feature Wizard, click on Next three times.
On the next screen, Server Roles page, select Hyper-V, as shown in the next screenshot, and click on Next three times.

In the Virtual Switches window, select the network adapter you want to use on Hyper-V. You can add, remove, and modify the virtual switches after the Hyper-V installation through Hyper-V Manager.
On the Virtual Machine Migration page, check the Allow this server to send and receive live migration of virtual machines option if you want to enable live migration requests, then click on Next.
In the last Hyper-V installation page called Default Stores, specify the default location for virtual disks and virtual machine configuration files, click on Next and then Install to start the installation process.
Reboot the server after the installation.
The process that you have performed to install Hyper-V is quite simple, but it changes the processor architecture by creating a new privileged layer called ring -1 that runs under the normal layers. The setup process, completed in the previous task, installs the Microsoft Hypervisor on this layer to make sure that Hyper-V has more privilege than Windows itself. Basically, the host operating system runs above the Hypervisor together and at the same level as the virtual machines. The host turns into a special virtual machine containing the virtualization stack, responsible to manage all the virtual machines from it. The following diagram illustrates Hyper-V being installed in the ring -1 and all the partitions running under it.
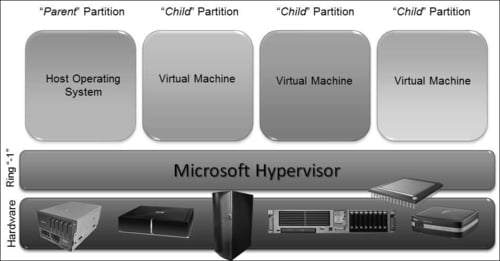
After the first reboot, the Windows boot (winload.exe) loads the driver (hvboot.sys) responsible to verify the processor that is running and if it supports virtualization. Then the Hypervisor image file is loaded. The host OS and the virtual machines are called
partitions. Because they run at the same privileged access above the Hypervisor, the host OS is known as
parent partition and the virtual machines are known as
child partitions.
For automation and fast installation, you can also enable Hyper-V using command lines. You can do that by using the command line ocsetup, Servermanagercmd, or Windows PowerShell.
The Creating and managing virtual switches recipe in Chapter 3, Managing Disk and Network Settings
The Hyper-V architecture components recipe in Appendix A