
After we have introduced the resource pool concept and requirements, we can start discussing how to create a resource pool in XenServer.
Resource pools can be created using either the XenCenter management console or the xe command-line interface (CLI). When you join a new host to a resource pool, the joining host synchronizes its local database with the pool-wide one, hosted and managed by the pool master, and inherits some settings from the pool:
VM, local, and remote storage configuration is added to the pool-wide database.
The joining host inherits existing shared storage repositories in the pool and appropriate PBD (Physical Block Devices) records are created, so that the new host can access existing shared storage automatically.
Networking information is partially inherited by the joining host: The structural details of NICs, VLANs, and bonded interfaces are all inherited, but policy information is not. This policy information, which must be re-configured, includes:
The IP addresses of management NICs, which are preserved from the original configuration.
The location of the primary management interface, which remains the same as the original configuration. For example, if the other pool hosts have their primary management interfaces on a bonded interface, then the joining host must be explicitly migrated to the bond once it has joined.
Dedicated storage NICs, which must be re-assigned to the joining host from XenCenter or the CLI, and the PBDs re-plugged to route the traffic accordingly.
Concepts related to storage and networking will be discussed in Chapter 2, Managing User Authentication, and Chapter 5, Managing Virtual Machines.
Now, we are ready to create a XenServer resource pool. Two hosts will be part of this pool, xenserver1 and xenserver2.
Host xenserver1 is configured with IP address 192.168.0.1 and host xenserver2 is configured with IP address 192.168.0.2.
We will configure the resource pool using XenCenter and CLI.
Usually XenCenter is a faster and user-friendly method for doing this task, so we will create the resource pool using XenCenter first:
Start XenCenter:

Click on Server | Add to add the
xenserver1host to the console.Type the IP address of
xenserver1and password for the userroot.
The first time you add a new host, the Save and Restore Connection State dialog box appears. This enables you to set your preferences for storing your host connection information and automatically restoring server connections.
Now, the
xenserver1host is visible on the XenCenter console:
Repeat the previous steps to add the
xenserver2host.Click on Pool | New Pool.
Type a name for the pool and, optionally, a description. Select the master and click on the servers that will be joined. In this example, we named the pool
XenPooland the masterxenserver1.
Click on Create Pool. The new pool will be created and configured:

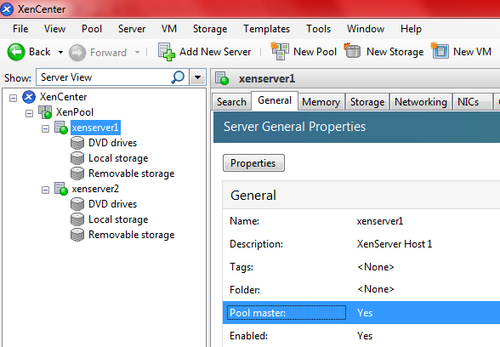
If you want to check if a XenServer host is the pool master for a pool, look at the Pool Master property available on the General tab of the host in XenCenter. If the value is Yes in the
Pool Master property the host is acting as the pool master for the pool. Also, when you connect to a XenServer pool, the first host displayed is the pool master. For example, if xenserver2 is the pool master of the pool, xenserver2 will be displayed first in XenCenter.
Now it is time to discover how to designate a pool master using the xe command-line interface. You can open the xe CLI from XenCenter by clicking on the Console tab or from a computer with XenCenter installed executing the xe.exe command from the path C:\Program Files\Citrix\XenCenter:
xe -s <server> -u <username> -pw <password> [-p <port>] <command> <arguments>
where:
The server parameter is used to specify the hostname or IP address
The username and password parameters are used to specify credentials for logging in
An optional port parameter can be used to specify the agent port on the remote XenServer Host (defaults to 443)
The command parameter is the
xenservercommand you want to executeThe arguments parameter is the argument related to the
xenservercommand you want to execute
In the following example, we use the xe CLI from XenCenter:
From XenCenter, select
xenserver1and click on the Console tab:
Press Enter to log in to the console.
XenServer hosts belong to an unnamed pool by default. To create your first resource pool, rename the existing nameless pool using the following command:
xe pool-param-set name-label=<"New Pool"> uuid=<pool_uuid>where
name-labelis the name to assign to the pool anduuidis the the unique identifier/object reference for the pool. To find the UUID for the pool, press the Tab key on your keyboard.We will run following command to create the pool named
XenPool:xe pool-param-set name-label="XenPool" uuid=8eaa281f-c7ae-20d3-f37d-00e8596e4bc4
Now we have to join the
xenserver2host to the pool. To do this, we will open the console onxenserver2and execute the following command:xe pool-join master-address=<host1> master-username=<administrator_username> master-password=<password>where
master-addressis the fully-qualified domain name or IP address of the pool master,master-usernameis the name of the master's administrator (root), andmaster-passwordmust be the administrator password set when the XenServer host acting as master was installed.We will run the following command to join
xenserver2to theXenPool:xe pool-join master-address=192.168.0.1 master-username=root master-password=xenserver
Host
xenserver2will join the pool, as shown in the following screenshots:

Note
You can use a program such as "PuTTY" to connect to XenServer hosts and execute console commands. You can download it from http://www.chiark.greenend.org.uk/~sgtatham/putty/download.html.
In the real world, virtual infrastructure grows according to the needs of the enterprise. It is often difficult to acquire multiple servers with the exact same CPUs and so minor variations are permitted. If you have a XenServer host in your environment with a different CPU you can join it to the pool by forcing the operation using the following xe command:
xe pool-join master-address=<host1> master-username=<administrator_username> master-password=<password> --force
where:
master-addressis the fully-qualified domain name or IP address of the pool mastermaster-usernameis the name of the master's administrator (root)master-passwordis the administrator password set when the XenServer host acting as master was installed