

SignalR sets a clear separation between the actual messaging runtime and the hosting environment. Although the host could be any plain old .NET-based process, the most natural context where you can add a SignalR Hub is inside an ASP.NET project, which is the topic of this recipe. Later in this chapter, we'll see how to host it in a different context.
This recipe will concentrate on the server-side; however, some minimal client-side code will also be added to be able to fully demonstrate a complete, although trivial, client-server connection.
There are three main types of ASP.NET projects:
A Web Forms application
An MVC application
A website
The process of creating them is a fairly common task, so we are going to skip the details. If you want more information, you can refer to the Appendix A, Creating Web Projects at the end of the book and check how to generate them step by step. In this recipe, we will be covering all of them at once, highlighting the points where there's some difference across those types.
Note
In order to show a complete sample for all three cases, the code that comes with this book will contain three separate projects, called Recipe01_WF (for the Web Forms sample), Recipe01_MVC (for the MVC project), and Recipe01_WS (for the website).
Before proceeding, please pick one of them and create your project in Visual Studio 2013.
We're ready to actually start adding the SignalR bits. Let's start with the Hub with the following steps.
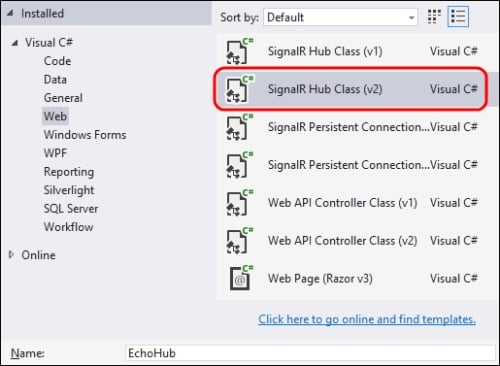
From the Project menu, select Add New Item (you can also use the project context menu from Solution Explorer or the Ctrl + Shift + A keyboard shortcut), click on the Web folder, and then select the SignalR Hub Class (v2) template; specify EchoHub as the name and click on OK as shown in the following screenshot. Make sure you have selected the v2 Version because we want to target SignalR 2.0.
Visual Studio will add a new file called EchoHub.cs with some boilerplate code inside.
Let's edit the file content to make it look like the following code snippet:
using System.Diagnostics;
using Microsoft.AspNet.SignalR;
using Microsoft.AspNet.SignalR.Hubs;
namespace Recipe01
{
    [HubName("echo")]
    public class EchoHub : Hub
    {
        public void Say(string message)
        {
            Trace.WriteLine(message);
        }
    }
}
Tip
Downloading the example code
You can download the example code files for all Packt books you have purchased from your account at http://www.packtpub.com. If you purchased this book elsewhere, you can visit http://www.packtpub.com/support and register to have the files e-mailed directly to you.
The following lists the important points here:
The necessary
usingdirectives are listed at the top of the file.The
EchoHubclass is derived fromHub, which comes fromMicrosoft.AspNet.SignalR.Hubsand makes the server-side SignalR API available to our class.The class is marked with the
HubNameattribute, which allows us to give the Hub a friendly name to be used by the clients; if we don't use theHubNameattribute, the Hub name will be the same as the class name (in this case, it would beEchoHub).Our Hub contains a method called
Say(). This is just a sample method we'll use to show how to expose Hub endpoints. On every call, it will just output the value of themessageparameter in the debugger Output window, or in any trace listener we may want to configure.
The class namespace is not so important. Here, I'm choosing the same name as the project name; it's the recommended way, but it does not have to be like that.
From the Project menu, select Add New Item again, click on the Web folder, and then select the OWIN Startup class template. Specify
Startupas the name and click on OK, as shown in the following screenshot:
Visual Studio will add a new file called
Startup.cswith some code inside it.Let's edit the file content to make it look like the following:
using Microsoft.Owin;
using Owin;
[assembly: OwinStartup(typeof(Recipe01.Startup))]
namespace Recipe01
{
    public class Startup
    {
        public void Configuration(IAppBuilder app)
        {
            app.MapSignalR();
        }
    }
}
The following lists the important points here:
SignalR 2.0 uses Open Web Interface (OWIN) for .NET as the standard interface between .NET web servers and web applications, enabling a level of indirection and abstraction that keeps your project from directly tying to any specific hosting platform. This is the technical foundation that actually enables SignalR to be hosted from both web applications and traditional .NET processes, as we'll see later.
Every OWIN application must have a
Startupclass that follows specific conventions. In particular, aConfiguration()method with the signature shown in the preceding code must be made available.The assembly-level attribute
OwinStartupis there to declare that ourStartupclass will be used to bootstrap every OWIN-based asset contained in all the loaded assemblies; there are other ways to declare the rightStartupclass to load, but we'll see them in the future recipes.Inside the
Configuration()method, we start up SignalR using an appropriate extension method (MapSignalR()) made available by the SignalR core inside theOwinnamespace; a call to theMapSignalR()method will expose an endpoint called/signalr, which the clients will use to connect to the server.
We're done! Our first SignalR Hub is ready to be called. However, as already mentioned, in order to see it in action, we need a client. Let's build one inside our web application using the JavaScript SignalR client.
Let's add a web page that we'll use as the place to put our basic client to test our Hub. This is where the recipe differs across the different project types. The most natural choices are as follows:
Web form for a Web Forms application: From the Project menu, select Add New Item, click on the Web folder, select the Web Form template (specifying, for example,
index.aspxas the name), and click on OK.Razor View for an MVC application: Let's first add a default controller named
HomeControllerand then a view for itsIndexdefault action, which will be calledindex.cshtml. Please refer to the Appendix A, Creating Web Projects if you want more details about these steps.HTML page for a website: From the Project menu, select Add New Item, click on the Web folder, select the HTML Page template (specifying, for example,
index.htmlas the name), and click on OK.
Visual Studio will create the specified file with some basic HTML content. Those files will slightly differ according to the type you picked earlier, but for now we're just interested in the content of the <head> section, which we'll modify to make it look like the following code:
    <script src="Scripts/jquery-2.1.0.js"></script>
    <script src="Scripts/jquery.signalR-2.0.2.js"></script>
    <script src="/signalr/hubs"></script>
    <script>
        $(function () {
            var hub = $.connection.echo;
            $.connection.hub
                .start()
                .done(function () {
                    hub.server.say('Hello SignalR!');
                });
        });
    </script>
We basically kept what was there and then we just added a few <script> blocks. We'll go into detail about this portion in the Connecting to a Hub from a JavaScript client recipe. So, for any questions you might have about this code, please hold on for a while! The only thing we anticipate here is that the special /signalr/hubs endpoint does not correspond to any file that you'll find in the project; nevertheless, it's correct and will be explained later on.
We can now launch the application from Visual Studio: a browser window will open, the page will be loaded, and the Say() method of the EchoHub class will be executed as soon as the page is completely loaded in the browser. We can prove this by observing the effect of the Trace.WriteLine(message); line of code on the Output debug window, where the message will be printed.
Let's review the main points of what we just did:
We added a
Hubclass. Any class available in the project that is derived fromHubis automatically discovered and exposed when SignalR is initialized callingMapSignalRin theStartupclass.The client page established a connection to our
EchoHubusing the JavaScript SignalR client library.When the connection is ready, we make a remote call to the
Say()method exposed by ourEchoHub.SignalR coordinates the two sides using the most appropriate connection strategy (more on that in future recipes), taking into account which is the HTTP server hosting the application and which web browser is used to run the client page; it gives us the feeling of a direct connection towards our server-side Hub, allowing us to call methods on it directly (the line
hub.server.say('Hello SignalR!');).