
There are many functions that are needed in Computer Vision. Some of them are simple, such as sorting, while others are more complex. Here, we will discuss how to use them with the JSFeat library and see several Computer Vision applications.
Sort algorithms are always helpful in any application. JSFeat provides an excellent way to sort a matrix. In addition to just sorting an array, it can even sort just part of the data. Let's see how we can do that:
First, we need to define a compare function, which is as follows:
var compareFunc = function (a, b) {
    return a < b;
};
Next, we do the sorting:
var length = mat.data.length;
jsfeat.math.qsort(mat.data, length / 3 * 2, length - 1, compareFunc);
The first parameter defines an array for sorting, the second and third are the starting index and the ending index, respectively. The final parameter defines the comparison function. You will see the following image:
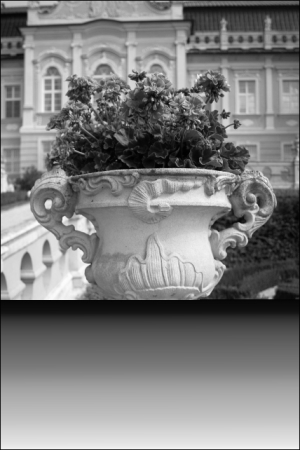
As we can see, the lower portion part of the image was sorted, looks good!
You will probably need a median function, which returns the number that separates the higher part of the data from the lower part. To understand this better, we need to see some examples:
var arr1 = [2, 3, 1, 8, 5];
var arr2 = [4, 6, 2, 9, -1, 6];
var median1 = jsfeat.math.median(arr1, 0, arr1.length - 1);
var median2 = jsfeat.math.median(arr2, 0, arr2.length - 1);
For the first array, the result is 3. It is simple. For the sorted array, number 3 just separates 1, 2 from 5, 8. What we do see for the second array, is the result of 4. Actually, different median algorithms may return different results; for the presented algorithm, JSFeat picks one of the array elements to return the result. In contrast, many approaches will return 5 in that case, since 5 represents the mean of two middle values (4, 6). Taking that into account, be careful and see how the algorithm is implemented.
Who wants to solve a system of linear equations? No one? Don't worry, it can be done very easily.
First, let's define a simple linear system. To start with, we define the linear system as Ax = B, where we know A and B matrices and need to find x:
var bufA = [9, 6, -3, 2, -2, 4, -2, 1, -2],
        bufB = [6, -4, 0];

var A = new jsfeat.matrix_t(3, 3, jsfeat.F32_t | jsfeat.C1_t, new jsfeat.data_t(bufA.length, bufA));
var B = new jsfeat.matrix_t(3, 1, jsfeat.F32_t | jsfeat.C1_t, new jsfeat.data_t(bufB.length, bufB));

jsfeat.linalg.lu_solve(A, B);
JSFeat places the result into the B matrix, so be careful if you want to use B somewhere else or you will loose your data. The result will look like this:
[2.000..., -4.000..., -4.000..]
Since the algorithm works with floats, we cannot get the exact values but after applying a round operation, everything will look fine:
[2, -4, -4]
In addition to this, you can use the svd_solve function. In that case, you will need to define an X matrix as well:
jsfeat.linalg.svd_solve(A, X, B);
Let us show you a more catchy illustration. Suppose you have an image that is distorted by perspective or you want to rectify an object plane, for example, a building wall. Here's an example:

Looks good, doesn't it? How do we do that? Let's look at the code:
var imgRectified = new jsfeat.matrix_t(mat.cols, mat.rows, jsfeat.U8_t | jsfeat.C1_t);
var transform = new jsfeat.matrix_t(3, 3, jsfeat.F32_t | jsfeat.C1_t);

jsfeat.math.perspective_4point_transform(transform,
        0, 0, 0, 0, // first pair x1_src, y1_src, x1_dst, y1_dst
        640, 0, 640, 0, // x2_src, y2_src, x2_dst, y2_dst and so on.
        640, 480, 640, 480,
        0, 480, 180, 480);
jsfeat.matmath.invert_3x3(transform, transform);
jsfeat.imgproc.warp_perspective(mat, imgRectified, transform, 255);
Primarily, as we did earlier, we define a result matrix object. Next, we assign a matrix for image perspective transformation. We calculate it based on four pairs of corresponding points. For example, the last, that is the fourth point of the original image, which is [0, 480], should be projected to the point of [180, 480] on the rectified image. Here, the first coordinate refers to X and the second to Y. Then, we invert the transform matrix to be able to apply it to the original image—mat variable. We pick the background color as white (255 for an unsigned byte). As a result, we get a nice image without any perspective distortion.