

We have been focusing so far on the versatility of JavaScript as the language of the browser. It speaks volumes about the brilliance of the language given that JavaScript has gained significant popularity as a language to program scalable server systems. In this chapter, we will look at Node.js. Node.js is one of the most popular JavaScript frameworks used for server-side programming. Node.js is also one of the most watched project on GitHub and has superb community support.
Node uses V8, the virtual machine that powers Google Chrome, for server-side programming. V8 gives a huge performance benefit to Node because it directly compiles the JavaScript into native machine code over executing bytecode or using an interpreter as a middleware.
The versatility of V8 and JavaScript is a wonderful combination—the performance, reach, and overall popularity of JavaScript made Node an overnight success. In this chapter, we will cover the following topics:
- An asynchronous evented-model in a browser and Node.js
- Callbacks
- Timers
- EventEmitters
- Modules and npm
Before we try to understand Node, let's try to understand JavaScript in a browser.
Node relies on event-driven and asynchronous platforms for server-side JavaScript. This is very similar to how browsers handle JavaScript. Both the browser and Node are event-driven and non-blocking when they use I/O.
To dive deeper into the event-driven and asynchronous nature of Node.js, let's first do a comparison of the various kinds of operations and costs associated with them:
|
L1 cache read |
0.5 nanoseconds |
|
L2 cache read |
7 nanoseconds |
|
RAM |
100 nanoseconds |
|
Read 4 KB randomly from SSD |
150,000 ns |
|
Read 1 MB sequentially from SSD |
1,000,000 ns |
|
Read 1 MB sequentially from disk |
20,000,000 ns |
These numbers are from https://gist.github.com/jboner/2841832 and show how costly Input/Output (I/O) can get. The longest operations taken by a computer program are the I/O operations and these operations slow down the overall program execution if the program keeps waiting on these I/O operations to finish. Let's see an example of such an operation:
console.log("1");
var log = fileSystemReader.read("./verybigfile.txt");
console.log("2");When you call fileSystemReader.read(), you are reading a file from the filesystem. As we just saw, I/O is the bottleneck here and can take quite a while before the read operation is completed. Depending on the kind of hardware, filesystem, OS, and so on, this operation will block the overall program execution quite a bit. The preceding code does some I/O that will be a blocking operation—the process will be blocked till I/O finishes and the data comes back. This is the traditional I/O model and most of us are familiar with this. However, this is costly and can cause terribly latency. Every process has associated memory and state—both these will be blocked till I/O is complete.
If a program blocks I/O, the Node server will refuse new requests. There are several ways of solving this problem. The most popular traditional approach is to use several threads to process requests—this technique is known as multithreading. If are you familiar with languages such as Java, chances are that you have written multithreaded code. Several languages support threads in various forms—a thread essentially holds its own memory and state. Writing multithreaded applications on a large scale is tough. When multiple threads are accessing a common shared memory or values, maintaining the correct state across these threads is a very difficult task. Threads are also costly when it comes to memory and CPU utilization. Threads that are used on synchronized resources may eventually get blocked.
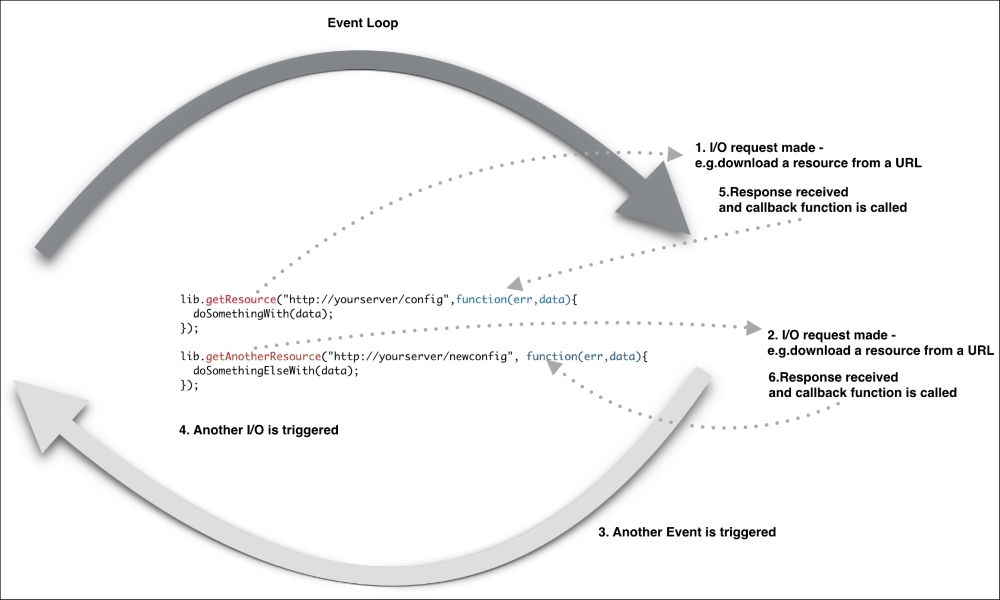
The browser handles this differently. I/O in the browser happens outside the main execution thread and an event is emitted when I/O finishes. This event is handled by the callback function associated with that event. This type of I/O is non-blocking and asynchronous. As I/O is not blocking the main execution thread, the browser can continue to process other events as they come without waiting on any I/O. This is a powerful idea. Asynchronous I/O allows browsers to respond to several events and allows a high level of interactivity.
Node uses a similar idea for asynchronous processing. Node's event loop runs as a single thread. This means that the application that you write is essentially single-threaded. This does not mean that Node itself is single-threaded. Node uses libuv and is multithreaded—fortunately, these details are hidden within Node and you don't need to know them while developing your application.
Every call that involves an I/O call requires you to register a callback. Registering a callback is also asynchronous and returns immediately. As soon as an I/O operation is completed, its callback is pushed on the event loop. It is executed as soon as all the other callbacks that were pushed on the event loop before are executed. All operations are essentially thread-safe, primarily because there is no parallel execution path in the event loop that will require synchronization.
Essentially, there is only one thread running your code and there is no parallel execution; however, everything else except for your code runs in parallel.
Node.js relies on libev (http://software.schmorp.de/pkg/libev.html) to provide the event loop, which is supplemented by libeio (http://software.schmorp.de/pkg/libeio.html) that uses pooled threads to provide asynchronous I/O. To learn even more, take a look at the libev documentation at http://pod.tst.eu/http://cvs.schmorp.de/libev/ev.pod.
Consider the following example of asynchronous code execution in Node.js:
var fs = require('fs');
console.log('1');
fs.readFile('./response.json', function (error, data) {
if(!error){
console.log(data);
});
console.log('2');In this program, we read the response.json file from the disk. When the disk I/O is finished, the callback is executed with parameters containing the argument's error, if any error occurred, and data, which is the file data. What you will see in the console is the output of console.log('1') and console.log('2') one immediately after another:
Node.js does not need any additional server component as it creates its own server process. A Node application is essentially a server running on a designated port. In Node, the server and application are the same.
Here is an example of a Node.js server responding with the Hello Node string when the http://localhost:3000/ URL is run from a browser:
var http = require('http');
var server = http.createServer();
server.on('request', function (req, res) {
res.writeHead(200, {'Content-Type': 'text/plain'});
res.end('Hello Node\n');
});
server.listen(3000); In this example, we are using an http module. If you recall our earlier discussions on the JavaScript module, you will realize that this is the CommonJS module implementation. Node has several modules compiled into the binary. The core modules are defined within Node's source. They can be located in the lib/ folder.
They are loaded first if their identifier is passed to require(). For instance, require('http') will always return the built-in HTTP module, even if there is a file by this name.
After loading the module to handle HTTP requests, we create a server object and use a listener for a request event using the server.on() function. The callback is called whenever there is a request to this server on port 3000. The callback receives request and response parameters. We are also setting the Content-Type header and HTTP response code before we send the response back. You can copy the preceding code, save it in a plain text file, and name it app.js. You can run the server from the command line using Node.js as follows:
$ » node app.js
Once the server is started, you can open the http://localhost:3000 URL in a browser and you will be greeted with unexciting text:

If you want to inspect what's happening internally, you can issue a curl command as follows:
~ » curl -v http://localhost:3000 * Rebuilt URL to: http://localhost:3000/ * Trying ::1... * Connected to localhost (::1) port 3000 (#0) > GET / HTTP/1.1 > Host: localhost:3000 > User-Agent: curl/7.43.0 > Accept: */* > < HTTP/1.1 200 OK < Content-Type: text/plain < Date: Thu, 12 Nov 2015 05:31:44 GMT < Connection: keep-alive < Transfer-Encoding: chunked < Hello Node * Connection #0 to host localhost left intact
Curl shows a nice request (>) and response (<) dialog including the request and response headers.
Callbacks in JavaScript usually take some time getting used to. If you are coming from some other non-asynchronous programming background, you will need to understand carefully how callbacks work; you may feel like you're learning programming for the first time. As everything is asynchronous in Node, you will be using callbacks for everything without trying to carefully structure them. The most important part of the Node.js project is sometimes the code organization and module management.
Callbacks are functions that are executed asynchronously at a later time. Instead of the code reading top to bottom procedurally, asynchronous programs may execute different functions at different times based on the order and speed that earlier functions such as HTTP requests or filesystem reads happen.
Whether a function execution is sequential or asynchronous depends on the context in which it is executed:
var i=0;
function add(num){
console.log(i);
i=i+num;
}
add(100);
console.log(i);If you run this program using Node, you will see the following output (assuming that your file is named app.js):
~/Chapter9 » node app.js 0 100
This is what we are all used to. This is traditional synchronous code execution where each line is executed in a sequence. The code here defines a function and then on the next line calls this function, without waiting for anything. This is sequential control flow.
Things will be different if we introduced I/O to this sequence. If we try to read something from the file or call a remote endpoint, Node will execute these operations in an asynchronous fashion. For the next example, we are going to use a Node.js module called request. We will use this module to make HTTP calls. You can install the module as follows:
npm install request
We will discuss the use of npm later in this chapter. Consider the following example:
var request = require('request');
var status = undefined;
request('http://google.com', function (error, response, body) {
if (!error && response.statusCode == 200) {
status_code = response.statusCode;
}
});
console.log(status); When you execute this code, you will see that the value of the status variable is still undefined. In this example, we are making an HTTP call—this is an I/O operation. When we do an I/O operation, the execution becomes asynchronous. In the earlier example, we are doing everything within the memory and there was no I/O involved, hence, the execution was synchronous. When we run this program, all of the functions are immediately defined, but they don't all execute immediately. The request() function is called and the execution continues to the next line. If there is nothing to execute, Node will either wait for I/O to finish or it will exit. When the request() function finishes its work, it will execute the callback function (an anonymous function as the second parameter to the request() function). The reason that we got undefined in the preceding example is that nowhere in our code exists the logic that tells the console.log() statement to wait until the request() function has finished fetching the response from the HTTP call.
Callbacks are functions that get executed at some later time. This changes things in the way you organize your code. The idea around reorganizing the code is as follows:
- Wrapping the asynchronous code in a function
- Passing a callback function to the wrapper function
We will organize our previous example with these two ideas in mind. Consider this modified example:
var request = require('request');
var status = undefined;
function getSiteStatus(callback){
request('http://google.com', function (error, response, body) {
if (!error && response.statusCode == 200) {
status_code = response.statusCode;
}
callback(status_code);
});
}
function showStatusCode(status){
console.log(status);
}
getSiteStatus(showStatusCode);When you run this, you will get the following (correct) output:
$node app.js 200
What we changed was to wrap the asynchronous code in a getSiteStatus() function, pass a function named callback() as a parameter to this function, and execute this function on the last line of getSiteStatus(). The showStatusCode() callback function simply wraps around console.log() that we called earlier. The difference, however, is in the way the asynchronous execution works. The most important idea to understand while learning how to program with callbacks is that functions are first-class objects that can be stored in variables and passed around with different names. Giving simple and descriptive names to your variables is important in making your code readable by others. Now that the callback function is called once the HTTP call is completed, the value of the status_code variable will have a correct value. There are genuine circumstances where you want an asynchronous task executed only after another asynchronous task is completed. Consider this scenario:
http.createServer(function (req, res) {
getURL(url, function (err, res) {
getURLContent(res.data, function(err,res) {
...
});
});
});As you can see, we are nesting one asynchronous function in another. This kind of nesting can result in code that is difficult to read and manage. This style of callback is sometimes known as callback hell. To avoid such a scenario, if you have code that has to wait for some other asynchronous code to finish, then you express that dependency by putting your code in functions that get passed around as callbacks. Another important idea is to name your functions instead of relying on anonymous functions as callbacks. We can restructure the preceding example into a more readable one as follows:
var urlContentProcessor = function(data){
...
}
var urlResponseProcessor = function(data){
getURLContent(data,urlContentProcessor);
}
var createServer = function(req,res){
getURL(url,urlResponseProcessor);
};
http.createServer(createServer);This fragment uses two important concepts. First, we are using named functions and using them as callbacks. Second, we are not nesting these asynchronous functions. If you are accessing closure variables within the inner functions, the preceding would be a bit different implementation. In such cases, using inline anonymous functions is even more preferable.
Callbacks are most frequently used in Node. They are usually preferred to define logic for one-off responses. When you need to respond to repeating events, Node provides another mechanism for this. Before going further, we need to understand the function of timers and events in Node.
Timers are used to schedule the execution of a particular callback after a specific delay. There are two primary methods to set up such delayed execution: setTimeout and setInterval. The setTimeout() function is used to schedule the execution of a specific callback after a delay, while setInterval is used to schedule the repeated execution of a callback. The setTimeout function is useful to perform tasks that need to be scheduled such as housekeeping. Consider the following example:
setTimeout(function() {
console.log("This is just one time delay");
},1000);
var count=0;
var t = setInterval(function() {
count++;
console.log(count);
if (count> 5){
clearInterval(t);
}
}, 2000 );First, we are using setTimeout() to execute a callback (the anonymous function) after a delay of 1,000 ms. This is just a one-time schedule for this callback. We scheduled the repeated execution of the callback using setInterval(). Note that we are assigning the value returned by setInterval() in a variable t—we can use this reference in clearInterval() to clear this schedule.
We discussed earlier that callbacks are great for the execution of one-off logic. EventEmitters are useful in responding to repeating events. EventEmitters fire events and include the ability to handle these events when triggered. Several important Node APIs are built on EventEmitters.
Events raised by EventEmitters are handled through listeners. A listener is a callback function associated with an event—when the event fires, its associated listener is triggered as well. The event.EventEmitter is a class that is used to provide a consistent interface to emit (trigger) and bind callbacks to events.
As a common style convention, event names are represented by a camel-cased string; however, any valid string can be used as an event name.
Use require('events') to access the EventEmitter class:
var EventEmitter = require('events');When an EventEmitter instance encounters an error, it emits an error event. Error events are treated as a special case in Node.js. If you don't handle these, the program exits with an exception stack.
All EventEmitters emit the newListener event when new listeners are added and removeListener when a listener is removed.
To understand the usage of EventEmitters, we will build a simplistic telnet server where different clients can log in and enter certain commands. Based on these commands, our server will respond accordingly:
var _net = require('net');
var _events = require ('events');
var _emitter = new events.EventEmitter();
_emitter.on('join', function(id,caller){
console.log(id+" - joined");
});
_emitter.on('quit', function(id,caller){
console.log(id+" - left");
});
var _server = _net.createServer(function(caller) {
var process_id = caller.remoteAddress + ':' + caller.remotePort;
_emitter.emit('join',id,caller);
caller.on('end', function() {
console.log("disconnected");
_emitter.emit('quit',id,caller);
});
});
_server.listen(8124);In this code snippet, we are using the net module from Node. The idea here is to create a server and let the client connect to it via a standard telnet command. When a client connects, the server displays the client address and port, and when the client quits, the server logs this too.
When a client connects, we are emitting a join event, and when the client disconnects, we are emitting a quit event. We have listeners for both these events and they log appropriate messages on the server.
You start this program and connect to our server using telnet as follows:
telnet 127.0.0.1 8124
On the server console, you will see the server logging which client joined the server:
» node app.js ::ffff:127.0.0.1:51000 - joined ::ffff:127.0.0.1:51001 – joined
If any client quits the session, an appropriate message will appear as well.
When you are writing a lot of code, you soon reach a point where you have to start thinking about how you want to organize the code. Node modules are CommonJS modules that we discussed earlier when we discussed module patterns. Node modules can be published to the Node Package Manager (npm) repository. The npm repository is an online collection of Node modules.
Node modules can be either single files or directories containing one or more files. It's usually a good idea to create a separate module directory. The file in the module directory that will be evaluated is normally named index.js. A module directory can look as follows:
node_project/src/nav
--- >index.jsIn your project directory, the nav module directory contains the module code. Conventionally, your module code needs to reside in the index.js file—you can change this to another file if you want. Consider this trivial module called geo.js:
exports.area = function (r) {
return 3.14 * r * r;
};
exports.circumference = function (r) {
return 3.14 * 3.14 * r;
};You are exporting two functions via exports. You can use the module using the require function. This function takes the name of the module or system path to the module's code. You can use the module that we created as follows:
var geo = require('./geo.js');
console.log(geo.area(2));As we are exporting only two functions to the outside world, everything else remains private. If you recollect, we discussed the module pattern in detail—Node uses CommonJS modules. There is an alternative syntax to create modules as well. You can use modules.exports to export your modules. Indeed, exports is a helper created for modules.exports. When you use exports, it attaches the exported properties of a module to modules.exports. However, if modules.exports already has some properties attached to it, properties attached by exports are ignored.
The geo module created earlier in this section can be rewritten in order to return a single Geo constructor function rather than an object containing functions. We can rewrite the geo module and its usage as follows:
var Geo = function(PI) {
this.PI = PI;
}
Geo.prototype.area = function (r) {
return this.PI * r * r;
};
Geo.prototype.circumference = function (r) {
return this.PI * this.PI * r;
};
module.exports = Geo;Consider a config.js module:
var db_config = {
server: "0.0.0.0",
port: "3306",
user: "mysql",
password: "mysql"
};
module.exports = db_config;If you want to access db_config from outside this module, you can use require() to include the module and refer the object as follows:
var config = require('./config.js');
console.log(config.user);There are three ways to organize modules:
- Using a relative path, for example,
config = require('./lib/config.js') - Using an absolute path, for example,
config = require('/nodeproject/lib/config.js') - Using a module search, for example,
config = require('config')
The first two are self-explanatory—they allow Node to look for a module in a particular location in the filesystem.
When you use the third option, you are asking Node to locate the module using the standard look method. To locate the module, Node starts at the current directory and appends ./node_modules/ to it. Node then attempts to load the module from this location. If the module is not found, then the search starts from the parent directory until the root of the filesystem is reached.
For example, if require('config') is called in /projects/node/, the following locations will be searched until a match a found:
/projects/node /node_modules/config.js/projects/node_modules/config.js/node_modules/config.js
For modules downloaded from npm, using this method is relatively simple. As we discussed earlier, you can organize your modules in directories as long as you provide a point of entry for Node.
The easiest way to do this is to create the ./node_modules/supermodule/ directory, and insert an index.js file in this directory. The index.js file will be loaded by default. Alternatively, you can put a package.json file in the mymodulename folder, specifying the name and main file of the module:
{
"name": "supermodule",
"main": "./lib/config.js"
}You have to understand that Node caches modules as objects. If you have two (or more) files requiring a specific module, the first require will cache the module in memory so that the second require will not have to reload the module source code. However, the second require can alter the module functionality if it wishes to. This is commonly called monkey patching and is used to modify a module behavior without really modifying or versioning the original module.
Creating modules
Node modules can be either single files or directories containing one or more files. It's usually a good idea to create a separate module directory. The file in the module directory that will be evaluated is normally named index.js. A module directory can look as follows:
node_project/src/nav
--- >index.jsIn your project directory, the nav module directory contains the module code. Conventionally, your module code needs to reside in the index.js file—you can change this to another file if you want. Consider this trivial module called geo.js:
exports.area = function (r) {
return 3.14 * r * r;
};
exports.circumference = function (r) {
return 3.14 * 3.14 * r;
};You are exporting two functions via exports. You can use the module using the require function. This function takes the name of the module or system path to the module's code. You can use the module that we created as follows:
var geo = require('./geo.js');
console.log(geo.area(2));As we are exporting only two functions to the outside world, everything else remains private. If you recollect, we discussed the module pattern in detail—Node uses CommonJS modules. There is an alternative syntax to create modules as well. You can use modules.exports to export your modules. Indeed, exports is a helper created for modules.exports. When you use exports, it attaches the exported properties of a module to modules.exports. However, if modules.exports already has some properties attached to it, properties attached by exports are ignored.
The geo module created earlier in this section can be rewritten in order to return a single Geo constructor function rather than an object containing functions. We can rewrite the geo module and its usage as follows:
var Geo = function(PI) {
this.PI = PI;
}
Geo.prototype.area = function (r) {
return this.PI * r * r;
};
Geo.prototype.circumference = function (r) {
return this.PI * this.PI * r;
};
module.exports = Geo;Consider a config.js module:
var db_config = {
server: "0.0.0.0",
port: "3306",
user: "mysql",
password: "mysql"
};
module.exports = db_config;If you want to access db_config from outside this module, you can use require() to include the module and refer the object as follows:
var config = require('./config.js');
console.log(config.user);There are three ways to organize modules:
- Using a relative path, for example,
config = require('./lib/config.js') - Using an absolute path, for example,
config = require('/nodeproject/lib/config.js') - Using a module search, for example,
config = require('config')
The first two are self-explanatory—they allow Node to look for a module in a particular location in the filesystem.
When you use the third option, you are asking Node to locate the module using the standard look method. To locate the module, Node starts at the current directory and appends ./node_modules/ to it. Node then attempts to load the module from this location. If the module is not found, then the search starts from the parent directory until the root of the filesystem is reached.
For example, if require('config') is called in /projects/node/, the following locations will be searched until a match a found:
/projects/node /node_modules/config.js/projects/node_modules/config.js/node_modules/config.js
For modules downloaded from npm, using this method is relatively simple. As we discussed earlier, you can organize your modules in directories as long as you provide a point of entry for Node.
The easiest way to do this is to create the ./node_modules/supermodule/ directory, and insert an index.js file in this directory. The index.js file will be loaded by default. Alternatively, you can put a package.json file in the mymodulename folder, specifying the name and main file of the module:
{
"name": "supermodule",
"main": "./lib/config.js"
}You have to understand that Node caches modules as objects. If you have two (or more) files requiring a specific module, the first require will cache the module in memory so that the second require will not have to reload the module source code. However, the second require can alter the module functionality if it wishes to. This is commonly called monkey patching and is used to modify a module behavior without really modifying or versioning the original module.
The npm is the package manager used by Node to distribute modules. The npm can be used to install, update, and manage modules. Package managers are popular in other languages such as Python. The npm automatically resolves and updates dependencies for a package and hence makes your life easy.
There are two ways to install npm packages: locally or globally. If you want to use the module's functionality only for a specific Node project, you can install it locally relative to the project, which is default behavior of npm install. Alternatively, there are several modules that you can use as a command-line tool; in this case, you can install them globally:
npm install request
The install directive with npm will install a particular module—request in this case. To confirm that npm install worked correctly, check to see whether a node_modules directory exists and verify that it contains a directory for the package(s) that you installed.
As you start adding modules to your project, it becomes difficult to manage the version/dependency of each module. The best way to manage locally installed packages is to create a package.json file in your project.
A package.json file can help you in the following ways:
- Defining versions of each module that you want to install. There are times when your project depends on a specific version of a module. In this case, your
package.jsonhelps you download and maintain the correct version dependency. - Serving as a documentation of all the modules that your project needs.
- Deploying and packaging your application without worrying about managing dependencies every time you deploy the code.
You can create package.json by issuing the following command:
npm init
After answering basic questions about your project, a blank package.json is created with content similar to the following:
{
"name": "chapter9",
"version": "1.0.0",
"description": "chapter9 sample project",
"main": "app.js",
"dependencies": {
"request": "^2.65.0"
},
"devDependencies": {},
"scripts": {
"test": "echo \"Error: no test specified\" && exit 1"
},
"keywords": [
"Chapter9",
"sample",
"project"
],
"author": "Ved Antani",
"license": "MIT"
}You can manually edit this file in a text editor. An important part of this file is the dependencies tag. To specify the packages that your project depends on, you need to list the packages you'd like to use in your package.json file. There are two types of packages that you can list:
In the preceding example, you can see the following dependency:
"dependencies": {
"request": "^2.65.0"
},This means that the project is dependent on the request module.
Note
The version of the module is dependent on the semantic versioning rules—https://docs.npmjs.com/getting-started/semantic-versioning.
Once your package.json file is ready, you can simply use the npm install command to install all the modules for your projects automatically.
There is a cool trick that I love to use. While installing modules from the command line, we can add the --save flag to add that module's dependency to the package.json file automatically:
npm install async --save npm WARN package.json [email protected] No repository field. npm WARN package.json [email protected] No README data [email protected] node_modules/async
In the preceding command, we installed the async module with the normal npm command with a --save flag. There is a corresponding entry automatically created in package.json:
"dependencies": {
"async": "^1.5.0",
"request": "^2.65.0"
},Installing packages
There are two ways to install npm packages: locally or globally. If you want to use the module's functionality only for a specific Node project, you can install it locally relative to the project, which is default behavior of npm install. Alternatively, there are several modules that you can use as a command-line tool; in this case, you can install them globally:
npm install request
The install directive with npm will install a particular module—request in this case. To confirm that npm install worked correctly, check to see whether a node_modules directory exists and verify that it contains a directory for the package(s) that you installed.
As you start adding modules to your project, it becomes difficult to manage the version/dependency of each module. The best way to manage locally installed packages is to create a package.json file in your project.
A package.json file can help you in the following ways:
- Defining versions of each module that you want to install. There are times when your project depends on a specific version of a module. In this case, your
package.jsonhelps you download and maintain the correct version dependency. - Serving as a documentation of all the modules that your project needs.
- Deploying and packaging your application without worrying about managing dependencies every time you deploy the code.
You can create package.json by issuing the following command:
npm init
After answering basic questions about your project, a blank package.json is created with content similar to the following:
{
"name": "chapter9",
"version": "1.0.0",
"description": "chapter9 sample project",
"main": "app.js",
"dependencies": {
"request": "^2.65.0"
},
"devDependencies": {},
"scripts": {
"test": "echo \"Error: no test specified\" && exit 1"
},
"keywords": [
"Chapter9",
"sample",
"project"
],
"author": "Ved Antani",
"license": "MIT"
}You can manually edit this file in a text editor. An important part of this file is the dependencies tag. To specify the packages that your project depends on, you need to list the packages you'd like to use in your package.json file. There are two types of packages that you can list:
In the preceding example, you can see the following dependency:
"dependencies": {
"request": "^2.65.0"
},This means that the project is dependent on the request module.
Note
The version of the module is dependent on the semantic versioning rules—https://docs.npmjs.com/getting-started/semantic-versioning.
Once your package.json file is ready, you can simply use the npm install command to install all the modules for your projects automatically.
There is a cool trick that I love to use. While installing modules from the command line, we can add the --save flag to add that module's dependency to the package.json file automatically:
npm install async --save npm WARN package.json [email protected] No repository field. npm WARN package.json [email protected] No README data [email protected] node_modules/async
In the preceding command, we installed the async module with the normal npm command with a --save flag. There is a corresponding entry automatically created in package.json:
"dependencies": {
"async": "^1.5.0",
"request": "^2.65.0"
},Like any other language, writing correct JavaScript code at scale is an involved task. As the language matures, several of the inherent problems are being taken care of. There are several exceptional libraries that aid in writing good quality code. For most serious systems, good code = correct code + high performance code. The demands of new-generation software systems are high on performance. In this section, we will discuss a few tools that you can use to analyze your JavaScript code and understand its performance metrics.
We will discuss the following two ideas in this section:
- Profiling: Timing various functions and operations during script-profiling helps in identifying areas where you can optimize your code
- Network performance: Examining the loading of network resources such as images, stylesheets, and scripts
JavaScript profiling is critical to understand performance aspects of various parts of your code. You can observe timings of the functions and operations to understand which operation is taking more time. With this information, you can optimize the performance of time-consuming functions and tune the overall performance of your code. We will be focusing on the profiling options provided by Chrome's Developer Tools. There are comprehensive analysis tools that you can use to understand the performance metrics of your code.
The CPU profile shows the execution time spent by various parts of your code. We have to inform DevTools to record the CPU profile data. Let's take the profiler for a spin.
You can enable the CPU profiler in DevTools as follows:
- Open the Chrome DevTools Profiles panel.
- Verify that Collect JavaScript CPU Profile is selected:

For this chapter, we will be using Google's own benchmark page, http://octane-benchmark.googlecode.com/svn/latest/index.html. We will use this because it contains sample functions where we can see various performance bottlenecks and benchmarks. To start recording the CPU profile, open DevTools in Chrome, and in the Profiles tab, click on the Start button or press Cmd/Ctrl + E. Refresh the V8 Benchmark Suite page. When the page has completed reloading, a score for the benchmark tests is shown. Return to the Profiles panel and stop the recording by clicking on the Stop button or pressing Cmd/Ctrl + E again.
The recorded CPU profile shows you a detailed view of the functions and the execution time taken by them in the bottom-up fashion, as shown in the following image:
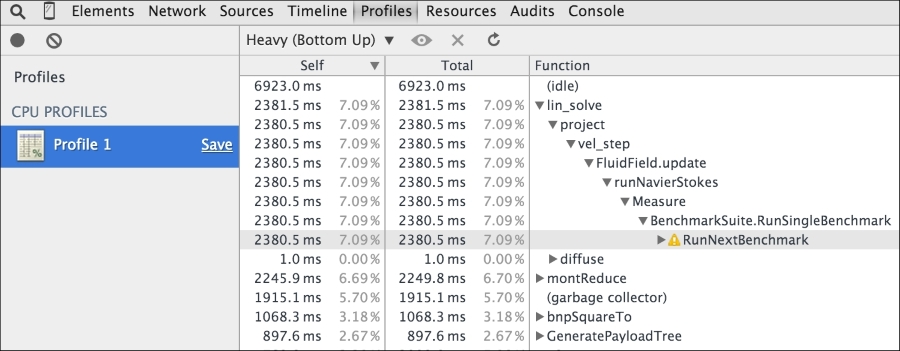
The Chrome DevTools Timeline tool is the first place you can start looking at the overall performance of your code. It lets you record and analyze all the activity in your application as it runs.
The Timeline provides you with a complete overview of where time is spent when loading and using your site. A timeline recording includes a record for each event that occurred and is displayed in a waterfall graph:

The preceding screen shows you the timeline view when we try to render https://twitter.com/ in the browser. The timeline view gives you an overall view of which operation took how much time in execution:

In the preceding screenshot, we can see the progressive execution of various JavaScript functions, network calls, resource downloads, and other operations involved in rendering the Twitter home page. This view gives us a very good idea about which operations may be taking longer. Once we identify such operations, we can optimize them for performance. The Memory view is a great tool to understand how the memory is used during the lifetime of your application in the browser. The Memory view shows you a graph of the memory used by your application over time and maintains a counter of the number of documents, DOM nodes, and event listeners that are held in the memory. The Memory view can help detect memory leaks and give you good enough hints to understand what optimizations are required:

JavaScript performance is a fascinating subject and deserves its own dedicated text. I would urge you to explore Chrome's DevTools and understand how best to use the tools to detect and diagnose performance problems in your code.
JavaScript profiling
JavaScript profiling is critical to understand performance aspects of various parts of your code. You can observe timings of the functions and operations to understand which operation is taking more time. With this information, you can optimize the performance of time-consuming functions and tune the overall performance of your code. We will be focusing on the profiling options provided by Chrome's Developer Tools. There are comprehensive analysis tools that you can use to understand the performance metrics of your code.
The CPU profile shows the execution time spent by various parts of your code. We have to inform DevTools to record the CPU profile data. Let's take the profiler for a spin.
You can enable the CPU profiler in DevTools as follows:
- Open the Chrome DevTools Profiles panel.
- Verify that Collect JavaScript CPU Profile is selected:
For this chapter, we will be using Google's own benchmark page, http://octane-benchmark.googlecode.com/svn/latest/index.html. We will use this because it contains sample functions where we can see various performance bottlenecks and benchmarks. To start recording the CPU profile, open DevTools in Chrome, and in the Profiles tab, click on the Start button or press Cmd/Ctrl + E. Refresh the V8 Benchmark Suite page. When the page has completed reloading, a score for the benchmark tests is shown. Return to the Profiles panel and stop the recording by clicking on the Stop button or pressing Cmd/Ctrl + E again.
The recorded CPU profile shows you a detailed view of the functions and the execution time taken by them in the bottom-up fashion, as shown in the following image:
The Chrome DevTools Timeline tool is the first place you can start looking at the overall performance of your code. It lets you record and analyze all the activity in your application as it runs.
The Timeline provides you with a complete overview of where time is spent when loading and using your site. A timeline recording includes a record for each event that occurred and is displayed in a waterfall graph:
The preceding screen shows you the timeline view when we try to render https://twitter.com/ in the browser. The timeline view gives you an overall view of which operation took how much time in execution:
In the preceding screenshot, we can see the progressive execution of various JavaScript functions, network calls, resource downloads, and other operations involved in rendering the Twitter home page. This view gives us a very good idea about which operations may be taking longer. Once we identify such operations, we can optimize them for performance. The Memory view is a great tool to understand how the memory is used during the lifetime of your application in the browser. The Memory view shows you a graph of the memory used by your application over time and maintains a counter of the number of documents, DOM nodes, and event listeners that are held in the memory. The Memory view can help detect memory leaks and give you good enough hints to understand what optimizations are required:
JavaScript performance is a fascinating subject and deserves its own dedicated text. I would urge you to explore Chrome's DevTools and understand how best to use the tools to detect and diagnose performance problems in your code.
The CPU profile
The CPU profile shows the execution time spent by various parts of your code. We have to inform DevTools to record the CPU profile data. Let's take the profiler for a spin.
You can enable the CPU profiler in DevTools as follows:
- Open the Chrome DevTools Profiles panel.
- Verify that Collect JavaScript CPU Profile is selected:
For this chapter, we will be using Google's own benchmark page, http://octane-benchmark.googlecode.com/svn/latest/index.html. We will use this because it contains sample functions where we can see various performance bottlenecks and benchmarks. To start recording the CPU profile, open DevTools in Chrome, and in the Profiles tab, click on the Start button or press Cmd/Ctrl + E. Refresh the V8 Benchmark Suite page. When the page has completed reloading, a score for the benchmark tests is shown. Return to the Profiles panel and stop the recording by clicking on the Stop button or pressing Cmd/Ctrl + E again.
The recorded CPU profile shows you a detailed view of the functions and the execution time taken by them in the bottom-up fashion, as shown in the following image:
The Chrome DevTools Timeline tool is the first place you can start looking at the overall performance of your code. It lets you record and analyze all the activity in your application as it runs.
The Timeline provides you with a complete overview of where time is spent when loading and using your site. A timeline recording includes a record for each event that occurred and is displayed in a waterfall graph:
The preceding screen shows you the timeline view when we try to render https://twitter.com/ in the browser. The timeline view gives you an overall view of which operation took how much time in execution:
In the preceding screenshot, we can see the progressive execution of various JavaScript functions, network calls, resource downloads, and other operations involved in rendering the Twitter home page. This view gives us a very good idea about which operations may be taking longer. Once we identify such operations, we can optimize them for performance. The Memory view is a great tool to understand how the memory is used during the lifetime of your application in the browser. The Memory view shows you a graph of the memory used by your application over time and maintains a counter of the number of documents, DOM nodes, and event listeners that are held in the memory. The Memory view can help detect memory leaks and give you good enough hints to understand what optimizations are required:
JavaScript performance is a fascinating subject and deserves its own dedicated text. I would urge you to explore Chrome's DevTools and understand how best to use the tools to detect and diagnose performance problems in your code.
The Timeline view
The Chrome DevTools Timeline tool is the first place you can start looking at the overall performance of your code. It lets you record and analyze all the activity in your application as it runs.
The Timeline provides you with a complete overview of where time is spent when loading and using your site. A timeline recording includes a record for each event that occurred and is displayed in a waterfall graph:
The preceding screen shows you the timeline view when we try to render https://twitter.com/ in the browser. The timeline view gives you an overall view of which operation took how much time in execution:
In the preceding screenshot, we can see the progressive execution of various JavaScript functions, network calls, resource downloads, and other operations involved in rendering the Twitter home page. This view gives us a very good idea about which operations may be taking longer. Once we identify such operations, we can optimize them for performance. The Memory view is a great tool to understand how the memory is used during the lifetime of your application in the browser. The Memory view shows you a graph of the memory used by your application over time and maintains a counter of the number of documents, DOM nodes, and event listeners that are held in the memory. The Memory view can help detect memory leaks and give you good enough hints to understand what optimizations are required:
JavaScript performance is a fascinating subject and deserves its own dedicated text. I would urge you to explore Chrome's DevTools and understand how best to use the tools to detect and diagnose performance problems in your code.
In this chapter, we looked at a different avatar of JavaScript—that of a server-side framework in the form of Node.js.
Node offers an asynchronous evented-model to program scalable and high-performance server applications in JavaScript. We dived deep into some core concepts on Node, such as an event loop, callbacks, modules, and timers. Understanding them is critical to write good Node code. We also discussed several techniques to structure Node code and callbacks in a better way.
With this, we reach the conclusion of our exploration of a brilliant programming language. JavaScript has been instrumental in the evolution of the World Wide Web because of its sheer versatility. The language continues to expand its horizons and improves with each new iteration.
We started our journey with understanding the building blocks of the grammar and syntax of the language. We grasped the fundamental ideas of closures and the functional behavior of JavaScript. These concepts are so essential that most of the JavaScript patterns are based on them. We looked at how we can utilize these patterns to write better code with JavaScript. We studied how JavaScript can operate on a DOM and how to use jQuery to manipulate the DOM effectively. Finally, we looked at the server-side avatar of JavaScript in Node.js.
This book should have enabled you to think differently when you start programming in JavaScript. Not only will you think about common patterns when you code, but also appreciate and use newer language features by ES6.