

This recipe will present you with how you can integrate with Facebook using the Implicit grant type which is the better choice for public clients and runs directly on the user's web browser.
Note
Grant types as you may already know, defines different methods for an application to retrieve access tokens from an Authorization Server. A grant type may apply for a given scenario regarding the client type being developed. Just as a reminder, OAuth 2.0 specification defines two types of client types: public and confidential.
To run this recipe, you must create a web application using Spring Boot, which will help the development of the application. In addition, we also need to register our application on Facebook. That's one important step when using OAuth 2.0, because as an OAuth Provider, Facebook needs to know which clients are asking for access token and, of course, the Resource Owner (the user) would want to know who is to be granted access to her profile.
Follow these steps to create a client application to integrate with Facebook using client-side flow from OAuth 2.0:
- First of all, remember that you must have a Facebook account, and have to register a new application. Go to https://developers.facebook.com/apps/ and you should see something like this:

- Click on
Create a New Appto start registering your application, and you should see the following interface which allows you to define the name of the application:
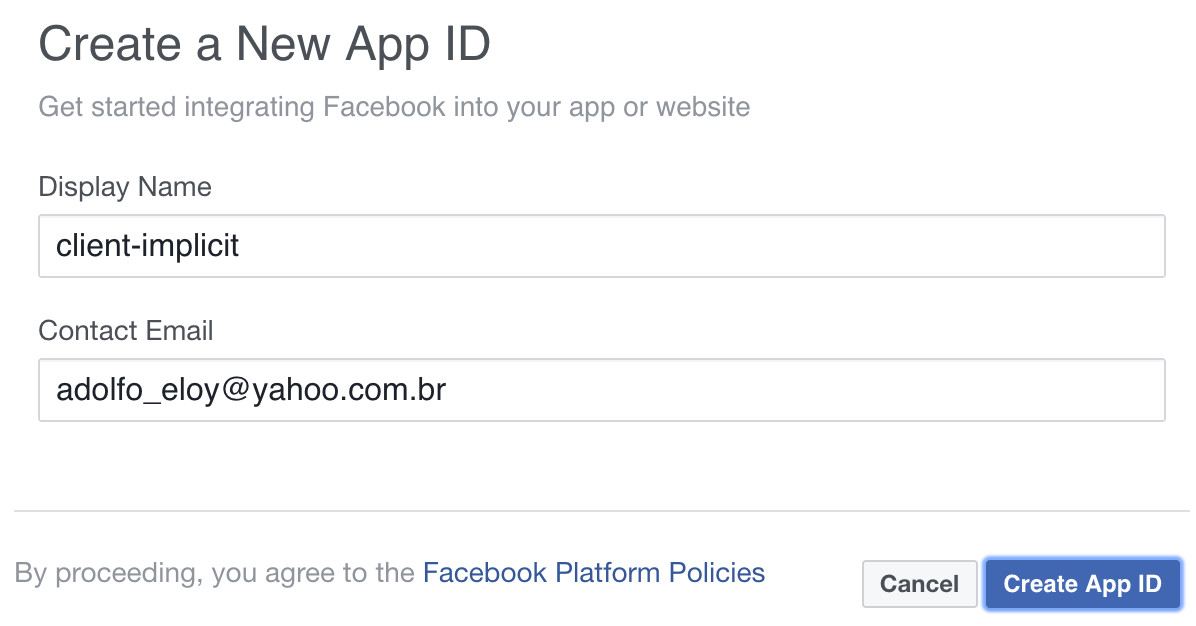
- Click on
Create App IDand you will be redirected to the newly created application's dashboard as follows:
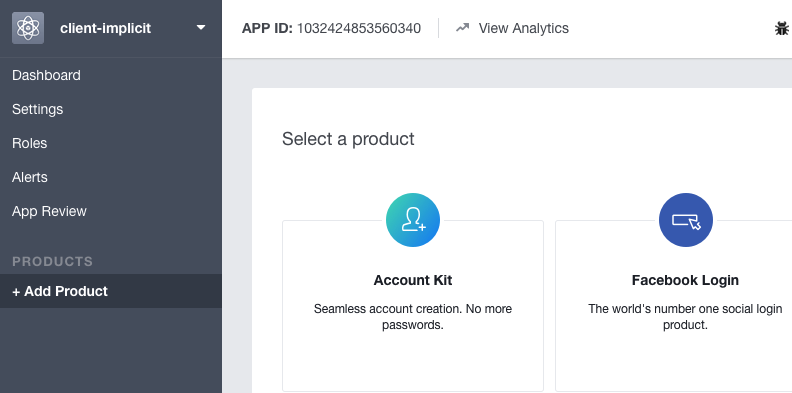
- To start using the Facebook's Graph API and retrieve the user's contacts, we first need to select one product from several provided by Facebook. For what we need now, you must click on the
Set Upbutton from theFacebook Loginbox. - After clicking on
Set Up, you must choose one platform, which must beWebfor this recipe. - After choosing the
Web platform, enter theSite URLfor your application. I am using a fictitious URL namedhttp://clientimplicit.test. - After saving the URL of your site, just click on
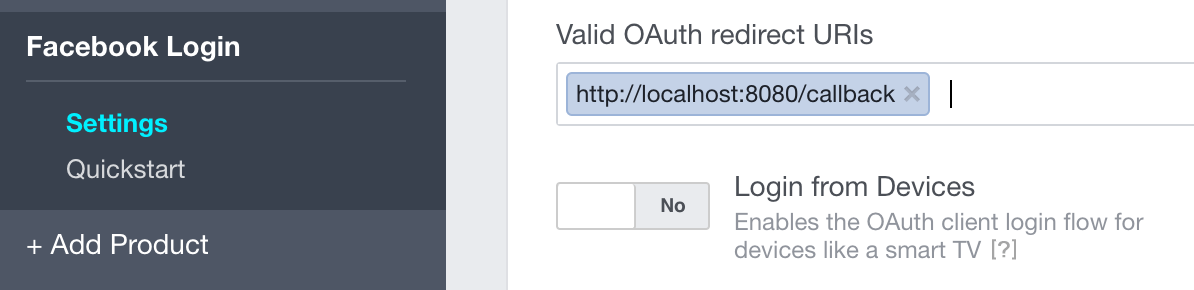
Continue. - Now you are ready to set up the redirection URI for the application by clicking on
Settingsin the left panel, as follows. As this application isn't running for production, I have set up the redirect URI ashttp://localhost:8080/callback. Don't forget to save the changes:
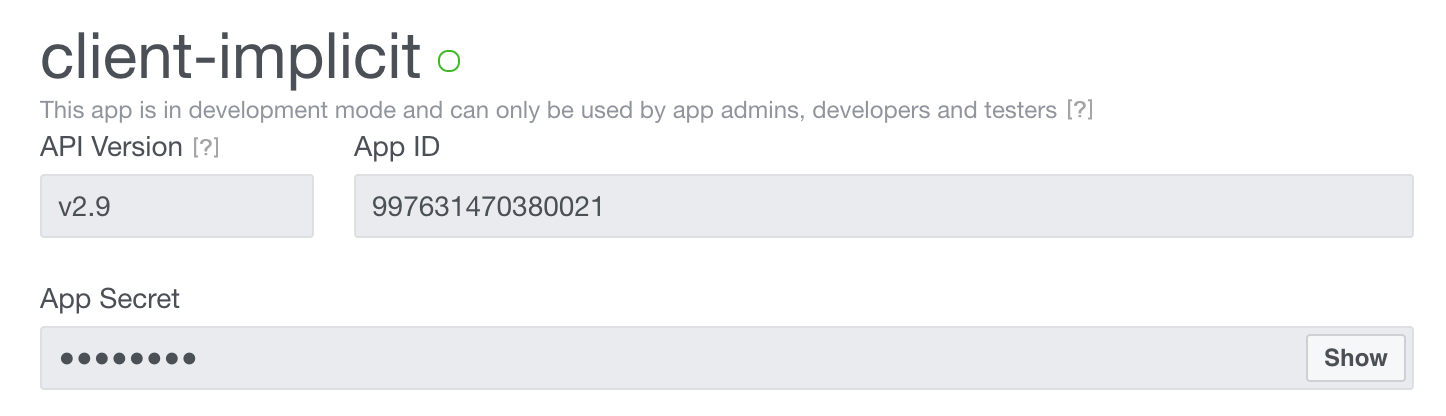
- Now you can click on
Dashboardat the left side of the panel so you can grab theApp IDandApp Secret, which maps to theclient_idandclient_secretfrom OAuth 2.0 specifications respectively. - Copy the
App IDandApp Secretfrom the dashboard as represented by the following screenshot as follows, so we can use in the code which comes in the next steps:
- Once we have our client registered on Facebook, we are ready to start writing code to retrieve the OAuth 2.0 access token using the Implicit grant type (requesting the access token from the client side).
- Create a new web application using Spring Initializr at https://start.spring.io/ and define the following data:
- Set up the group as
com.packt.example - Define the artifact as
client-implicit - Add
WebandThymeleafas dependencies for this project
- Set up the group as
- Create the file
client.htmlwithin the foldertemplateswhich resides inside thesrc/main/resourcesproject's directory.
- Add the following content within the file
client.html:
<!DOCTYPE html>
<html xmlns:th="http://www.thymeleaf.org">
<head><title>Facebook - client side integration</title></head>
<body>
   Press the following button to start the implicit flow.
   <button id="authorize" type="button">Authorize</button>
   <div id="box"></div>
</body>
</html>
- The button we have added to the
client.htmlpage does not have any behavior attached. So, to allow the user to start the Implicit grant type flow, add the following JavaScript code after the body tag:
<script
   src="https://ajax.googleapis.com/ajax/libs/jquery/3.2.1/jquery.min.js"></script>
<script type="text/javascript" th:inline="javascript">
/*<![CDATA[*/
$(document).ready(function() {
   $("#authorize").click(makeRequest);
});

function makeRequest() {
    var auth_endpoint = "https://www.facebook.com/v2.9/dialog/oauth",
         response_type = "token",
         client_id = "1948923582021549",
         redirect_uri = "http://localhost:8080/callback",
         scope = "public_profile user_friends";

   var request_endpoint = auth_endpoint + "?" +
         "response_type=" + response_type + "&" +
         "client_id=" + client_id + "&" +
         "redirect_uri=" + encodeURI(redirect_uri) + "&" +
         "scope=" + encodeURI(scope);

   window.location.href = request_endpoint;
}
/*]]>*/
</script>- Before starting the application, we need to map a URL pattern so the HTML code we wrote before can be rendered. To do so, open the class
ClientImplicitApplication.javaand assure your code looks like the following:
@Controller @SpringBootApplication
public class ClientImplicitApplication {
    public static void main(String[] args) {
         SpringApplication.run(ClientImplicitApplication.class, args);
   }

   @GetMapping("/")
   public String client() { return "client"; }
} - In the previous code, we've mapped the root of our application to the
client.htmlweb page. But all of this is now serving the purpose of sending to the user the Authorization Server (in this case Facebook) so she could grant our application access to protected resources (which are her friends). Try to start the application and go tohttp://localhost:8080/. - Click on the ;
Authorizebutton that will be provided byclient.htmlto start the Implicit grant flow, log in with your Facebook account, and accept the permissions requested by theclient-implicitapplication (make sure that jquery is properly declared insideclient.htmlfile). - If you grant all the permissions at the consent user page you shall be redirected to
http://localhost:8080/callbackURL that was specified at the client registration phase on Facebook. Click onContinueand pay attention to the content received and the URL fragment in the browser's address bar. It should be something like the following:
http://localhost:8080/callback#access_token=EAAbsiSHMZC60BANUwKBDCYeySZCjcBpvFuUO1gXsfTGwWjnZAFTAZBIJB62jdUroAcNuZAVWO24yeqo0iazWYytVgrQ1bgNWI8vm07Ws4ZCHXpGridHfZB6PQ1rzM4BzP29IljgTTuBLZBFQBEnEn2LJiOWJjA8J6Y73BLcjIe2vVMZB9c2GnZBpiK4iZAWEtkTsMEZD&expires_in=7152
- Now we need to extract both the
access_tokenand theexpires_inparameters which comes after#character, and start using the Facebook Graph API to retrieve the user's friends.
- The first thing we can do is to create another URL mapping through our default controller, which is
ClientImplicitApplication. Open this class and add the following method so we can deal with Facebook's redirection:
@GetMapping("/callback")
public String callback() { return "callback_page"; } - As we can see, the method
callbackis returning thecallback_pagestring, which will automatically be mapped to the filecallback_page.html. So, let's create this file inside the templates folder which resides in thesrc/main/resourcesproject directory. At first just add the following HTML content to thecallback_page.htmlfile:
<!DOCTYPE html>
<html>
<head><title>Insert title here</title></head>
<body>
Friends who has also granted client-implicit
<div id="friends">
   <ul></ul>
</div>
</body>
</html>
- After receiving the
acces_tokenas a URL fragment, this file will use JavaScript code to interact with Facebook's graph API to retrieve the user's friends, and will populate the tag<ul>with each friend received within the respective<li>tag. Let's start writing our JavaScript code by adding the following content after the body tag:
<script
   src="https://ajax.googleapis.com/ajax/libs/jquery/3.2.1/jquery.min.js"></script>
<script type="text/javascript">
/*<![CDATA[*/
$(document).ready(function() {
   var fragment = window.location.hash;
 });
/*]]>*/
</script>- As we have the fragment content in the fragment variable, add the following function at the end of the JavaScript code:
function getResponse(fragment) {
   var attributes = fragment.slice(1).split('&');
   var response = {};

   $(attributes).each(function(idx, attr) {
         var keyValue = attr.split('=');
         response[keyValue[0]] = keyValue[1];
   });

   response.hasError = function() {
         return !response['access_token'];
   };

   return response;
} - The code presented before creates an object named
responsewhich might contain anaccess_tokenor error description. Unfortunately, Facebook returns all the error data as URL query parameters instead of using the fragment as per OAuth 2.0's specifications. At least the object returned by thegetResponsefunction can tell if the response has an error. - Now let's update the main JavaScript code to the following. The following code extracts the response from the URL fragment, clears the fragment of the URL as a security measure, and in case of an error, just presents a message to the user through a
<div>HTML tag:
$(document).ready(function() {
   var fragment = window.location.hash;
   var res = getResponse(fragment);
   window.location.hash = '_#';
    if (res.hasError()) {
        $("<div>Error trying to obtain user's authorization!</div>").insertBefore('#friends');
        return;
   }
});- Now let's create the most expected function, which is responsible for using the
access_tokento interact with the Facebook Graph API. Add the following function at the end of the JavaScript code:
function getFriends(accessToken, callback) {
   var baseUrl = 'https://graph.facebook.com/v2.9/';
   var endpoint = 'me/friends';
   var url = baseUrl + endpoint;

   $.ajax({
        url: url,
        beforeSend: function(xhr) {
            xhr.setRequestHeader("Authorization", "Bearer " + accessToken);
        },
        success: function(result){
               var friends = result.data;
               callback(friends);
        },
        error: function(jqXHR, textStatus, errorThrown)   {
            console.log(textStatus);
        }
    });
} - And to finish, just update the main JavaScript code which is using all the declared functions as follows:
$(document).ready(function() {
   var fragment = window.location.hash;
   var res = getResponse(fragment);
   window.location.hash = '_#';
   if (res.hasError()) {
       $("<div>Error trying to obtain user's authorization!</div>").insertBefore('#friends');
       return;
   }
   getFriends(res['access_token'], function(friends) {
       $(friends).each(function(index, friend) {
           $('#friends').find('ul').append('<li>' + friend.name + '</li>');
       });
   });
}); - Now it's time to run the
client-implicitapplication to see the usage of OAuth 2.0 and the Facebook Graph API in practice.
- Start the application.
- Go to
http://localhost:8080/and click on theAuthorizebutton. - Grant the requested permissions.
- When you are redirected back to
client-implicit, you should see something like the following in your web browser:
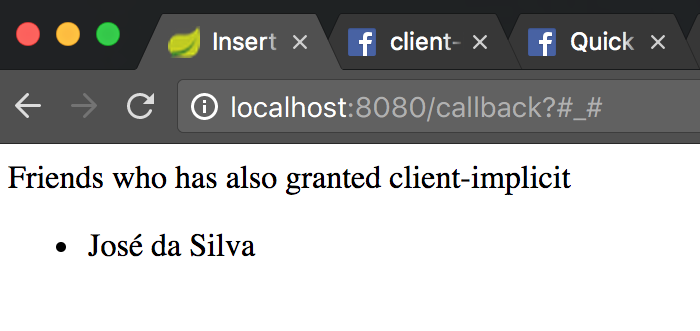
- As you might notice, your application might not retrieve any users yet. That's because Facebook just allows you to present friends who also authorized your application. In our case, another user should be the
client-implicituser and you have to register her as a tester for your application.
To start using OAuth 2.0's protected resources, before requesting the access_token through the user's grant, we registered the application client-implicit through the OAuth 2.0 Provider (Facebook). The responsibility of maintaining the client's data belongs to the Authorization Server. In using Facebook the boundaries between the Authorization Server and the Resource Server is not so clear. The most important thing to understand here is that Facebook is acting as an OAuth 2.0 Provider.
As per the specifications, we have performed the three important steps in client registration process, which was to choose the client type, register the redirection URI, and enter the application's information.
By registering the application, we've received the client_id and client_secret, but as we are using the Implicit grant flow the client_secret won't be needed. That's because this first recipe presents an application which runs directly on the web browser. So, there is no way to safely protect the client_secret. When not using the client_secret we must try not to expose the received access_token that comes with the URL fragment after the user grants permission to access her resources. Another measure to help the application to not expose the access token was to clear the URL fragment.
Another measure that might be applied is to not use any external JavaScript code as such that was used to send usage metrics (in such a way that the access_token could be sent to the external service).
After the registration process we got into the code to effectively interact with the Facebook Graph API, which at the time of this writing was version 2.9. Facebook offers two ways to log a user with a valid account:
- By using the Facebook SDK
- By manually building a login flow
To make the OAuth 2.0 usage explicit, this recipe was written by manually building a login flow. So to start the process of user's authentication and authorization, the client-implicit application builds the URL for the Authorization Server manually as follows:
var request_endpoint = auth_endpoint + "?" +
   "response_type=" + response_type + "&" +
   "client_id=" + client_id + "&" +
   "redirect_uri=" + encodeURI(redirect_uri) + "&" +
   "scope=" + encodeURI(scope);

window.location.href = request_endpoint;
After simply redirecting the user to the Authorization Server's endpoint, the flow is transferred to Facebook, which authenticates the user if needed, and the user authorizes whether or not the client application can make use of its resources. Once the user authorizes the client, she is redirected back to the registered redirection URI, which in our case was http://localhost:8080/callback.
When receiving the access_token all we need to do is extract the token from the URL fragment and start using the Facebook Graph API.
As an exercise, you might try to use Facebook SDK, which should be simpler to use for abstracting what we did into the SDK's API. Besides, using the SDK or not, one important thing that should be added to our code is the usage of the state parameter to avoid Cross Site Request Forgery (CSRF) attacks.
Note
A CSRF attack allows a malicious user to execute operations in the name of another user (a victim). Regarding web applications, a valid approach to avoid CSRF is to make the client send a variable to the server with some random string which might be checked after receiving it back from the server's response, so the first value and the second (received) must be the same.
Regarding security issues, one other valuable suggestion is to send the access_token to the server side so you don't have to request a new access token on every web page of your application (but take care with the expiration time).
Note
All the recipes that follow in this chapter will be using Spring Social project. For more information about the project, you can read the official documents at https://projects.spring.io/spring-social/.