Book Image

Learning Node.js Development

By : Andrew Mead
Book Image

Learning Node.js Development

By: Andrew Mead

Overview of this book

Learning Node.js Development is a practical, project-based book that provides you with all you need to get started as a Node.js developer. Node is a ubiquitous technology on the modern web, and an essential part of any web developers' toolkit. If you are looking to create real-world Node applications, or you want to switch careers or launch a side project to generate some extra income, then you're in the right place. This book has been written around a single goal—turning you into a professional Node developer capable of developing, testing, and deploying real-world production applications. Learning Node.js Development is built from the ground up around the latest version of Node.js (version 9.x.x). You'll be learning all the cutting-edge features available only in the latest software versions. This book cuts through the mass of information available around Node and delivers the essential skills that you need to become a Node developer. It takes you through creating complete apps and understanding how to build, deploy, and test your own Node apps. It maps out everything in a comprehensive, easy-to-follow package designed to get you up and running quickly.
Table of Contents (13 chapters)

Why use Node

In this section, we'll cover the why behind Node.js. Why is it so good at creating backend apps? And why is it becoming so popular with companies such as Netflix, Uber and Walmart, who are all using Node.js in production?

As you might have noticed since you're taking this course, when people want to learn a new backend language, more and more they're turning to Node as the language they want to learn. The Node skillset is in hot demand, for both frontend developers who need to use Node day to day to do things such as compile their applications, to engineers who are creating applications and utilities using Node.js. All of this has made Node the backend language of choice.

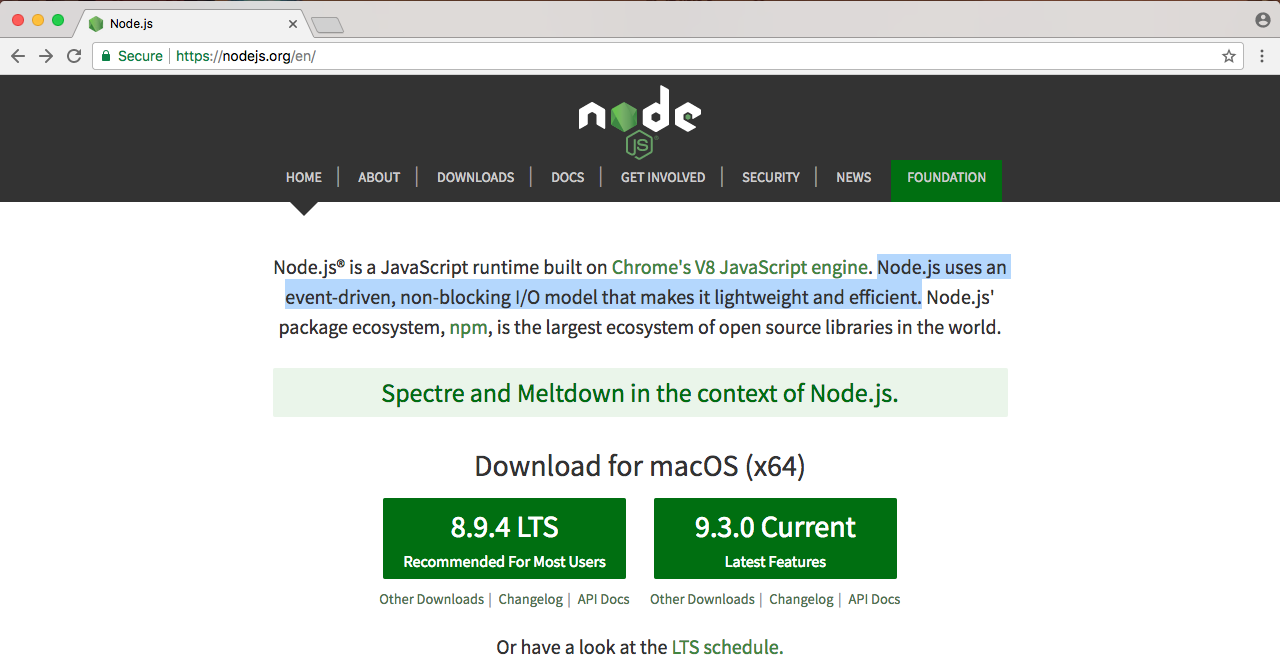
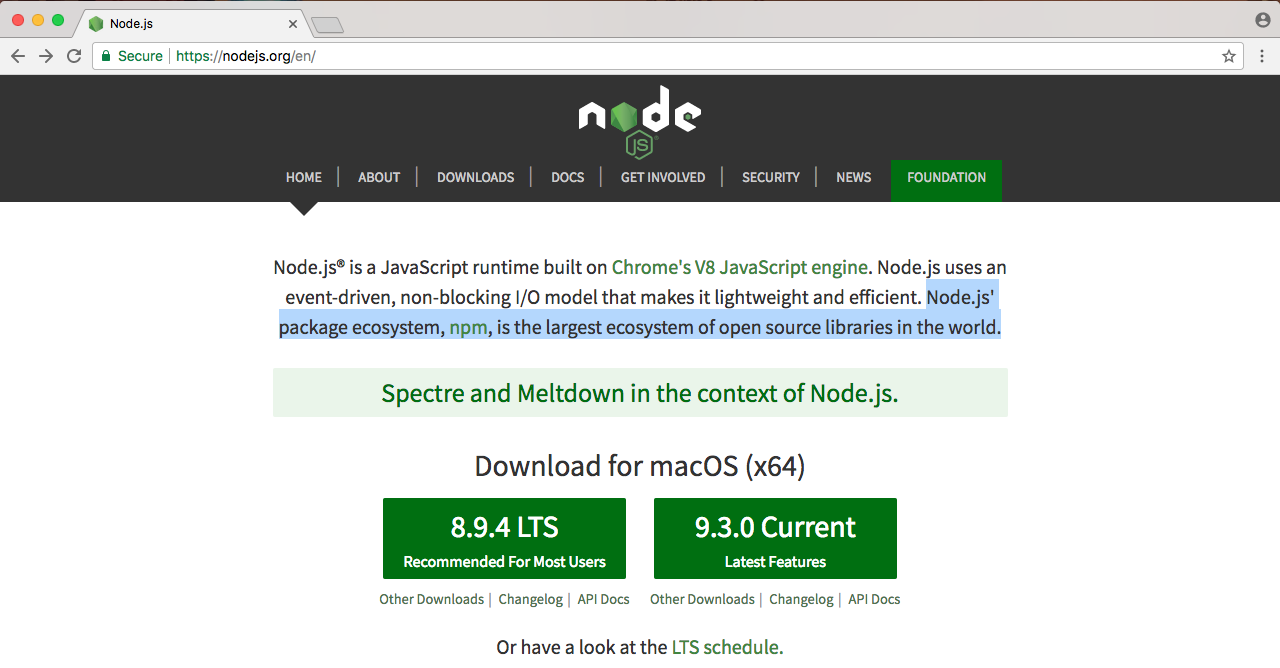
Now, if we look at the homepage of Node, we have three sentences, as shown in the following screenshot:

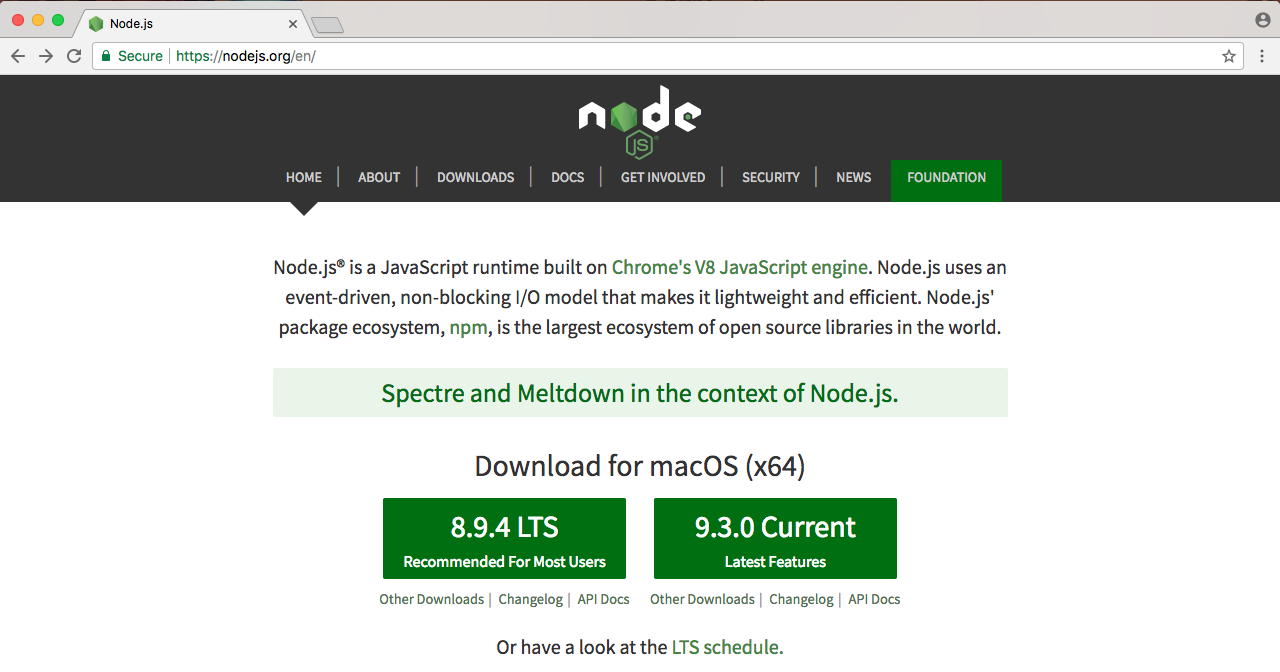
In the previous section, we addressed the first sentence. We took a look at what Node.js is. There's only three sentences in the image, so in this section, we'll take a look at the second two sentences. We'll read them now, then we'll break it down, learning exactly why Node is so great.

The first sentence, Node.js uses an event-driven, non-blocking I/O model that makes it lightweight and efficient; we'll explore all of this now. The second sentence we'll explore at the end of the section—Node.js' packaged ecosystem, npm, is the largest ecosystem of open source libraries in the world. Now, these two sentences have a ton of information packed into them.

We'll go over a few code examples, we'll dive into some charts and graphs, and we'll explore what makes Node different and what makes it so great.

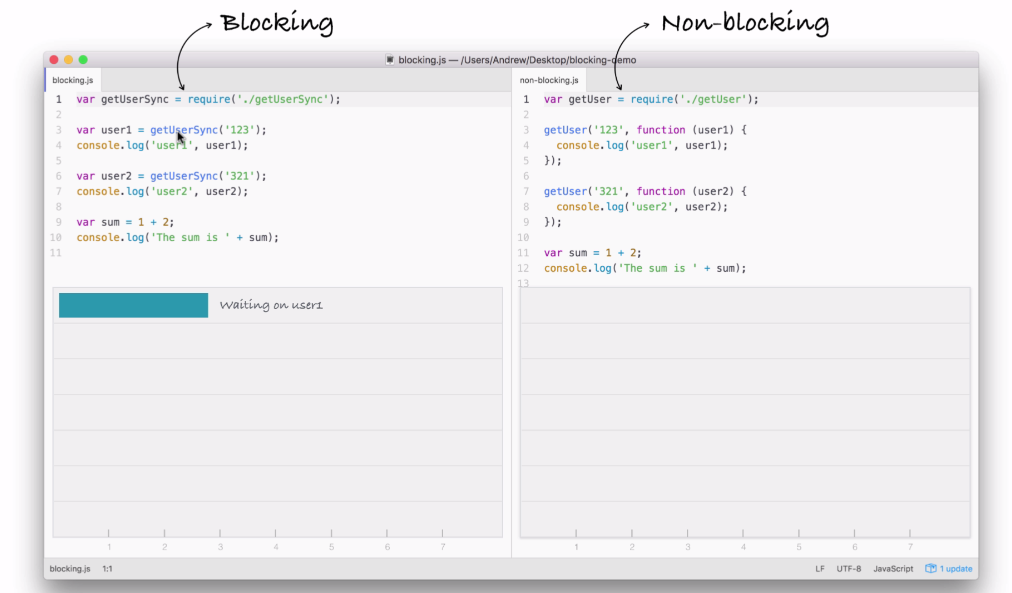
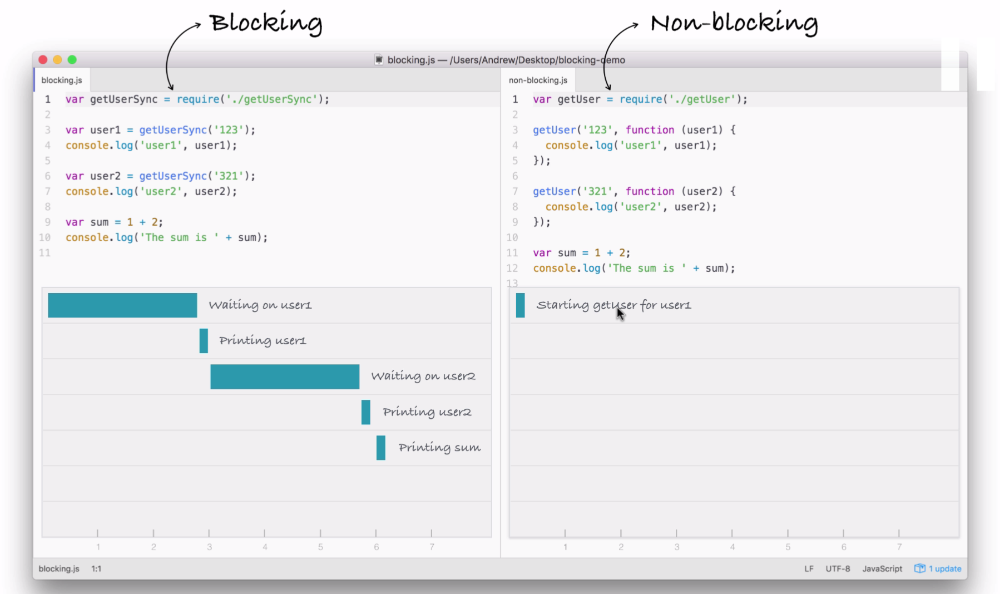
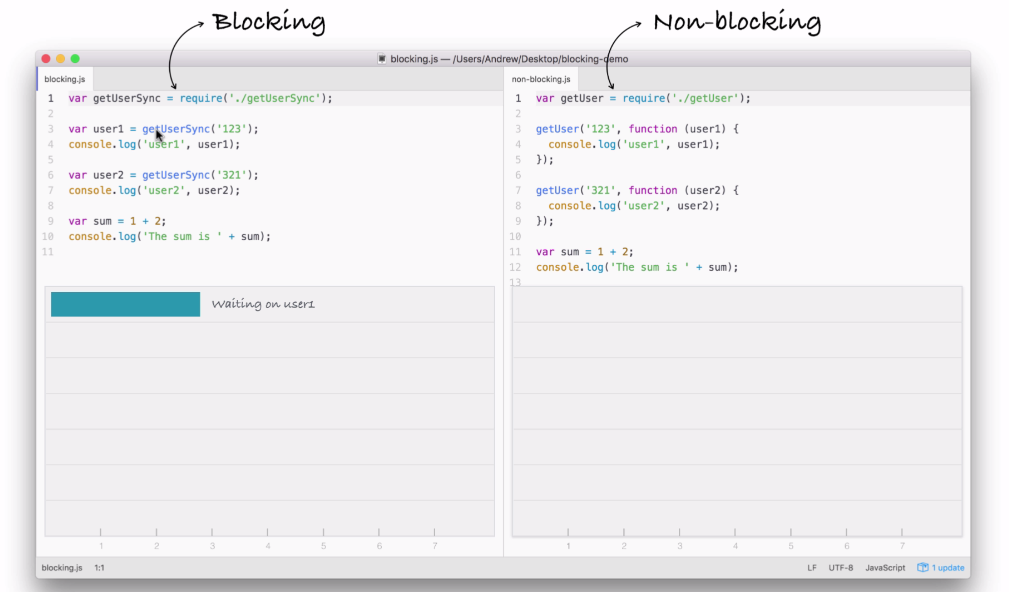
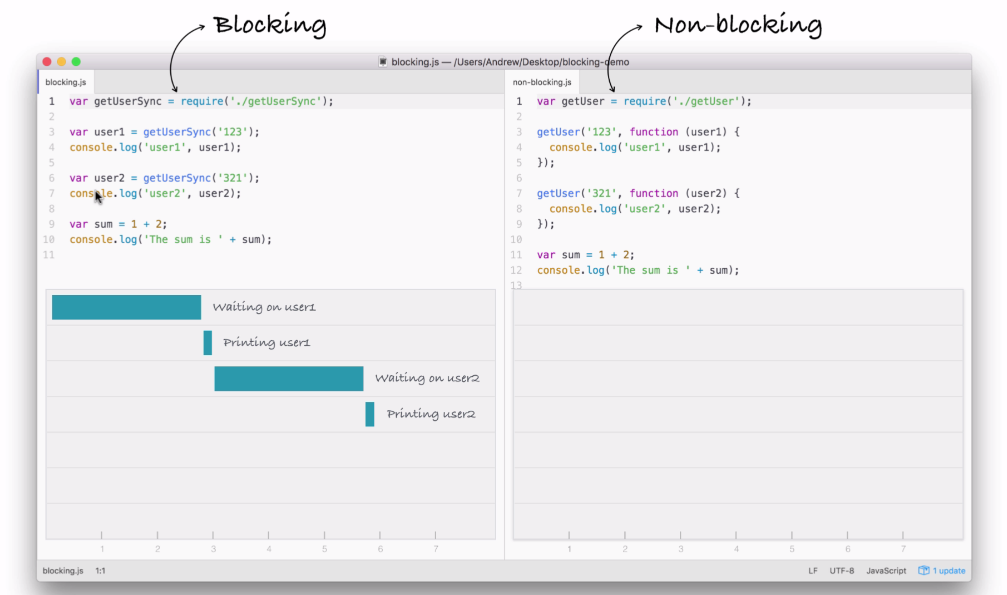
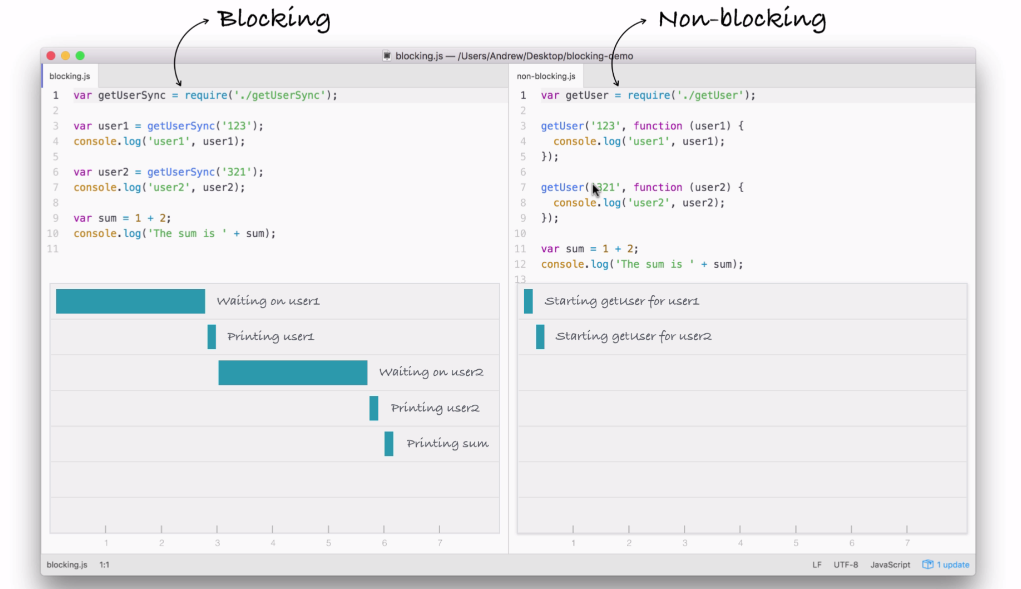
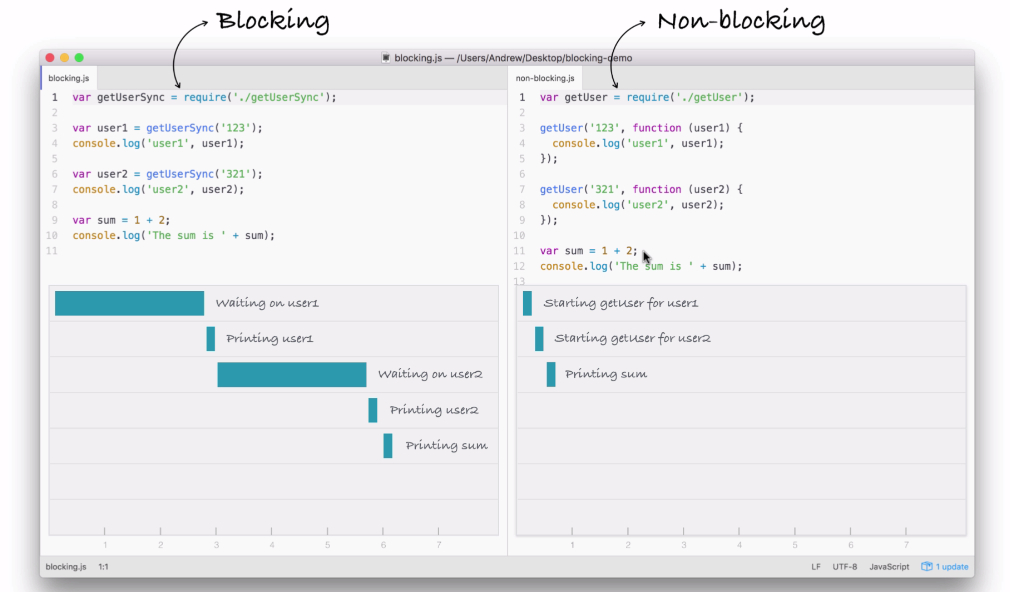
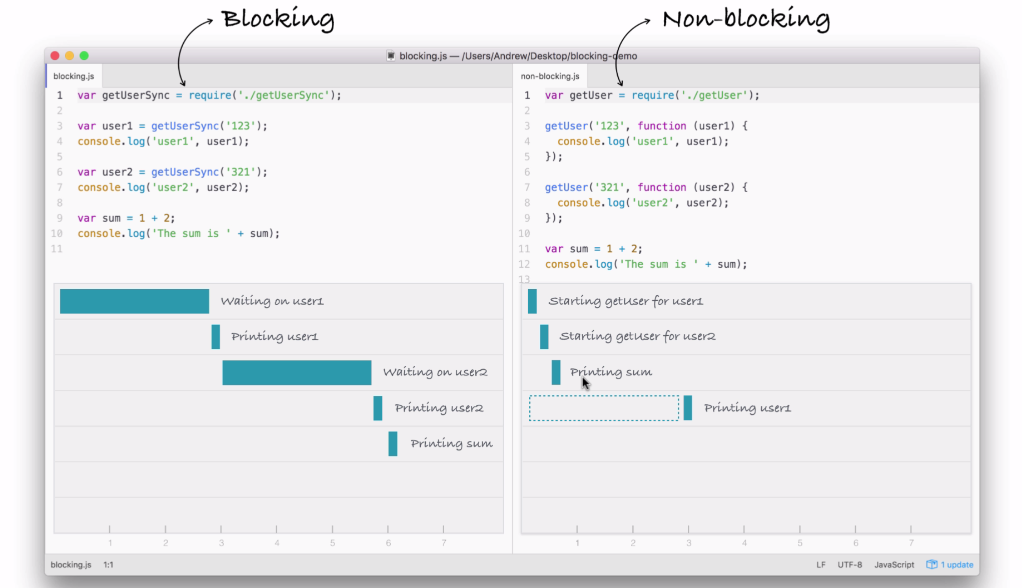
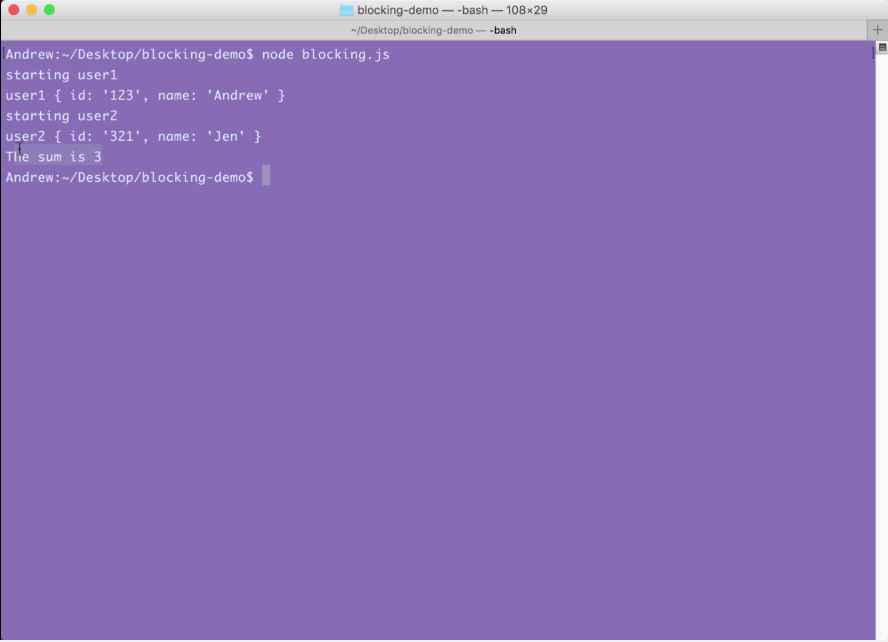
Node is an event-driven, non-blocking language. Now, what is I/O? I/O is something that your application does all of the time. When you're reading or writing to a database, that is I/O, which is short form for input/output.

This is the communication from your Node application to other things inside of the Internet of Things. This could be a database read and write request, you may be changing some files on your filesystem, or you may be making an HTTP request to a separate web server, such as a Google API for fetching a map for the user's current location. All of these use I/O, and I/O takes time.

Now, the non-blocking I/O is great. That means while one user is requesting a URL from Google, other users can be requesting a database file read and write access, they can be requesting all sorts of things without preventing anyone else from getting some work done.

Blocking and non-blocking software development

Let's go ahead and take a look at the differences between blocking and non blocking software development:

In the preceding screenshot, I have two files that we'll be executing. But before going to that, first let's explore how each of these files operates, the steps that are required in order to finish the program.

This will help us understand the big differences between blocking, which I have on the left side of the image, which is not what Node uses, and non-blocking is on the right side, which is exactly how all of our Node applications in the book are going to operate.

You don't have to understand the individual details, such as what require is, in order to understand what's going on in this code example. We'll be breaking things down in a very general sense. The first line on each code is responsible for fetching a function that gets called. This function will be our simulated I/O function that is going to a database, fetching some user data and printing it to the screen.

Refer to the preceding code image. After we load in the function, both files try to fetch a user with an ID of 123. When it gets that user, it prints it to the screen with the user1 string first, and then it goes on and it fetches the user with 321 as the ID. And it prints that to the screen. And finally both files add up 1 + 2, storing the result, which is 3, in the sum variable and print it to the screen.

Now, while they all do the same thing, they do it in very different ways. Let's break down the individual steps. In the following code image, we'll go over what Node executes and how long it takes:

You can consider the seconds shown in the preceding screenshot; it doesn't really matter, it's just to show the relative operating speed between the two files.

The working of blocking I/O

The blocking example can be illustrated as follows:

The first thing that happens inside our blocking example, as shown in the preceding screenshot, is that we fetch the user on line 3 in the code:

var user1 = getUserSync('123');

Now, this request requires us to go to a database, which is an I/O operation to fetch that user by ID. This takes a little bit of time. In our case, we'll say it takes three seconds.

Next, on line 4 in the code, we print the user to the screen, which is not an I/O operation and it runs right away, printing user1 to the screen, as shown in the following code:

console.log('user1', user1); 

As you can see in the following screenshot, it takes almost no time at all:

Next up, we wait on the fetching of user2:

var user2 = getUserSync('321');

When user2 comes back, as you might expect, we print it to the screen, which is exactly what happens on line 7:

console.log('user2', user2);

Finally, we add up our numbers and we print it to the screen:

var sum = 1 + 2; 
console.log('The sum is ' + sum); 

None of this is I/O, so right here we have our sum printing to the screen in barely any time.

This is how blocking works. It's called blocking because while we're fetching from the database, which is an I/O operation, our application cannot do anything else. This means our machine sits around idle waiting for the database to respond, and can't even do something simple like adding two numbers and printing them to the screen. It's just not possible in a blocking system.

The working non-blocking I/O

In our non-blocking example, this is how we'll be building our Node applications.

Let's break this code example down line by line. First up, things start much the same way as we discussed in the blocking example. We'll start the getUser function for user1, which is exactly what we did earlier:

But we're not waiting, we're simply kicking off that event. This is all part of the event loop inside Node.js, which is something we'll be exploring in detail.

Notice it takes a little bit of time; we're just starting the request, we're not waiting for that data. The next thing we do might surprise you. We're not printing user1 to the screen because we're still waiting for that request to come back, instead we start the process of fetching our user2 with the ID of 321:

In this part of the code, we're kicking off another event, which takes just a little bit of time to do-it is not an I/O operation. Now, behind the scenes, the fetching of the database is I/O, but starting the event, calling this function is not, so it happens really quickly.

Next up, we print the sum. The sum doesn't care about either of the two user objects. They're basically unrelated, so there's no need to wait for the users to come back before I print that sum variable, as shown in the following screenshot:

What happens after we print the sum? Well, we have the dotted box, as shown in the following screenshot:

This box signifies the simulated time it takes for our event to get responded to. Now, this box is the exact same width as the box in the first part of the blocking example (waiting on user1), as shown here:

Using non-blocking doesn't make our I/O operations any faster, but what it does do is it lets us run more than one operation at the same time.

In the non-blocking example, we start two I/O operations before the half second mark, and in between three and a half seconds, both come back, as shown in the following screenshot:

Now, the result here is that the entire application finishes much quicker. If you compare the time taken in executing both the files, the non-blocking version finishes in just over three seconds, while the blocking version takes just over six seconds. A difference of 50%. This 50% comes from the fact that in blocking, we have two requests each taking three seconds, and in non-blocking, we have two requests each taking three seconds, but they run at the same time.

Using the non-blocking model, we can still do stuff like printing the sum without having to wait for our database to respond. Now, this is the big difference between the two; blocking, everything happens in order, and in non-blocking we start events, attaching callbacks, and these callbacks get fired later. We're still printing out user1 and user2, we're just doing it when the data comes back, because the data doesn't come back right away.

Inside Node.js, the event loop attaches a listener for the event to finish, in this case for that database to respond back. When it does, it calls the callback you pass in the non-blocking case, and then we print it to the screen.

Now, imagine this was a web server instead of the preceding example. That would mean if a web server comes in looking to query the database, we can't process other users' requests without spinning up a separate thread. Now, Node.js is single threaded, which means your application runs on one single thread, but since we have non-blocking I/O, that's not a problem.

In a blocking context, we could handle two requests on two separate threads, but that doesn't really scale well, because for each request we have to beef up the amount of CPU and RAM resources that we're using for the application, and this sucks because those threads, are still sitting idle. Just because we can spin up other threads doesn't mean we should, we're wasting resources that are doing nothing.

In the non-blocking case, instead of wasting resources by creating multiple threads, we're doing everything on one thread. When a request comes in, the I/O is non-blocking so we're not taking up any more resources than we would be if it never happened at all.

Blocking and non-blocking examples using Terminal

Let's run these examples in real time and see what we get. And we have the two files (blocking and non-blocking files) that we saw in the previous section.

We'll run both of these files, and I'm using the Atom editor to edit my text files. These are things we'll be setting up later in the section, this is just for your viewing purpose, you don't need to run these files.

Now, the blocking and non-blocking files, will both get run and they'll do similar things to those we did in the previous section, just in a different way. Both use I/O operations, getUserSync and getUser, that take five seconds apiece. The time is no different, it's just the order they execute in that makes the non-blocking version much quicker.

Now, to simulate and show how things work, I'll add a few console.log statements as shown in the following code example, console.log('starting user1'), console.log('starting user2').

This will let us visualize how things work inside Terminal. By running node blocking.js, this is how we run files. We type node and we specify the filename, as shown in the following code:

 node blocking.js 

When I run the file, we get some output. starting user1 prints to the screen and then it sits there:

Now, we have the user1 object printing to the screen with the name Andrew, and starting user2 prints to the screen, as shown in the following code output:

After that, the user2 object comes back around five seconds later with the name of Jen.

As shown in the preceding screenshot, our two users have printed to the screen, and at the very end our sum, which is 3, prints to the screen; everything works great.

Notice that starting user1 was immediately followed by the finishing of user1, and starting user2 was immediately followed by the finishing of user2 because this is a blocking application.

Now, we'll run the non-blocking file, which I've called non-blocking.js. When I run this file, starting user1 prints, starting user2 prints, then the sum prints all back to back:

Around 5 seconds later, at basically the same time, user1 and user2 both print to the screen.

This is how non-blocking works. Just because we started an I/O operation doesn't mean we can't do other things, such as starting another one and printing some data to the screen, in this case just a number. This is the big difference, and this is what makes non-blocking apps so fantastic. They can do so many things at the exact same time without having to worry about the confusion of multi-threading applications.

Let's move back into the browser and take a look at those sentences again in the Node website:

Node.js uses an event-driven, non-blocking I/O model that makes it lightweight and efficient, and we saw that in action.

Because Node is non-blocking, we were able to cut down the time our application took by half. This non-blocking I/O makes our apps super quick, this is where the lightweight and efficient comes into play.

Node community – problem solving open source libraries

Now, let's go to the last sentence on the Node website, as shown in the following screenshot:

Node.js' package ecosystem, npm, is the largest ecosystem of open-source libraries in the world. This is what really makes Node fantastic. This is the cherry on top-the community, the people every day developing new libraries that solve common problems in your Node.js applications.

Things such as validating objects, creating servers, and serving up content live using sockets. There's libraries already built for all of those so you don't have to worry about this. This means that you can focus on the specific things related to your application without having to create all this infrastructure before you can even write real code, code that does something specific to your apps use case.

Now, npm, which is available on npmjs.org, is the site we'll be turning to for a lot of third-party modules:

If you're trying to solve a problem in Node that sounds generic, chances are that someone's already solved it. For example, if I want to validate some objects, let's say I want to validate that a name property exists and that there's an ID with a length of three. I could go into Google or go into npm; I usually choose Google, and I could Google search npm validate object.

When I google that, I'll just look for results from npmjs.com, and you can find the first three or so are from that:

I can click the first one, and this will let me explore the documentation and see if it's right for me:

This one looks great, so I can add it to my app without any effort.

Now, we'll go through this process. Don't worry, I'm not going to leave you high and dry on how to add third-party modules. We'll be using a ton of them in the book because this is what real Node developers do. They take advantage of the fantastic community of developers, and that's the last thing that makes Node so great.

This is why Node has come to the position of power that it currently sits at, because it's non-blocking, meaning it's great for I/O applications, and it has a fantastic community of developers. So, if you ever want to get anything done, there's a chance someone already wrote the code to do it.

This is not to say you should never use Rails or Python or any other blocking language again, that is not what I'm getting at. What I'm really trying to show you is the power of Node.js and how you can make your applications even better. Languages like Python have things such as the library Twisted, which aims to add non-blocking features to Python. Though the big problem is all of the third-party libraries, as they are still written in a blocking fashion, so you're really limited as to which libraries you can use.

Since Node was built non-blocking from the ground up, every single library on npmjs.com is non-blocking. So you don't have to worry about finding one that's non blocking versus blocking; you can install a module knowing it was built from the ground up using a non blocking ideology.

In the next couple of sections, you'll be writing your very first app and running it from Terminal.