
Follow the steps shown here to get started with Selenium WebDriver.
Preparing for the very first script
Installing Java 8
Follow the instructions below to install Java 8:
- Go to http://www.oracle.com/technetwork/java/javase/downloads/jdk8-downloads-2133151.html and click on the appropriate version. I have selected the 64-bit Windows version since mine is a Windows machine.
- Once the file has downloaded, run the .exe file. Java will start installing it onto your machine. Next, we have to set two environment variables in order to use Java.
- Go to Control Panel and click Advanced System Settings.
- Click on Environment variables and add two system variables:
- One is JAVA_HOME. Provide the path of the root folder where Java is installed. In this case, this will be C:\Program Files\Java\jdk1.8.0_152.
- The second is the Path variable. Remember that this variable has to be appended after adding a ;. Here, the path of the bin folder has to be specified. In this case, this will be C:\Program Files\Java\jdk1.8.0_152\bin.
- The next step is to check our configuration. Open the Command Prompt and type java –version:

If you get an output similar to the one shown in the preceding screenshot, you are all set to start coding.
Now, let's get our hands dirty!
Setting up Eclipse
We will be using Eclipse as an IDE for developing Selenium Scripts in this book, but you are free to use whichever IDE suits you best.
Downloading Eclipse
Navigate to the Eclipse website (www.eclipse.org/ide) and click on the Download link. Here, you can find very specific instructions regarding how to install you favourite IDE version (Kepler, Neon, and so on).
Creating a Maven project
Once the IDE is installed, perform the following steps:
- Double click on the .exe file for Eclipse and go to File | New | Other.
- Select Maven Project. Click Next.
- Click Next on the screen that appears.
- Select Create a simple project (skip archetype selection). Then, click Next.
- Input the Group ID. Ideally, this is the package name of the project. The Artifact ID corresponds to the name of the JAR file in case you want to create one. Keep the packaging as JAR. Notice that the version is 0.0.1-SNAPSHOT. The SNAPSHOT part indicates that the project is still under development and has not been released.
- Click Finish. The following is a snapshot of the Project Explorer:
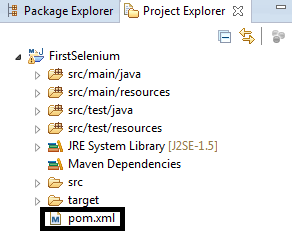
When you create a Maven Project, the src/main/java, src/main/resources, src/test/java, and src/test/resources folders, are created for you. Apart from these, you will see a Maven Dependencies folder that is currently empty. Marked with a black box, there is a .xml file called pom.xml. This is the place where you will place all of the dependencies for your project. By dependencies, I mean dependent JARs. JAR stands for Java archive.
Understanding pom.xml
It's time to explore pom.xml. This is what pom.xml looks like:
<project xmlns="http://maven.apache.org/POM/4.0.0" xmlns:xsi="http://www.w3.org/2001/XMLSchema-instance" xsi:schemaLocation="http://maven.apache.org/POM/4.0.0 http://maven.apache.org/xsd/maven-4.0.0.xsd">
 <modelVersion>4.0.0</modelVersion>
 <groupId>org.packt.selenium</groupId>
 <artifactId>FirstSelenium</artifactId>
 <version>0.0.1-SNAPSHOT</version>
</project>
Group ID and Artifact ID that you added in the previous screens have appeared in the preceding file, inside the Project tag. In order to work with Selenium, we will need to add Selenium dependencies within the Project tag. Let's go ahead and add those from the Maven repository:
- Go to the Maven repository (https://mvnrepository.com) and grab the dependency shown here:
      <!--
      https://mvnrepository.com/artifact/org.seleniumhq.selenium/
      selenium-java -->
      <dependency>
          <groupId>org.seleniumhq.selenium</groupId>
          <artifactId>selenium-java</artifactId>
          <version>3.13.0</version>
      </dependency>
- Place this dependency inside a dependencies tag, as shown in the pom.xml file here:
      <project xmlns="http://maven.apache.org/POM/4.0.0"
      xmlns:xsi="http://www.w3.org/2001/XMLSchema-instance"
      xsi:schemaLocation="http://maven.apache.org/POM/4.0.0
      http://maven.apache.org/xsd/maven-4.0.0.xsd">
          <modelVersion>4.0.0</modelVersion>
          <groupId>org.packt.selenium</groupId>
          <artifactId>FirstSelenium</artifactId>
          <version>0.0.1-SNAPSHOT</version>
          <dependencies>
              <!--
      https://mvnrepository.com/artifact/org.seleniumhq.selenium/
      selenium-java -->
               <dependency>
                  <groupId>org.seleniumhq.selenium</groupId>
                  <artifactId>selenium-java</artifactId>
                  <version>3.13.0</version>
              </dependency>
           </dependencies>
      </project>
- Save the pom.xml. You will see a small activity in the bottom-right corner of Eclipse, stating that the project is being built.
The Maven Dependencies folder now gets populated with all of the downloaded JARs, as shown previously.
Manual configuration
With this, we are ready, and have the basic Eclipse setup for Selenium WebDriver. But we are not done yet. It might occur that, under a corporate firewall, you are unable to download the required JARS. In this situation, perform the following steps:
- Simply create a plain Java project.
- Right -click on the project in Project Explorer.
- Select Build Path | Configure Build Path.
- Click on Add External JARs and add the required JARs manually.
- Next, we will write a very simple script which just opens www.google.com (this is shown in the following section). Right-click the Project and select new class.
Creating the first script
Type the following code. What the following script does is simply opens a new Chrome browser and navigates to the URL http://www.google.com:
public class FirstTest {
    public static void main(String[] args) {
        System.setProperty("webdriver.chrome.driver",
                       "C:\\SeleniumWD\\src\\main\\resources\\chromedriver.exe");
        WebDriver driver = new ChromeDriver();
        driver.get("http://www.google.com");
    }
}
Right-click the file and click Run as Java Application and hurrah! A chrome browser opens and http://www.google.com gets loaded.
You have successfully created your first Selenium Script.