

WorkoutRunnerComponent, is the central piece of our 7 Minute Workout app and it will contain the logic to execute the workout.
What we are going to do in the WorkoutRunnerComponent implementation is as follows:
- Start the workout
- Show the workout in progress and show the progress indicator
- After the time elapses for an exercise, show the next exercise
- Repeat this process until all the exercises are over
We are ready to create (or scaffold) our component.
From the command line, navigate to the src/app folder and execute the following ng command:
ng generate component workout-runner -isThe generator generates a bunch of files (three) in the workout-runner folder and updates the module declaration in WorkoutRunnerModule to include the newly created WorkoutRunnerComponent.
Note
The -is flag is used to stop generation of a separate CSS file for the component. Since we are using global styles, we do not need component-specific styles.
Note
Remember to run this command from the src/app folder and not from the src/app/workout-runner folder. If we run the preceding command from src/app/workout-runner, Angular CLI will create a new subfolder with the workout-runner component definition.
The preceding ng generate command for component generates these three files:
<component-name>.component.html: This is the component's view HTML.<component-name>.component.spec.ts: Test specification file used in unit testing.<component-name>.component.ts: Main component file containing component implementation.
Again, we will encourage you to have a look at the generated code to understand what gets generated. The Angular CLI component generator saves us some keystrokes and once generated, the boilerplate code can evolve as desired.
Note
While we see only four decorator metadata properties (such as templateUrl), the component decorator supports some other useful properties too. Look at the Angular documentation for component to learn more about these properties and their application.
An observant reader might have noticed that the generated selector property value has a prefix abe; this is intentional. Since we are extending the HTML domain-specific language (DSL) to incorporate a new element, the prefix abe helps us demarcate HTML extensions that we have developed. So instead of using <workout-runner></workout-runner> in HTML we use <abe-workout-runner></abe-workout-runner>. The prefix value has been configured in angular.json, see the prefix property.
We now have the WorkoutRunnerComponent boilerplate; let's start adding the implementation, starting with adding the model reference.
In workout-runner.component.ts, import all the workout models:
import {WorkoutPlan, ExercisePlan, Exercise} from './model';Next, we need to set up the workout data. Let's do that by adding some code in the generated ngOnInit function and related class properties to the WorkoutRunnerComponent class:
workoutPlan: WorkoutPlan;
restExercise: ExercisePlan;
ngOnInit() {
   this.workoutPlan = this.buildWorkout();
   this.restExercise = new ExercisePlan(
     new Exercise('rest', 'Relax!', 'Relax a bit', 'rest.png'),
     this.workoutPlan.restBetweenExercise);
}
ngOnInit is a special function that Angular calls when a component is initialized. We will talk about ngOnInit shortly.
The buildWorkout on WorkoutRunnerComponent sets up the complete workout, as we will define shortly. We also initialize a restExercise variable to track even the rest periods as exercise (note that restExercise is an object of type ExercisePlan).
The buildWorkout function is a lengthy function, so it's better to copy the implementation from the workout runner's implementation available in Git branch checkpoint2.1 (http://bit.ly/ng6be-2-1-workout-runner-component-ts). The buildWorkout code looks as follows:
buildWorkout(): WorkoutPlan {
let workout = new WorkoutPlan('7MinWorkout',
"7 Minute Workout", 10, []);
   workout.exercises.push(
      new ExercisePlan(
        new Exercise(
          'jumpingJacks',
          'Jumping Jacks',
          'A jumping jack or star jump, also called side-straddle hop
           is a physical jumping exercise.',
          'JumpingJacks.png',
          'jumpingjacks.wav',
          `Assume an erect position, with feet together and
           arms at your side. ...`,
          ['dmYwZH_BNd0', 'BABOdJ-2Z6o', 'c4DAnQ6DtF8']),
        30));
   // (TRUNCATED) Other 11 workout exercise data.
   return workout;
}
This code builds the WorkoutPlan object and pushes the exercise data into the exercises array (an array of ExercisePlan objects), returning the newly built workout.
The initialization is complete; now, it's time to actually implement the start workout. Add a start function to the WorkoutRunnerComponent implementation, as follows:
start() {
   this.workoutTimeRemaining =
   this.workoutPlan.totalWorkoutDuration();
   this.currentExerciseIndex = 0;
   this.startExercise(this.workoutPlan.exercises[this.currentExerciseIndex]);
}
Then declare the new variables used in the function at the top, with other variable declarations:
workoutTimeRemaining: number;
currentExerciseIndex: number;
The workoutTimeRemaining variable tracks the total time remaining for the workout, and currentExerciseIndex tracks the currently executing exercise index. The call to startExercise actually starts an exercise. This is how the code for startExercise looks:
startExercise(exercisePlan: ExercisePlan) {
    this.currentExercise = exercisePlan;
    this.exerciseRunningDuration = 0;
    const intervalId = setInterval(() => {
      if (this.exerciseRunningDuration >=  this.currentExercise.duration) {
          clearInterval(intervalId);
      }
      else { this.exerciseRunningDuration++; }
    }, 1000);
}
We start by initializing currentExercise and exerciseRunningDuration. The currentExercise variable tracks the exercise in progress and exerciseRunningDuration tracks its duration. These two variables also need to be declared at the top:
currentExercise: ExercisePlan;
exerciseRunningDuration: number;
We use the setInterval JavaScript function with a delay of one second (1,000 milliseconds) to make progress. Inside the setInterval callback, exerciseRunningDuration is incremented with each passing second. The nested clearInterval call stops the timer once the exercise duration lapses.
Note
TypeScript arrow functions
The callback parameter passed to setInterval (()=>{...}) is a lambda function (or an arrow function in ES 2015). Lambda functions are short-form representations of anonymous functions, with added benefits. You can learn more about them at http://bit.ly/ng2be-ts-arrow-functions.
The first cut of the component is almost complete, except it currently has a static view (UI) and hence we cannot verify the implementation. We can quickly rectify this situation by adding a rudimentary view definition. Open workout-runner.component.ts, comment out the templateUrl property, and add an inline template property (template) and set it to the following:
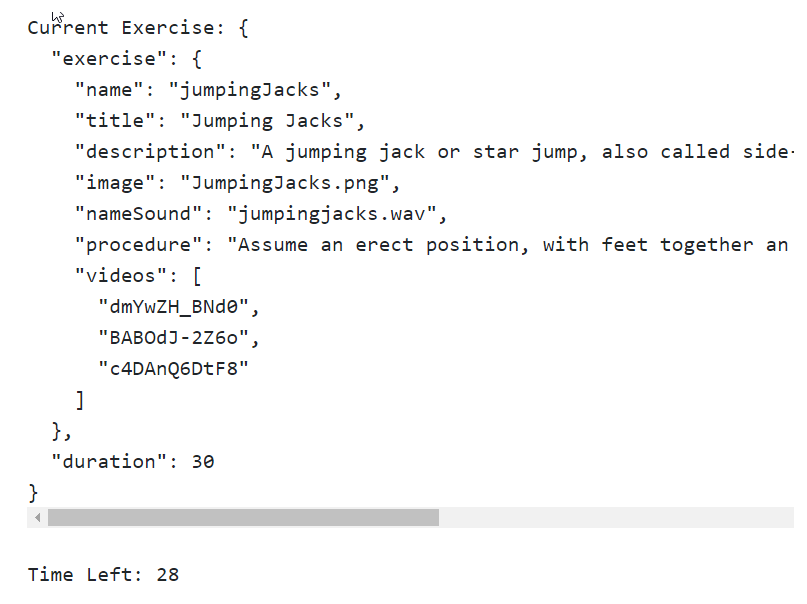
template: `<pre>Current Exercise: {{currentExercise | json}}</pre>
<pre>Time Left: {{currentExercise.duration - exerciseRunningDuration}}</pre>`,
Note
Strings enclosed in backticks (` `) are a new addition to ES2015. Also called template literals, such string literals can be multiline and allow expressions to be embedded inside (not to be confused with Angular expressions). Look at the MDN article at http://bit.ly/template-literals for more details.
Note
Inline versus external view templateThe preceding template property is an example of inline component template. This allows the component developer to specify the component template inline instead of using a separate HTML file. The inline template approach generally works for components with a trivial view. Inline templates have a disadvantage: formatting HTML becomes difficult and IDE support is very limited as the content is treated as a string literal. When we externalize HTML, we can develop a template as a normal HTML document. We recommend you use an external template file (specified using templateUrl) for elaborate views. Angular CLI by default generates an external template reference, but we can affect this behavior by passing the --inline-template flag to the ng component generation command, such as --inline-template true.
The preceding template HTML will render the raw ExercisePlan object and the exercise time remaining. It has an interesting expression inside the first interpolation: currentExercise | json. The currentExercise property is defined in WorkoutRunnerComponent, but what about the | symbol and what follows it (json)? In the Angular world, it is called a pipe. The sole purpose of a pipe is to transform/format template data.
The json pipe here does JSON data formatting. You will learn more about pipes later in this chapter, but to get a general sense of what the json pipe does, we can remove the json pipe plus the | symbol and render the template; we are going to do this next.
To render the new WorkoutRunnerComponent implementation, it has to be added to the root component's view. Modify src/components/app/app.component.html and replace the h3 tag with the following code:
<div class="container body-content app-container">
      <abe-workout-runner></abe-workout-runner>
</div>
While the implementation may look complete, there is a crucial piece missing. Nowhere in the code do we actually start the workout. The workout should start as soon as we load the page.
Component lifecycle hooks are going to rescue us!
The life of an Angular component is eventful. Components get created, change state during their lifetime, and finally, they are destroyed. Angular provides some lifecycle hooks/functions that the framework invokes (on the component) when such an event occurs. Consider these examples:
- When a component is initialized, Angular invokes
ngOnInit - When a component's data-bound properties change, Angular invokes
ngOnChanges - When a component is destroyed, Angular invokes
ngOnDestroy
As developers, we can tap into these key moments and perform some custom logic inside the respective component.
The hook we are going to utilize here is ngOnInit. The ngOnInit function gets fired the first time the component's data-bound properties are initialized, but before the view initialization starts.
Note
While ngOnInit and the class constructor seem to look similar, they have a different purpose. A constructor is a language feature and it is used to initialize class members. ngOnInit, on the other hand, is used to do some initialization stuff once the component is ready. Avoid use of a constructor for anything other than member initialization.
Update the ngOnInit function to the WorkoutRunnerComponent class with a call to start the workout:
ngOnInit() {
    ...
    this.start();
}
Angular CLI as part of component scaffolding already generates the signature for ngOnInit. The ngOnInit function is declared on the OnInit interface, which is part of the core Angular framework. We can confirm this by looking at the import section of WorkoutRunnerComponent:
import {Component,OnInit} from '@angular/core';
...
export class WorkoutRunnerComponent implements OnInit {
Note
There are a number of other lifecycle hooks, including ngOnDestroy, ngOnChanges, and ngAfterViewInit, that components support, but we are not going to dwell on any of them here. Look at the developer guide (https://angular.io/guide/lifecycle-hooks) on lifecycle hooks to learn more about other such hooks.
Note
Implementing the interface (OnInit in the preceding example) is optional. These lifecycle hooks work as long as the function name matches. We still recommend you use interfaces to clearly communicate the intent.
Time to run our app! Open the command line, navigate to the trainer folder, and type this line:
ng serve --openThe code compiles, but no UI is rendered. What is failing us? Let's look at the browser console for errors.
Open the browser's dev tools (common keyboard shortcut F12) and look at the console tab for errors. There is a template parsing error. Angular is not able to locate the abe-workout-runner component. Let's do some sanity checks to verify our setup:
WorkoutRunnerComponentimplementation complete - check- Component declared in
WorkoutRunnerModule- check WorkoutRunnerModuleimported intoAppModule- check
Still, the AppComponent template cannot locate the WorkoutRunnerComponent. Is it because WorkoutRunnerComponent and AppComponent are in different modules? Indeed, that is the problem! While WorkoutRunnerModule has been imported into AppModule, WorkoutRunnerModule still does not export the new WorkoutRunnerComponent that will allow AppComponent to use it.
Note
Remember, adding a component/directive/pipe to the declaration section of a module makes them available inside the module. It's only after we export the component/directive/pipe that it becomes available to be used across modules.
Let's export WorkoutRunnerComponent by updating the export array of the WorkoutRunnerModule declaration to the following:
declarations: [WorkoutRunnerComponent],
exports:[WorkoutRunnerComponent]
This time, we should see the following output:
Note
Always export artifacts defined inside an Angular module if you want them to be used across other modules.
The model data updates with every passing second! Now you'll understand why interpolations ({{ }}) are a great debugging tool.
Note
This will also be a good time to try rendering currentExercise without the json pipe and see what gets rendered.
We are not done yet! Wait long enough on the page and we realize that the timer stops after 30 seconds. The app does not load the next exercise data. Time to fix it!
Update the code inside the setInterval function:
if (this.exerciseRunningDuration >=  this.currentExercise.duration) {
   clearInterval(intervalId);
   const next: ExercisePlan = this.getNextExercise();
   if (next) {
     if (next !== this.restExercise) {
       this.currentExerciseIndex++;
        }
     this.startExercise(next);}
   else { console.log('Workout complete!'); }
}
The if condition if (this.exerciseRunningDuration >= this.currentExercise.duration) is used to transition to the next exercise once the time duration of the current exercise lapses. We use getNextExercise to get the next exercise and call startExercise again to repeat the process. If no exercise is returned by the getNextExercise call, the workout is considered complete.
During exercise transitioning, we increment currentExerciseIndex only if the next exercise is not a rest exercise. Remember that the original workout plan does not have a rest exercise. For the sake of consistency, we have created a rest exercise and are now swapping between rest and the standard exercises that are part of the workout plan. Therefore, currentExerciseIndex does not change when the next exercise is rest.
Let's quickly add the getNextExercise function too. Add the function to the WorkoutRunnerComponent class:
getNextExercise(): ExercisePlan {
    let nextExercise: ExercisePlan = null;
    if (this.currentExercise === this.restExercise) {
      nextExercise = this.workoutPlan.exercises[this.currentExerciseIndex + 1];
    }
    else if (this.currentExerciseIndex < this.workoutPlan.exercises.length - 1) {
      nextExercise = this.restExercise;
    }
    return nextExercise;
}
The getNextExercise function returns the next exercise that needs to be performed.
Note
Note that the returned object for getNextExercise is an ExercisePlan object that internally contains the exercise details and the duration for which the exercise runs.
The implementation is quite self-explanatory. If the current exercise is rest, take the next exercise from the workoutPlan.exercises array (based on currentExerciseIndex); otherwise, the next exercise is rest, given that we are not on the last exercise (the else if condition check).
With this, we are ready to test our implementation. The exercises should flip after every 10 or 30 seconds. Great!
Note
The current build setup automatically compiles any changes made to the script files when the files are saved; it also refreshes the browser after these changes. But just in case the UI does not update or things do not work as expected, refresh the browser window. If you are having a problem with running the code, look at the Git branch checkpoint2.1 for a working version of what we have done thus far. Or if you are not using Git, download the snapshot of Checkpoint 2.1 (a ZIP file) from http://bit.ly/ng6be-checkpoint2-1. Refer to the README.md file in the trainer folder when setting up the snapshot for the first time.
We have done enough work on the component for now, let's build the view.