When building a network, it is always recommended to start with a network diagram called a network topology. A topology is used to show the logical and physical connections between devices on a network, as well as basic IP addressing assignments.
Figure 2.24 shows the first lab topology:
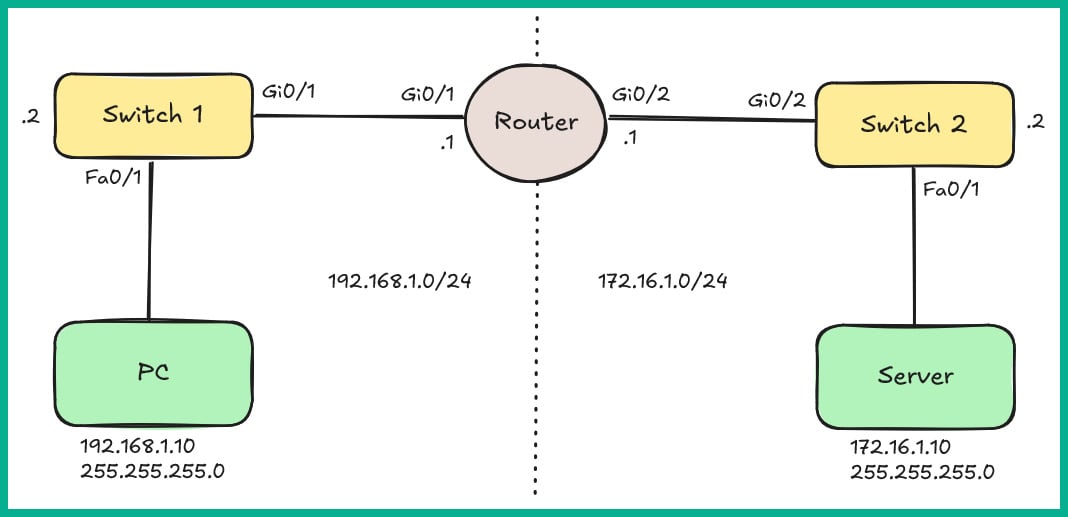
Figure 2.24: Lab topology
As you can see, there are two networks: 192.168.1.0/24 and 172.16.1.0/24. These are interconnected using a Cisco 2911 model router. Each of these networks has a Cisco 2960 model switch to allow the PC and server to interface with the network.
Table 2.1 shows the IP addressing scheme for each device in the lab topology:
|
Device
|
Interface
|
IP Address
|
Subnet Mask
|
Default Gateway
|
|
Router
|
GigabitEthernet 0/1
|
192.168.1.1
|
255.255.255.0
|
N/A
|
|
GigabitEthernet 0/2
|
172.16.1.1
|
255.255.255.0
|
N/A
|
|
Switch 1
|
Interface VLAN 1
|
192.168.1.2
|
255.255.255.0
|
192.168.1.1
|
|
Switch 2
|
Interface VLAN 1
|
172.16.1.2
|
255.255.255.0
|
172.16.1.1
|
|
PC
|
FastEthernet 0
|
192.168.1.10
|
255.255.255.0
|
192.168.1.1
|
|
Server
|
FastEthernet 0
|
172.16.1.10
|
255.255.255.0
|
172.16.1.1
|
Table 2.1: IP addressing table
If you are up for the challenge, you can choose to build this lab topology within Cisco Packet Tracer or download a pre-built file by taking the following steps:
- Go to https://packt.link/CCNArepoCh02
- Download the
Lab 2 - Configuring Cisco IOS Devices.pkt file and open it with Cisco Packet Tracer on your computer to follow along.
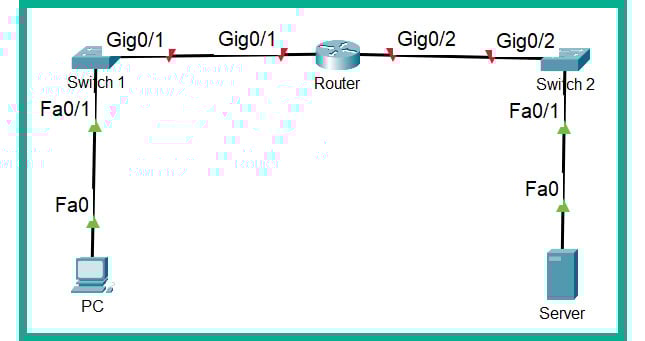
- Figure 2.25 shows the contents of the file when it is opened using Cisco Packet Tracer:
Figure 2.25: Lab file
Note
To display the interface labels in Packet Tracer, click on Options | Preferences, then select the Interface tab and check Always Show Port Labels in Logical Workspace.
Once you have opened the Lab 2 - Configuring Cisco IOS Devices.pkt file using Cisco Packet Tracer on your computer, you can proceed to the next steps.
Task 1: Navigating Cisco IOS
Understanding how to interact with Cisco IOS is essential for performing various configuration and management tasks. In this task, you will become familiar with the basics of navigating Cisco IOS:
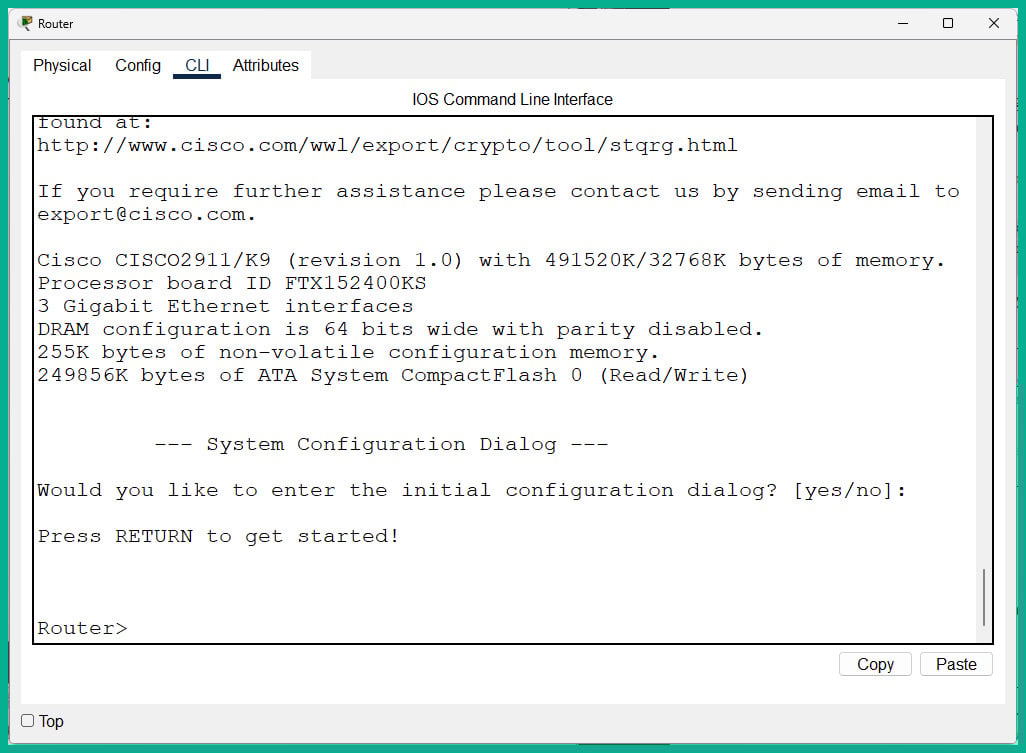
- You can start with the Cisco router. Click on the
Router icon and select the CLI tab, as shown in Figure 2.26:
Figure 2.26: Router CLI
Note
In a real-world scenario, you’ll need to connect the console cable between your computer and the console port of the router. Then, use a terminal emulator application such as PuTTY or SecureCRT to access the CLI of the Cisco router running Cisco IOS.
- Since the bootstrap on the router did not find a
startup-config file within NVRAM, the following prompt appears:--- System Configuration Dialog ---
Would you like to enter the initial configuration dialog? [yes/no]:
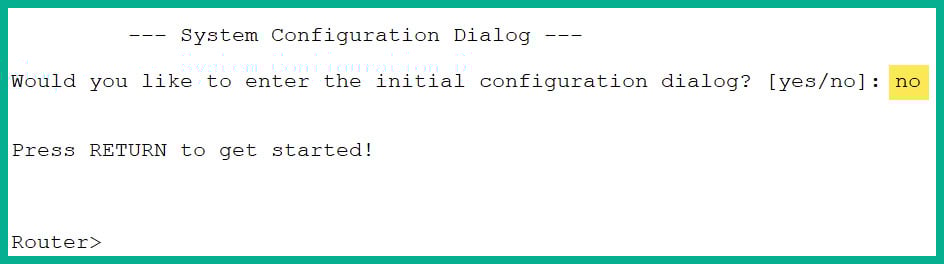
- Type
no and hit Enter twice to access User Exec mode, as shown in Figure 2.27:
Figure 2.27: Router CLI
- Now, you should be in the User Exec mode (
>). To access Privilege Exec mode, use the enable command, as shown here:Router> enable
- As shown in Figure 2.28, the prompt has changed from
> to #, which indicates you are no longer in User Exec mode and are now in Privilege Exec mode:
Figure 2.28: Elevating to Privilege Exec mode
- To move from Privilege Exec to User Exec mode, use the
disable command:Router# disable
- As shown in Figure 2.29, the prompt has changed from
# to >, which now indicates that you are back in User Exec mode:
Figure 2.29: Moving to User Exec mode
Note
Cisco IOS is able to temporarily store the last 15 commands executed on the device. Using the up and down keys on your keyboard, you can cycle through recently used commands for each mode. Therefore, if you are in Privilege Exec mode, you will only see the most recent commands used in that mode.
- Cisco IOS allows network professionals to enter the shorthand version of a command provided Cisco IOS is able to recognize most parts of the command itself. While in User Exec mode, type
en and hit Enter:
Router> en
- As shown in Figure 2.30, Cisco IOS automatically recognizes the
enable command and executes it:
Figure 2.30: Shorthand commands
Note
If Cisco IOS is unable to recognize a shorthand command, it will provide an error message such as % Ambiguous command: " e".
- Cisco IOS supports context-sensitive help and a command syntax checker feature for verifying the accuracy of a command entered by a user.
- If you want to determine all the commands that begin with
sh, then type sh? as shown here:
Router# sh?
- As shown in Figure 2.31, Cisco IOS returns the
show command:
Figure 2.31: Using the context-sensitive help
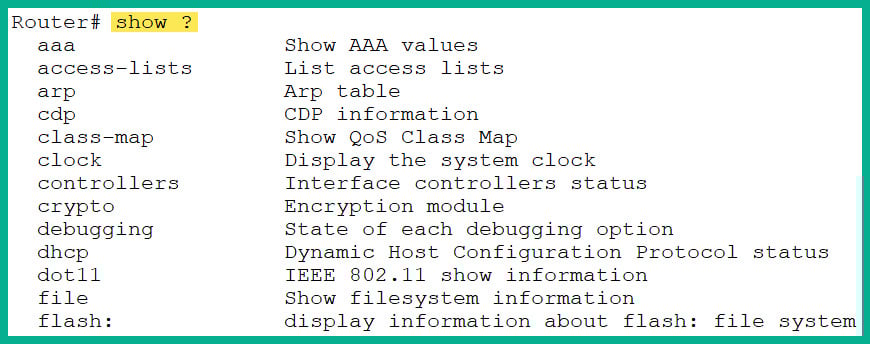
- Additionally, if you want to view a list of commands that are supported by
show, use the show ? command, shown in Figure 2.32:
Figure 2.32: Using the context-sensitive help
- As shown in Figure 2.32, the left column shows the various commands to append after the
show command, such as show clock, while the right column shows their descriptions.
Note
When Cisco IOS displays multiple lines, it temporarily breaks by indicating a --More-- syntax at the end of a page. Using the Enter key on your keyboard will display an additional line of output, while the spacebar will display another page of output on your screen.
Cisco IOS is filled with a lot of commands that enable you to perform many tasks, such as routing, switching, and security. However, you do not need to learn about every command, only those that are applicable to the CCNA certification.
Now that you have a better idea of how to navigate Cisco IOS, you can dive into configuring your small network topology.
Task 2: Checking the IOS Version
As an aspiring network professional, it is important to identify the current IOS version on your Cisco device. By identifying the IOS version, you will be able to determine whether there is a newer version of the operating system and whether there are security vulnerabilities and bugs, as well as getting help with asset management.
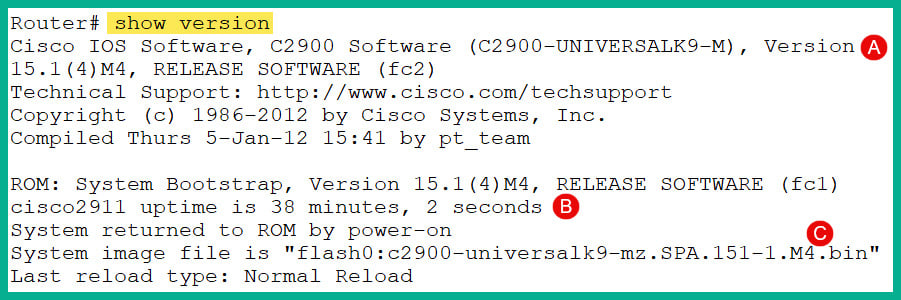
Use show version on the Cisco IOS router to view the device’s operating system, hardware components, and system uptime, as shown in Figure 2.33:
Figure 2.33: The show version command
Figure 2.33 shows the following:
- The version of Cisco IOS as
15.1(4)M4.
- The system uptime since the last boot. This helps network professionals determine whether the device lost power, triggering a network outage.
- The location and filename of Cisco IOS on the device.
Task 3: Best Practices for Securing Devices
By default, anyone with physical access can use a console cable that is connected to their computer and the console port of a Cisco IOS device to access the User Exec mode of the device.
Securing the Console Port
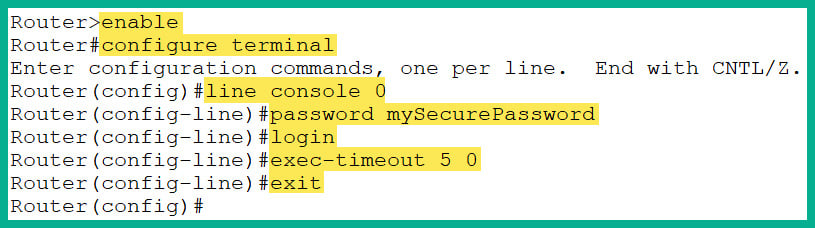
To password-protect and enable authentication on the console port, use the following commands on the router:
Router> enable
Router# configure terminal
Router(config)# line console 0
Router(config-line)# password mySecurePassword
Router(config-line)# login
Router(config-line)# exec-timeout 5 0
Router(config-line)# exit
If you are already in Privilege Exec mode, you can simply start with line #2 and move from there. The following is a description of each line of the command:
- The
enable command allows elevation to Privilege Exec mode
- The
configure terminal command allows elevation to Global Configuration mode.
- The
line console 0 command enters the console line mode
- The
password [your_password] command allows you to set a password
Note
The password command sets your password in plaintext within the configuration files. It’s not recommended to use this command unless there’s no other choice. The secret command automatically encrypts your password and stores the encrypted version, but the secret command is not available in Line mode.
- The
login command enables authentication on the console line and, therefore, prompts the user to enter a password that’s set within the Line mode. In this scenario, the user will be required to enter MySecurePassword to access Cisco IOS via the console port.
- The
exec-timeout [minutes] [seconds] command specifies the exec-timeout period to automatically terminate an idle session on the console line.
- The
exit command is used to exit the line mode and return to the Global Configuration mode.
Figure 2.34 shows the execution of the preceding commands on the router:
Figure 2.34: Securing the console port
Note
To remove the password from the line console mode, use the no password command.
Securing the Privilege Exec Mode
By default, users move from User Exec to Privilege Exec mode without restrictions. To secure administrative access to the Privilege Exec mode, use the following instructions:
- To restrict unauthorized access in the Privilege Exec mode, use the
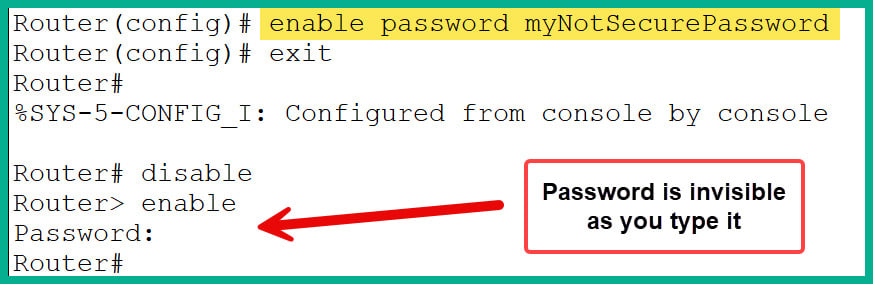
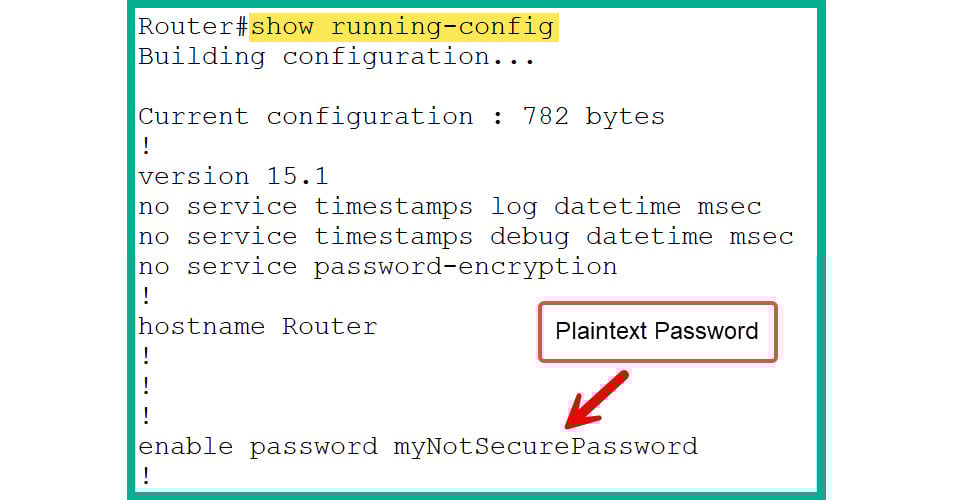
enable password [your_password] command within Global Configuration mode, as shown here:Router(config)# enable password myNotSecurePassword
Note
The enable password command does not encrypt the actual password when it is stored in the running-config or startup-config file.
- Figure 2.35 shows how the preceding command sets the password and shows how the user will be prompted to enter the correct credentials to access Privilege Exec mode:
Figure 2.35: Using the enable password command
- As shown in Figure 2.35, when prompted to enter the password to access Privilege Exec mode, it is invisible as you type it for security reasons.
- Figure 2.36 shows the contents of the
running-config file and displays enable password in plaintext:
Figure 2.36: Plaintext password
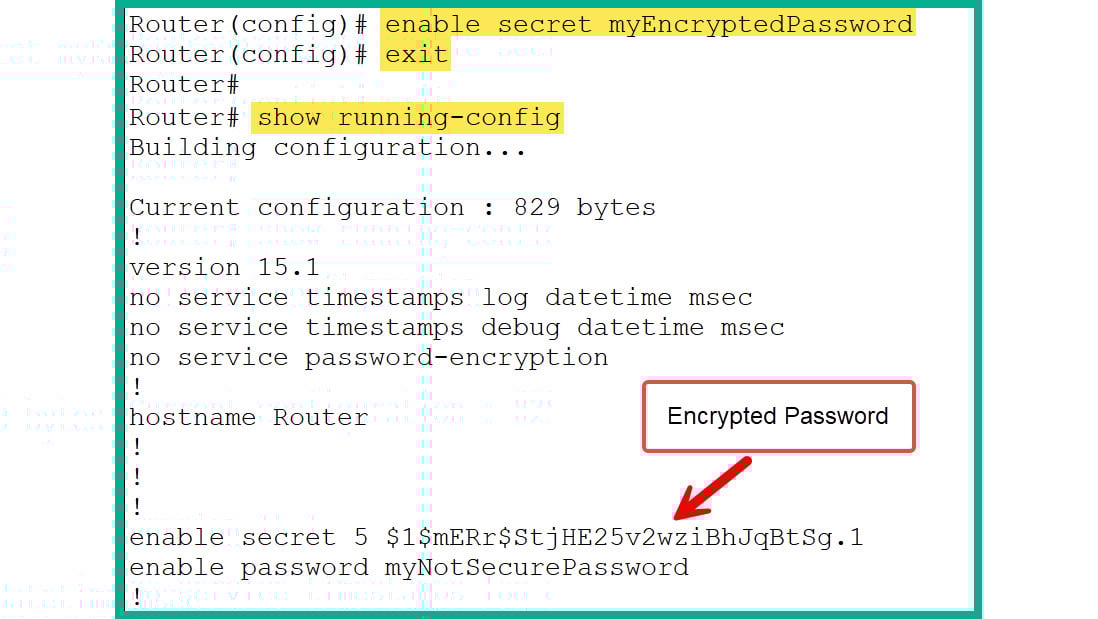
- However, it is highly recommended to use the
enable secret [your_password] command to set an encrypted password, which is more secure, by using the following commands:Router(config)# enable secret myEncryptedPassword
- Figure 2.37 shows the execution of the preceding command and verifies the
enable secret command stores the encrypted form of the password in the running-config file:
Figure 2.37: Plaintext password
- As shown in Figure 2.37, both the
enable secret and enable password passwords are stored in the running-config file. However, if both exist on a Cisco IOS device, enable secret will take precedence when the user is moving from User Exec to Privilege Exec mode. This means enable password will no longer be enforced when the enable secret password is set.
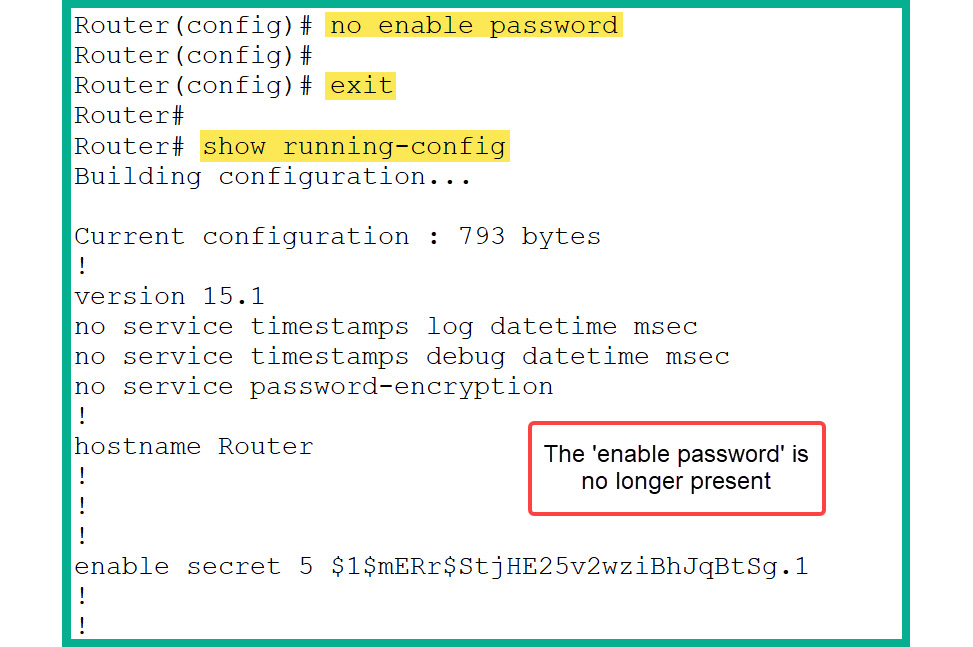
- It’s recommended to remove the less secure password from the configurations by using the following command:
Router(config)# no enable password
- Figure 2.38 shows the execution of the preceding command and verifies that
enable password is no longer saved within the running-config file on the router:
Figure 2.38: Removing enable password
As shown in Figure 2.38, the encrypted form of the password is stored in the running-config file on the router.
Task 4: Changing the Hostname and Setting a Banner
One of the very first tasks when provisioning a new router, switch, access point, or even a firewall is changing the default hostname of the device. Each device on your network should have a unique hostname. Many organizations usually implement a naming convention that’s used for assigning hostnames to systems and devices on the network.
Displaying a legal banner whenever someone logs in to your network device is highly recommended. Such notifications can be used as an official legal warning to anyone who is either attempting to gain or has gained unauthorized access to the device.
Setting a Hostname
Hostnames help network professionals to easily identify and manage their network devices. When a network professional remotely connects to a device, the hostname quickly helps the user recognize and determine whether they have connected to the right device, especially if there are multiple devices in a large network architecture.
The following are general guidelines when configuring a hostname on a Cisco IOS device:
- The hostname should not have any spaces. For instance,
BLD RTR 01 is not acceptable. However, using the underscore (_) or period (.) character to represent a space is acceptable – BLD_RTR_01.
- Hostnames should not be more than 64 characters in length.
- It’s recommended that hostnames begin with a letter and not a number.
- Hostnames can end with either a letter or a number.
To change the hostname of the router from the Global Configuration mode, use the following commands:
Router(config)# hostname TT-RTR-01
As shown in Figure 2.39, the hostname of the router changed immediately after executing the hostname command:
Figure 2.39: Changing the hostname
If you need to reset the hostname of a device to the default, use the no hostname command within the Global Configuration mode of the Cisco IOS device.
Setting a Banner
To set a banner on the Cisco IOS device, use the banner command. There are different banners, such as the message of the day (MOTD) banner, the login banner, and the Exec banner.
To set the MOTD banner from Global Configuration mode, use the following command on the router:
TT-RTR-01(config)# banner motd #Unauthorized Access is Prohitbited.#
The following is a breakdown of the preceding command:
- The
banner motd command sets the message of the day that will be shown to anyone who administratively attempts to access Cisco IOS on the router.
- The
# character represents an opening and closing delimiter with the message enclosed between them. A delimiter can be #, $, @, !, %, or &. Delimiters work in pairs. If you use $ as the opening delimiter, you should use the same as the closing delimiter.
Figure 2.40 shows the banner that appears during a console connection:
Figure 2.40: Displaying the banner
Legal statements in banners should be crafted by the legal team of an organization and placed on company-owned devices to notify unauthorized users about the consequences of unauthorized access.
Task 5: Configuring IP Addresses
Before configuring IP addresses on a router’s interfaces, it is essential to verify which interfaces are available and which ones are in use. Privilege Exec mode enables you to run your show commands to verify the device’s operating status, hardware components, and configurations.
The show ip interface brief command displays a summary of all interfaces on the router, as shown in Figure 2.41:
Figure 2.41: Summary of interfaces
The following provides a description of each column of the output in Figure 2.41:
Interface: Specifies the interface type (Ethernet, FastEthernet, or GigabitEthernet) and the interface ID.IP-Address: Specifies whether an IP address is assigned to an interface.OK?: Validates whether the assigned IP address on the interface is valid. If the address is valid, it will show YES. If there’s an issue with the address, it will show NO.Method: Tells you how the IP address was assigned to the interface. The following are the different methods indicated by Cisco IOS:manual: The IP address was manually configured on the interfaceDHCP: The interface was automatically assigned the IP address from a DHCP server on the networkunset: No IP address was assigned on the interface
Status: Specifies the line protocol status of the interface. The following are the different status types indicated by Cisco IOS:up: The interface is administratively up and in operationdown: The interface is administratively downadministratively down: The interface is manually shut down by a network professional using the shutdown command within Interface mode
Protocol: Verifies the status of the IP protocol on the interface. The following are the different protocol statuses that are indicated by Cisco IOS:up: The IP protocol on the interface is runningdown: The IP protocol is not running due to a misconfiguration on the interface or other issues
To configure an IP address, subnet mask, and description on a router’s interface, use the following instructions:
- From the Global Configuration mode, use the following commands to configure the
GigabitEthernet0/1 interface of the router with a description and IP address with a subnet mask, and administratively enable the interface:TT-RTR-01(config)# interface gigabitEthernet 0/1
TT-RTR-01(config-if)# description connected to LAN_1
TT-RTR-01(config-if)# ip address 192.168.1.1 255.255.255.0
TT-RTR-01(config-if)# no shutdown
TT-RTR-01(config-if)# exit
- Next, from the Global Configuration mode, use the following commands to configure the
GigabitEthernet0/2 interface of the router:TT-RTR-01(config)# interface gigabitEthernet 0/2
TT-RTR-01(config-if)# description connected to LAN_2
TT-RTR-01(config-if)# ip address 172.16.1.1 255.255.255.0
TT-RTR-01(config-if)# no shutdown
TT-RTR-01(config-if)# exit
- Then, use the
show ip interface brief command to view the status changes of the interfaces, as shown in Figure 2.42:
Figure 2.42: Summary of interfaces
- The following are additional commands to verify the status and configurations of an interface:
show interfaces: Displays all information about all interfacesshow interfaces gigabitEthernet 0/1: Displays all information about a specific interfaceshow interfaces status: Displays a summary of interfaces and their duplex, speed, and VLAN statusshow running-config: Displays the configurations on the interfaces
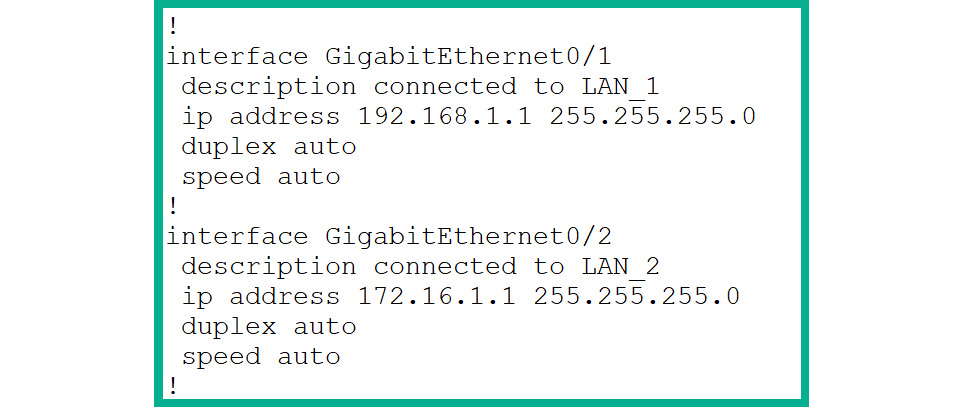
- Next, use the
show running-config command to display the configurations that were applied on each interface of the router, as shown in Figure 2.43:
Figure 2.43: Interface configurations
- As shown in the preceding screenshot, each interface contains the default configurations for both the duplex and speed modes – both are set to automatic mode.
Task 6: Setting up Secure Remote Access
Remote access enables network professionals to remotely monitor, manage, and troubleshoot devices. There are two common remote access protocols that are supported on Cisco IOS devices:
- Telnet: An unsecured protocol that transmits data in plaintext and operates on port
23 by default
- SSH: A secure protocol that establishes a secure communication channel and operates on port
22 by default
Both Telnet and SSH allow you to remotely access a device via a terminal, allowing you to gain shell access. However, Telnet is an unsecured method to remotely access and manage a device as traffic can be seen in plaintext. SSH is the recommended method for remote access. All SSH traffic is encrypted by default. If a hacker is intercepting SSH traffic over a network, the attacker will not be able to see the actual contents of the traffic flowing between the SSH client and the SSH server.
Setting Up Telnet
To configure Telnet on the router from Global Configuration mode, use the following commands:
TT-RTR-01(config)# line vty 0 4
TT-RTR-01(config-line)# password myTelnetPassword
TT-RTR-01(config-line)# exec-timeout 10 0
TT-RTR-01(config-line)# login
TT-RTR-01(config-line)# exit
The following are descriptions of the preceding commands:
line vty 0 4: The command will be applied to the VTY lines 0 to 4, which are used for remote accesspassword myTelnetPassword: Sets the Telnet password for the VTY lines 0 to 4login: Enables password-checking and prompts the user to enter the Telnet passwordexec-timeout 10 0: Sets an exec inactivity timeout of 10 minutes and 0 seconds
However, to disable Telnet and prevent any incoming Telnet connections to the router, use the following commands from Global Configuration mode:
TT-RTR-01(config)# line vty 0 4
TT-RTR-01(config-line)# transport input ssh
TT-RTR-01(config-line)# no password
TT-RTR-01(config-line)# exit
The following are descriptions of the preceding commands:
line vty 0 4: The commands will be applied to the VTY lines 0 to 4, which are used for remote accesstransport input ssh: Ensures the router accepts incoming SSH connections onlyNo password: The password that’s set in Line mode is applicable to Telnet connections
By disabling Telnet and configuring SSH, any password that is configured under Line mode will no longer be applicable as users are prompted to enter a valid username and password combination during the SSH authentication process to the Cisco IOS router.
Configuring SSH
To configure SSH on the router from Global Configuration mode, follow the given instructions:
- Change the default hostname of the device. This was completed during Task 4 already.
- Configure an
enable secret password. This was completed during Task 3.
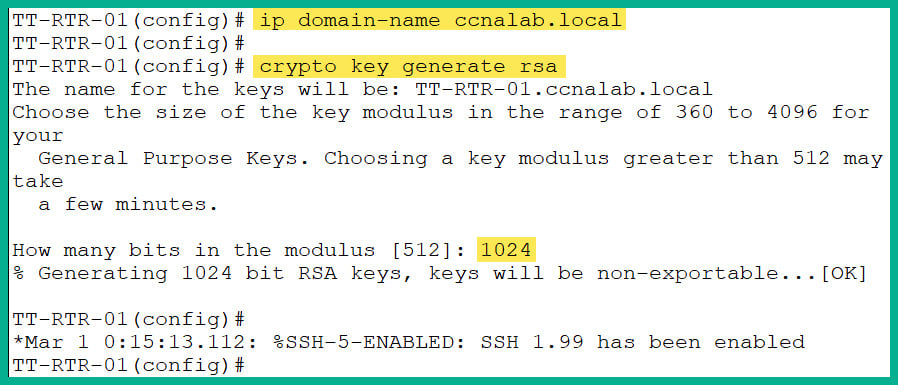
- Set the domain name of the router as it’s required for creating the RSA encryption keys. Use the
ip domain-name [your_domain_name] command in Global Configuration mode:TT-RTR-01(config)# ip domain-name ccnalab.local
- Create the RSA encryption keys for data encryption with SSH:
TT-RTR-01(config)# crypto key generate rsa
- The key (modulus) size should be at least
1024 or greater to improve security, as shown in Figure 2.44:
Figure 2.44: Configuring SSH
- Create a local user account for the SSH user:
TT-RTR-01(config)# username User1 secret mySSHpassword
Note
The secret command will store the encrypted form of the password within the running-config file. Instead, if you use the password command, the password will be stored in plaintext. This command is not recommended unless it’s the only available option.
- Enable SSHv2 and configure SSH on the VTY lines:
TT-RTR-01(config)# ip ssh version 2
TT-RTR-01(config)# line vty 0 4
TT-RTR-01(config-line)# transport input ssh
TT-RTR-01(config-line)# login local
TT-RTR-01(config-line)# exit
- The
login local command is commonly used on the VTY and console lines, which specifies the local authentication should be used, that is, check for a valid username and password only.
- When this command is applied, the authentication mechanisms will not acknowledge any password that’s configured under Line mode. For instance, if the previous Telnet password is still present, the
login local command will only check for the user accounts that were created in step 4.
Note
In Privilege Exec mode, the show users command enables device administrators to identify which users are remotely connected.
Task 7: Configuring the Console to Use Local User Accounts
Now that you have created a local user account, you can also configure the console line to check for a local user account, instead of a password only.
To perform this task, use the following commands:
TT-RTR-01(config)# line console 0
TT-RTR-01(config-line)# login local
TT-RTR-01(config-line)# no password
TT-RTR-01(config-line)# exit
Task 8: Disabling Domain Lookup and Encrypting All Plaintext Passwords
If you have incorrectly entered a command, Cisco IOS may attempt to perform a domain lookup, as shown in Figure 2.45:
Figure 2.45: Domain lookup
To prevent or disable automatic domain name or Domain Name System (DNS) lookup on a Cisco IOS device, use the following command in Global Configuration mode:
TT-RTR-01(config)# no ip domain-lookup
There are various modes within Cisco IOS that do not support the enable secret or the secret command for storing the encrypted form of a password, and only the password command is available.
To automatically encrypt all existing and future plaintext passwords that are stored in the configuration file, use the following command in Global Configuration mode:
TT-RTR-01(config)# service password-encryption
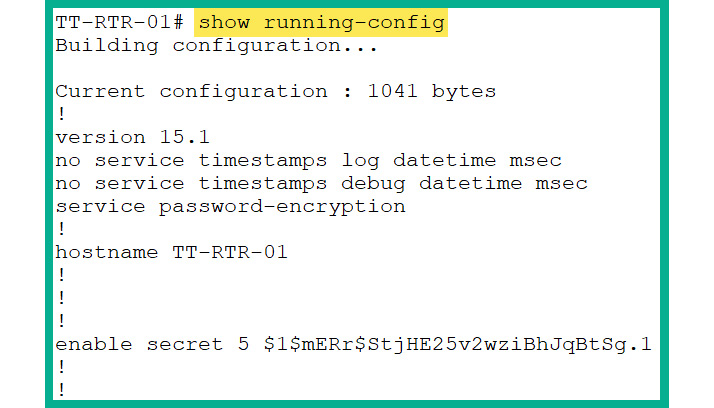
Task 9: Saving Configurations and Rebooting Systems
All the configurations that were performed in the previous steps and tasks are stored in the running-config file. To view the running-config file, use the show running-config command, as shown in Figure 2.46:
Figure 2.46: Current configuration
Use the following steps to properly save the current configurations such that these configurations are loaded into memory when the device reboots:
- If the device loses power or reboots, the configurations are lost. Therefore, to save the current configurations in the
startup-config file, use the following commands in Privilege Exec mode:TT-RTR-01# copy running-config startup-config
- After executing the preceding command, the following prompt will appear:
Destination filename [startup-config]?
- Simply hit
Enter again to use the default name of the configuration file.
- To test whether your configurations save properly, use the
show startup-config command within Privilege Exec mode and compare it with the running-config file.
- Lastly, use the
reload command to reboot the device from the CLI.
Keep in mind that the configurations of running-config are lost if the device reboots or loses power. Therefore, it’s essential to save the current configurations after completing and testing the functionality of a system change.
Task 10: Configuring Switch 1
This sub-section covers the instructions for configuring Switch 1 within your lab topology:
- To secure Privilege Exec mode, use the following commands to restrict unauthorized access:
Switch> enable
Switch# configure terminal
Switch(config)# enable secret myEncryptedPassword
- Use the following commands to configure the hostname and banner on the switch:
Switch(config)# hostname TT-SW-01
TT-SW-01(config)# banner motd #Unauthorized Access is Prohitbited.#
- A switch virtual interface (SVI) enables a network professional to configure an IP address on a management virtual local area network (VLAN) interface for the purposes of remote management and troubleshooting. To configure an SVI on
Switch 1, use the following commands:TT-SW-01(config)# interface vlan 1
TT-SW-01(config-if)# ip address 192.168.1.2 255.255.255.0
TT-SW-01(config-if)# no shutdown
TT-SW-01(config-if)# exit
- To ensure that the switch is reachable outside its own IP network, a default gateway should be configured on the switch. Use the following command to set a default gateway on the switch:
TT-SW-01(config)# ip default-gateway 192.168.1.1
- To configure a domain name and generate RSA keys for setting up SSH, use the following commands:
TT-SW-01(config)# ip domain-name ccnalab.local
TT-SW-01(config)# crypto key generate rsa
- To create a local user account and enable SSHv2 to improve security, use the following commands:
TT-SW-01(config)# username User1 secret mySSHpassword
TT-SW-01(config)# ip ssh version 2
- To configure VTY lines for SSH input only, use the following commands:
TT-SW-01(config)# line vty 0 4
TT-SW-01(config-line)# transport input ssh
TT-SW-01(config-line)# login local
TT-SW-01(config-line)# exit
- To configure the console line for local authentication, use the following commands:
TT-SW-01(config)# line console 0
TT-SW-01(config-line)# login local
TT-SW-01(config-line)# exit
- To disable domain name lookup, encrypt all plaintext passwords, and save configurations on the device, use the following commands:
TT-SW-01(config)# no ip domain-lookup
TT-SW-01(config)# service password-encryption
TT-SW-01(config)# exit
TT-SW-01# copy running-config startup-config
Now that you have configured Switch 1 within the lab, you can move on to the next section within the topology.
Task 11: Configuring Switch 2
In this sub-section, you will be configuring Switch 2 within the lab topology:
- To secure Privilege Exec mode on
Switch 2, use the following commands:Switch> enable
Switch# configure terminal
Switch(config)# enable secret myEncryptedPassword
- To configure the hostname and banner on
Switch 2, use the following configurations:Switch(config)# hostname TT-SW-02
TT-SW-02(config)# banner motd #Unauthorized Access is Prohitbited.#
- To configure an SVI on the switch, use the following commands:
TT-SW-02(config)# interface vlan 1
TT-SW-02(config-if)# ip address 172.16.1.2 255.255.255.0
TT-SW-02(config-if)# no shutdown
TT-SW-02(config-if)# exit
- To ensure the switch is reachable outside its own IP network, a default gateway should be configured on the switch. Use the following commands to set a default gateway on the switch:
TT-SW-02(config)# ip default-gateway 172.16.1.1
- To configure a domain name and generate RSA keys for setting up SSH, use the following commands:
TT-SW-02(config)# ip domain-name ccnalab.local
TT-SW-02(config)# crypto key generate rsa
- To create a local user account and enable SSHv2 for better security, use the following commands:
TT-SW-02(config)# username User1 secret mySSHpassword
TT-SW-02(config)# ip ssh version 2
- To configure VTY lines for SSH access, use the following:
TT-SW-02(config)# line vty 0 4
TT-SW-02(config-line)# transport input ssh
TT-SW-02(config-line)# login local
TT-SW-02(config-line)# exit
- To configure the console line for local authentication, use the following commands:
TT-SW-02(config)# line console 0
TT-SW-02(config-line)# login local
TT-SW-02(config-line)# exit
- To disable domain name lookup, encrypt all plaintext passwords, and save configurations, use the following commands:
TT-SW-02(config)# no ip domain-lookup
TT-SW-02(config)# service password-encryption
TT-SW-02(config)# exit
TT-SW-02# copy running-config startup-config
Having completed this section, you have learned how to set up a small Cisco environment and apply common device configurations. Next, you will learn how to perform common troubleshooting procedures.


 Free Chapter