Events are another key part of allowing a component to be interactive. In this section, we will understand what React events are and how to use events on DOM elements. We will also learn how to create our own React events.
We will continue to expand the alert component’s functionality as we learn about events. We will start by finishing the close button implementation before creating an event for when the alert has been closed.
Understanding events
Browser events happen as the user interacts with DOM elements. For example, clicking a button raises a click event from that button.
Logic can be executed when an event is raised. For example, an alert can be closed when its close button is clicked. A function called an event handler (sometimes referred to as an event listener) can be registered for an element event that contains the logic to execute when that event happens.
Note
See the following link for more information on browser events: https://developer.mozilla.org/en-US/docs/Learn/JavaScript/Building_blocks/Events.
Events in React events are very similar to browser native events. In fact, React events are a wrapper on top of the browser’s native events.
Event handlers in React are generally registered to an element in JSX using an attribute. The following code snippet registers a click event handler called handleClick on a button element:
<button onClick={handleClick}>...</button>
Next, we will return to our alert component and implement a click handler on the close button that closes the alert.
Implementing a close button click handler in the alert
At the moment, our alert component contains a close button, but nothing happens when it is clicked. The alert also contains a visible state that dictates whether the alert is shown. So, to finish the close button implementation, we need to add an event handler when it is clicked that sets the visible state to false. Carry out the following steps to do this:
- Open
Alert.js and register a click handler on the close button as follows:<button aria-label="Close" onClick={handleCloseClick}>
We have registered a click handler called handleCloseClick on the close button.
- We then need to implement the
handleCloseClick function in the component. Create an empty function to start with, just above the return statement:export function Alert(...) { const [visible, setVisible] = useState(true);
if (!visible) { return null;
}
function handleCloseClick() {} return (
...
);
}
This may seem a little strange because we have put the handleCloseClick function inside another function, Alert. The handler needs to be inside the Alert function; otherwise, the alert component won’t have access to it.
Arrow function syntax can be used for event handlers if preferred. An arrow function version of the handler is as follows:
export function Alert(...) {
  const [visible, setVisible] = useState(true);
  if (!visible) {
    return null;
  }
  const handleCloseClick = () => {}
  return (
    ...
  );
}
Event handlers can also be added directly to the element in JSX as follows:
<button aria-label="Close" onClick={() => {}}>
In the alert component, we will stick to the named handleCloseClick event handler function.
- Now we can use the
visible state setter function to make the visible state false in the event handler:function handleCloseClick() { setVisible(false);
}
If you click the close button in the Browser panel, the alert disappears. Nice!
The refresh icon can be clicked to make the component reappear in the Browser panel:
Figure 1.7 – The Browser panel refresh option
Next, we will extend the close button to raise an event when the alert closes.
Implementing an alert close event
We will now create a custom event in the alert component. The event will be raised when the alert is closed so that consumers can execute logic when this happens.
A custom event in a component is implemented by implementing a prop. The prop is a function that is called to raise the event.
To implement an alert close event, follow these steps:
- Start by opening
Alert.js and add a prop for the event:export function Alert({ type = "information",
heading,
children,
closable,
onClose
}) {}
We have called the prop onClose.
Note
It is common practice to start an event prop name with on.
- In the
handleCloseClick event handler, raise the close event after the visible state is set to false:function handleCloseClick() { setVisible(false);
if (onClose) { onClose();
}
}
Notice that we only invoke onClose if it is defined and passed as a prop by the consumer. This means that we aren’t forcing the consumer to handle this event.
- We can now handle when an alert is closed in the
App component. Open App.js and add the following event handler to Alert in the JSX:<Alert
type="information"
heading="Success"
closable
onClose={() => console.log("closed")}>
Everything is really good!
</Alert>;
We have used an inline event handler this time.
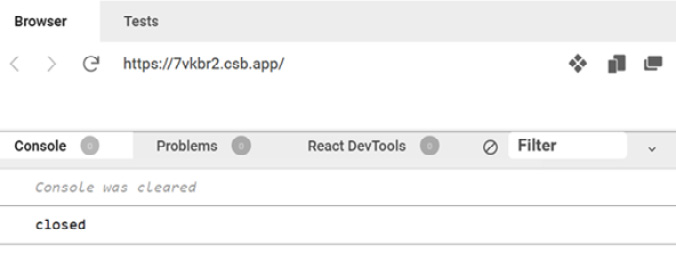
In the Browser panel, if you click the close button and look at the console, you will see that closed has been output:
Figure 1.8 – The Browser panel closed console output
That completes the close event and the implementation of the alert for this chapter.
Here’s what we have learned about React events:
- Events, along with state, allow a component to be interactive
- Event handlers are functions that are registered on elements in JSX
- A custom event can be created by implementing a function prop and invoking it to raise the event
The component we created in this chapter is a function component. You can also create components using classes. For example, a class component version of the alert component is at https://github.com/PacktPublishing/Learn-React-with-TypeScript-2nd-Edition/blob/main/Chapter1/Class-component/Alert.js. However, function components are dominant in the React community because of the following reasons:
- Generally, they require less code to implement
- Logic inside the component can be more easily reused
- The implementation is very different
For these reasons, we will focus solely on function components in this book.
Next, we will summarize what we have learned in this chapter.


 Free Chapter


