Book Image

Mastering CSS Grid

By : Pascal Thormeier
4 (2)
Book Image

Mastering CSS Grid

4 (2)
By: Pascal Thormeier

Overview of this book

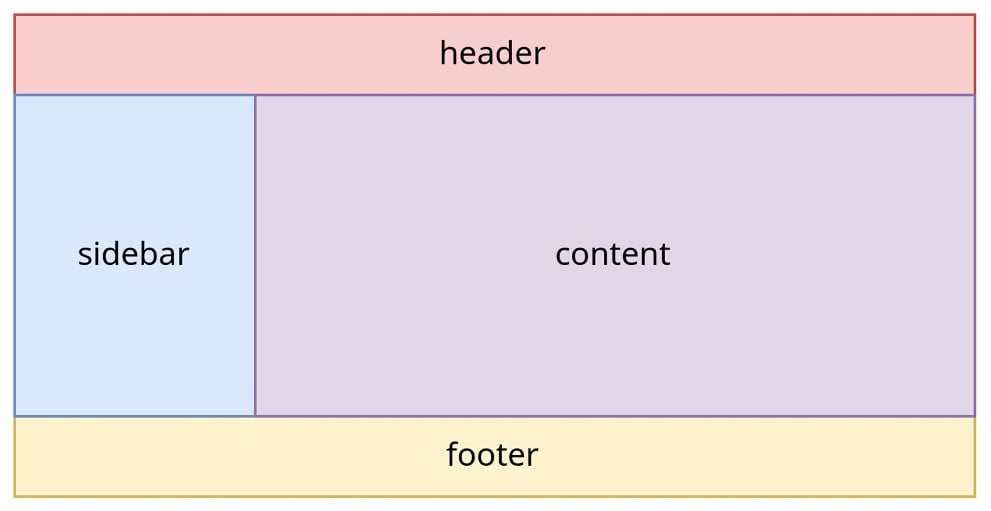
CSS Grid has revolutionized web design by filling a long-existing gap in creating real, dynamic grids on the web. This book will help you grasp these CSS Grid concepts in a step-by-step way, empowering you with the knowledge and skills needed to design beautiful and responsive grid-based layouts for your web projects. This book provides a comprehensive coverage of CSS Grid by taking you through both fundamental and advanced concepts with practical exercises. You'll learn how to create responsive layouts and discover best practices for incorporating grids into any design. As you advance, you'll explore the dynamic interplay between CSS Grid and flexbox, culminating in the development of a usable responsive web project as a reference for further improvement. You'll also see how frameworks utilize CSS Grid to construct reusable components and learn to rebuild and polyfill CSS Grid for browsers that don't fully support it yet. The concluding chapters include a quick reference and cheat sheet, making this book an indispensable resource for frontend developers of all skill levels. By the end of this book, you'll have thoroughly explored all aspects of CSS Grid and gained expert-level proficiency, enabling you to craft beautiful and functional layouts for web projects of any size.
Table of Contents (16 chapters)
1
Part 1–Working with CSS Grid
5
Part 2 – Understanding the CSS Grid Periphery
9
Part 3 – Exploring the Wider Ecosystem
12
Part 4 – A Quick Reference

Using grid templates

Working with larger grids can get confusing. For now, we used two rules on the container to define our grid size and then some seemingly arbitrary numbers to denote where an element should be placed in both rows and columns. For developers not familiar with the code, these seemingly arbitrary numbers and sizes could be hard to understand.

They would need to spend more time understanding the grid since it’s not very self-descriptive. However, CSS Grid offers us possibilities to be more explicit. We’ll now have a look at how to name rows, columns, and entire grid areas.

Naming grid rows and columns

To add more clarity to our grid definitions, CSS Grid allows us to name columns and rows.

When defining columns and rows with grid-template-columns and grid-template-rows, we can add names in between grid sizes with a syntax like this:

grid-template-columns: [sidebar-start] 1fr [sidebar-end content-start] 3fr [content-end];

Everything in square brackets is considered a name. We can also see that we’ve assigned two names to the middle grid line between the sidebar and the content, which we can separate by using spaces. Using explicit two names, such as sidebar-end and content-start, for the same grid line allows us to decouple the name from the structure: the sidebar doesn’t necessarily have to end where the content starts.

So, instead of using numbers when placing elements, we can use these names to explicitly state where an element’s placement starts and where it ends. If we wanted to align the header of our example with the new names, we would replace the numbers with the corresponding names, as shown here:

header {  grid-column-start: sidebar-start;
  grid-column-end: span content-end;
}

Unlike the case where we used numbers, we also added a grid-column-start rule to the code. Otherwise, CSS Grid wouldn’t know where the element starts (it defaults to auto) and would assume that it should only span a single column.

By naming rows and columns, we make our code more readable. In the template definition, we can see what the rows and columns are meant to contain. In addition, we now have more context on the grid items as well: the header, for example, spans from the start of the sidebar to the end of the content. Someone reading this code for the first time would understand its placement better, especially in a complex grid.

We can also define and use grid areas to place grid items. With grid areas, we have an almost visual representation of our grid within the code. The CSS rule we use to define grid areas is grid-template-areas.

This rule is sometimes accompanied by grid-template-rows and grid-template-columns to ensure we have size definitions for rows and columns, if necessary. This is especially necessary for fixed-size grid cells—for example, a 100px-wide sidebar or a 250px-high footer. If we work with fr only, using grid-template-rows and grid-template-columns isn’t obligatory.

We know, for example, the size of our grid columns: 1fr 3fr. And we also know the sizes of our rows: 1fr 4fr 1fr. If we wanted to give the grid areas names, we would probably use a system as illustrated in the next screenshot:

Figure 1.10 – Our grid with explicit names for every area

Figure 1.10 – Our grid with explicit names for every area

Using the six rows and four columns, we can also translate this to a system where we name each grid cell, as shown in the next screenshot:

Figure 1.11 – Our grid with explicit names for every cell

Figure 1.11 – Our grid with explicit names for every cell

Our grid sizes (1fr 3fr and 1fr 4fr 1fr) are represented by the number of grid cells we have for rows and columns. We can then, more or less, translate the system shown in the previous screenshot as CSS code:

.container { display: grid;
 grid-template-areas:
   "header header header header"
   "sidebar content content content"
   «sidebar content content content»
   «sidebar content content content»
   "sidebar content content content"
   "footer footer footer footer"
 ;
}

What CSS Grid will do now is automatically calculate the grid-template-rows and grid-template-columns rules. However, instead of having two columns and three rows of different sizes, CSS Grid will create four columns and six rows, each cell being the same size.

If we now want to place elements within the grid, we use the grid-area rule on our elements. So, to place the header, sidebar, content, and footer, we use the following code:

header {  grid-area: header;
}
aside {
  grid-area: sidebar;
}
main {
  grid-area: content;
}
footer {
  grid-area: footer;
}

This will take care of the entire grid-column-start, grid-column-end, grid-row-start, and grid-row-end configuration for us and places the elements correctly. We can see the new structure of the same-sized grid cells when inspecting and how the elements span them according to the template:

Figure 1.12 – How CSS Grid represents grid-area templates

Figure 1.12 – How CSS Grid represents grid-area templates

Usually, this is the most straightforward way to configure grids. It gives us a visual representation of our grid in the code and lets us assign elements to grid areas using a single CSS rule, making it very obvious where an element will go in the grid.

However, we can also combine it with grid-template-rows and grid-template-columns to give the areas specific sizes. If we, for example, wanted to make the sidebar 150px wide and the header and footer 200px tall, we would add the following definitions next to the grid-area definitions:

.container {  display: grid;
  grid-template-areas:
   "header header header header"
   "sidebar content content content"
   «sidebar content content content»
   «sidebar content content content»
   «sidebar content content content»
   «footer footer footer footer»
  ;
  grid-template-rows: 200px 1fr 1fr 1fr 1fr 200px;
  grid-template-columns: 150px 1fr 1fr 1fr;
}

This would result in a grid, as shown in the following screenshot:

Figure 1.13 – Our grid with explicitly sized rows and columns

Figure 1.13 – Our grid with explicitly sized rows and columns

When we use grid-template-area together with grid-template-rows and grid-template-columns, however, there is no need to define larger grid areas. We can thus simplify our grid-template-area definition, and therefore our grid, to the following:

.container {  display: grid;
  grid-template-areas:
   "header header"
   "sidebar content"
   "footer footer"
  ;
  grid-template-rows: 200px 1fr 200px;
  grid-template-columns: 150px 1fr;
}

And that works just as well:

Figure 1.14 – Our grid with explicitly sized rows and columns and a reduced number of rows

Figure 1.14 – Our grid with explicitly sized rows and columns and a reduced number of rows

Instead of six rows and four columns, we now only have three rows and two columns.

To summarize, grid areas allow us to specify our grid in a visual way without forgoing structural simplicity or flexibility.