
In the next few pages we’ll guide you through installing the following softwares, which you’ll need for this book:
1. IIS (Internet Information Services), which is the Web Server used to serve ASP.NET pages.
2. Visual Web Developer 2005 Express Edition, which is the tool that you’ll be using to develop your ASP.NET applications.
3. The ASP.NET AJAX Framework.
To run ASP.NET web applications, you can use either Visual Web Developer’s integrated Web server (Cassini), or you can use IIS. Theoretically, the most important difference between the two environments are the credentials under which the code runs. Cassini runs with the credentials of the logged in user, while IIS uses a special system account named ASPNET.
Note
 |
If you really want to, you can also run ASP.NET pages using Apache, although we’ve not tested this configuration for the purposes of this book. Read more details at
http://weblogs.asp.net/israelio/archive/2005/09/11/424852.aspx
.
The two major benefits of using Cassini are:
Cassini works on systems that don’t ship with IIS, such as Windows XP Home Edition.
Cassini can be used in case you don’t want to use your main IIS Web Server for development purposes.
Even if these advantages don’t convince you, we still recommend using IIS because your application would end up running under an IIS server anyway, so the development environment would more closely resemble the production environment.
IIS is delivered with most versions of server-capable Windows operating systems, including Windows Vista Business, Windows XP Professional, Windows XP Media Center Edition, Windows 2000 Professional, Server, Advanced Server, and Windows Server 2003, but it’s not installed automatically in all versions, which is why it may not be present on your computer.
IIS isn’t available in Windows XP Home Edition, Windows Vista Home Basic, or Windows Vista Home Premium—if you run one of these, you’ll need to rely on Cassini.
Note
|
The main development tool we’ll use in this book is Visual Web Developer 2005, which works best with IIS 6, which ships with Windows XP. Windows Vista, on the other hand, includes IIS 7, whose default settings aren’t very friendly with Visual Web Developer 2005. This explains that you have more configuration work to do before you’ll be able to run and debug your ASP.NET Web Applications under Windows Vista properly.
To install IIS, simply follow these steps:
1. In the Control Panel, select Programs and Features (in Windows Vista), or Add or Remove Programs (in Windows XP).
2. Choose Turn Windows features on or off (in Windows Vista), or Add/Remove Windows Components (in Windows XP). The list of components will become visible within a few seconds.
3. In the list of components, check Internet Information Services. If running Windows XP, expand the node and make sure that the IIS Frontpage Extensions node is checked.
In Windows Vista, also select the following options (also see Figure 1-4).
1. Web Management Tools | IIS 6 Management Compatibility node, and its IIS Metabase and IIS 6 configuration compatibility sub-node. (IIS 6 Management Compatbility is required by Visual Web Developer 2005 when connecting to your web site through FrontPage Extensions.)
2. World Wide Web Services | Application Development Features | ASP.NET node.
3. Select the World Wide Web Services | Security | Windows Authentication node, which is necessary if you want to run applications in debug mode.

Figure 1-5 Configuring IIS 7 Options in Windows Vista
4. Click Next or OK. Windows may prompt you to insert the Windows CD or DVD.
To administer IIS, you use the Internet Information Services (IIS) Manager tool (in Windows Vista) or the Internet Information Services tool (in Windows XP) that you can find in the Administrative Tools menu of the Control Panel.
Install Visual Web Developer 2005 Express Edition following these simple steps:
2. Click the Download link. You’ll download a file named
vwdsetup.exe.3. Execute the downloaded file.
4. Accept the default options. At one point you’ll be asked about installing Microsoft MSDN 2005 Express Edition, which is the product’s documentation. Installing it will do no harm, but you need to be patient, because it’s quite big.
5. Install the Visual Web Developer Service Pack 1. If you use Windows Vista, you should install the Service Pack 1 for Windows Vista.
6. The final step involves configuring ASP.NET with IIS. If you’ll be using Cassini or IIS 7, this step is not needed. Start a command-line console (Start | Run | cmd), and type the following commands:
cd C:\Windows\Microsoft.NET\Framework\v2.0.50727
aspnet_regiis.exe -i
To keep your hard drive tidy, let’s create a folder that we’ll be using for every exercise in this book. Create a folder named Atlas in an easily accessible place of your hard drive. I’ll assume you’re creating it as C:\Atlas.
Now we need to configure this folder as an IIS virtual directory so that it doesn’t interfere with other applications you may have on your machine. After preparing the Atlas Web Application, the http://localhost/Atlas/ application will be loaded from the C:\Atlas physical folder. If you can’t use IIS, then skip to the “Hello World!” section, a bit later in this chapter.
Because of the interface differences between the IIS 5/6 and IIS 7, separate installation instructions are provided for Windows XP and Windows Vista.
If you’re running Windows Vista and IIS 7, follow these steps to prepare your Atlas folder.
1. Open the IIS Manager tool from the Administrative Tools section of the Control Panel.
2. Find the Default Web Site in the Connections tab, and make sure it’s started. If its status is Stopped, right-click on it and select Start.
3. Right-click Default Web Site, and select Add Application from the context menu.
4. Choose Atlas for the alias name, and C:\Atlas for its “physical” path. Then click Select..., choose Classic .NET AppPool, and click OK. (If you don’t choose the Classic .NET AppPool, you won’t be able to debug the project using Visual Web Developer 2005.) In the end, the Add Application dialog should look like Figure 1-6.
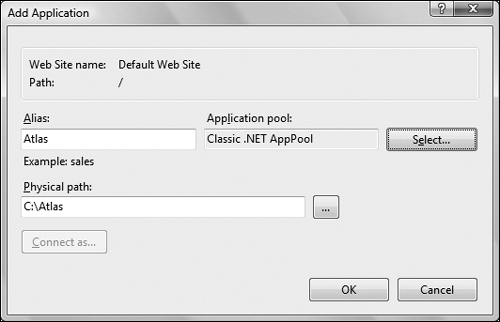
Figure 1-6 Creating the Atlas IIS Application
5. After clicking OK to close the Add Application dialog, the Atlas virtual directory will show up as a child node under Default Web Site. Select the Atlas node, double-click the Authentication icon, and enable Windows Authentication.
6. Close the IIS Manager.
If you’re running Windows XP, follow these steps to prepare your Atlas folder
1. Open the Internet Information Services tool from the Administrative Tools section of the Control Panel. Then expand the node for your local computer, then expand the Web Sites node, as shown in Figure 1-7.

Figure 1-7 Internet Information Services Tool in Windows XP
2. Make sure that the Default Web Site is running. If its status is Stopped, right-click on it and select Start:
3. Right-click Default Web Site, and select New | Virtual Directory.
4. In the wizard that shows up, first click Next, then type Atlas for the name of the Virtual Directory. Then click Next.
5. Type the full path for the “physical” folder where you’ll save the examples from this book. If you created the folder as suggested, then the path whould be C:\Atlas.
6. In the next screen, check Read and Run scripts (such as ASP), and click Next.
7. Click Finish to close the wizard, then close the Internet Information Services applet.