

Alright, we've spent half this chapter just setting up a development system, and now it's time to actually develop something. This application will be the world's simplest Content Management System, and pretty much useless in the real world, but we'll be getting our hands dirty on creating the basics of all web Content Management Systems.
At the heart of any Content Management System is the ability to change content without doing any programming. Most CMS users will be unskilled in development, web design, or even the basics of HTML, but they will be skilled in creating the content they wish to be managed. This application will allow them to add, delete, and change simple content on a very simple web page.
We'll walk through creating this application in Visual Web Developer, though in future chapters I'll assume that you can find your way through VWD well enough to write the application with just code snippets. All the code for every chapter is available for download (see the appendix for instructions).
Our application is going to consist of two pages:
Default.aspx: The page presented to the viewerEdit.aspx: The page that handles the editing of the content onDefault.aspx
We're going to use a few simple ASP.NET controls to accomplish this. First, let's create the Default.aspx page.
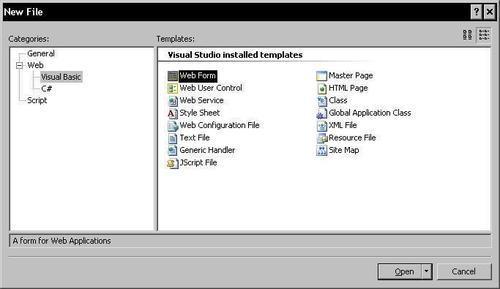
Open Visual Web Developer, and create a new file by choosing File | New File on the menu, and then selecting a Visual Basic Web Form as shown in the following screenshot:
Visual Web Developer creates an ASP.NET form with basic HTML and a script block, and we'll use that as our base for this application. Immediately save this file as Default.aspx in the root of your web site, normally C:\inetpub\wwwroot\ on a fresh installation of IIS. Go ahead and overwrite the "Hello World!" Default.aspx we created earlier. We know that our development environment is working.
We'll first need a place for the content. In this example, we'll be using only text as the content, and a Textbox control will do fine. We will also need a link to take us to the Edit.aspx page so we can edit the content. We'll use a simple Hyperlink control for this. The following code will create a Textbox control and the Hyperlink when inserted in the <div> in the Default.aspx created by VWD:
<asp:Label ID="Label1" runat="server"
Height="300px" Width="500px"
Text="This is where the content will be." >
</asp:Label>
<br />
<asp:HyperLink ID="HyperLink1" runat="server">Edit Text
</asp:HyperLink>
You'll notice we have no NavigateURL for the Hyperlink control yet. We still need to create the Edit.aspx it will point to. We also need to populate the Label control with the text for our content, and we need to store that content for future use or editing. Right now it is being populated with the Text attribute of the Label control. However, to change the text, you would need to open the ASP.NET code and edit it—something that a CMS is designed to avoid.
In our main CMS project, we'll use a database for content. However, as databases aren't fully covered until Chapter 2, for this example, we'll use a simple text file to store our content. The principal is the same as using a database, and many content management systems have been built that store content in the file system instead of a database.
Before we can read a text file into the Label control, or edit it with Edit.aspx, we need to have the text file. Create a simple text file named Content.txt in the root of your web site, using any text editor such as Notepad. For this example we've used "Greeked" text—a publishing layout tool that consists of random Latin words and phrases, which when printed on a page or viewed in a web page, have the general look of text that will eventually appear there. You've probably seen this used in sample web sites, and it's often referred to as Lorem Ipsum text after the first words normally found in it. You can create your own by using the Lorem Ipsum generator at http://www.lipsum.com/ For our sample, we'll use two paragraphs, saved in the Content.txt file.
We need to alter our code to display the Content.txt file in the Label control, and it should look something like this:
<%@ Page Language StreamReader ="VB" %>
<%@ Import Namespace="System.IO" %>
<!DOCTYPE html PUBLIC "-//W3C//DTD XHTML 1.0 Transitional//EN" "http://www.w3.org/TR/xhtml1/DTD/xhtml1-transitional.dtd">
<script runat="server">
Sub Page_Load(ByVal sender As Object, ByVal e As EventArgs)
Dim Filetext As String = Server.MapPath("Content.txt")
Dim objStreamReader As StreamReader
objStreamReader = File.OpenText(Filetext)
Dim Content As String = objStreamReader.ReadToEnd()
Label1.Text = Content.Replace(vbCrLf, "<br>")
objStreamReader.Close()
End Sub
</script>
<html xmlns="http://www.w3.org/1999/xhtml">
<head runat="server">
<title>Basic CMS</title>
</head>
<body>
<form id="form1" runat="server">
<div>
<asp:Label ID="Label1" runat="server"
Height="300px"
Width="500px">
</asp:Label>
<br />
<asp:HyperLink ID="HyperLink1" runat="server">Edit Text
</asp:HyperLink>
</div>
</form>
</body>
</html>
We used a StreamReader class to read the text file Content.txt, and then replaced the CR/LF characters in the text file with <br> characters, which are understood by the browser and loaded the result into the Label control. Let's run through the code for this.
We needed to import the System.IO namespace because we'll use the File class to open the text file and read it, so we added the line:
<%@ Import Namespace="System.IO" %>
Our script uses the Page_Load event to run so that our text file will be loaded into the Label control whenever the page is loaded into a browser. We are reading the file through a StreamReader object that is returned by the OpenText method of the File class, so the following lines define the name of the file and create the StreamReader object:
Dim Filetext As String = Server.MapPath("Content.txt")
Dim objStreamReader As StreamReader
Then we open the Content.txt file and create a string using the StreamReader object with these lines:
objStreamReader = File.OpenText(Filetext)
Dim Content As String = objStreamReader.ReadToEnd()
In the next line, we set the Text attribute of our Label control to be the contents of the string, but we replace the CR/LF characters of the text file with a <br> HTML command that the browser will understand:
Label1.Text = Content.Replace(vbCrLf, "<br>")
We then close the StreamReader object. If you don't do this, you can get unpredictable results from future attempts to access this file. And good programming dictates that if we open something, we close it when we're done.
objStreamReader.Close()
We've also modified our Label control to remove the Text attribute we had assigned, as this will now be assigned by our application code:
<asp:Label ID="Label1" runat="server"
Height="300px"
Width="500px">
</asp:Label>
When you test this code, you will see results similar to this:

Our content is displayed in the web page and we no longer need to edit the code directly to change it. Of course, we still need to edit the Content.txt file to change it, which is only possible by someone with direct access to the file through the Windows file system. That's better than having to edit the code, but it's not very convenient and it certainly can open security risks if you need to provide access to the files in the root of your web site. We need to create a better way to edit the content, without needing physical access to the content storage file.
We will create a second ASP.NET page to handle editing the Content.txt file. While we could simply write new text to the Content.txt file, that isn't a very clean way of handling editing of content, so we'll use a third-party application called the FCKEditor. This program is distributed under the GPL, LGPL, and MPL open source licenses, and is perfect for open source projects or your own personal projects. FCKEditor got its name from the program's author, Frederico Caldeira Knabben, and can be integrated into an ASP.NET application using the FCKEditor.Net control, licensed in the same manner.
FCKEditor may be downloaded from http://www.fckeditor.net/, and you will need both the editor and the ASP.NET control. Once you have downloaded the compressed files, the ZIP file you download can be unzipped directly to your web site's root and it will expand into the properly named folders. You can test the installation by browsing to http://localhost/FCKeditor/_samples/ default.html. This should bring up a sample of the FCKEditor.
To use FCKEditor in an ASP.NET page, we need to install the second file you downloaded, the FCKEditor.Net control. Expand the downloaded file, open the folders, and find the path /bin/Release/2.0/. The FredCK.FCKeditorV2.dll file in that folder is all we need to install in our application. Create a /bin folder under your web site root, at c:\inetpub\wwwroot\bin\, and copy the FredCK.FCKeditorV2.dll into it.
Now that we have the FCKEditor installed in our application, we need to create the Edit.aspx page that uses it to edit our content. Start a new Visual Basic web form in Visual Web Developer, and just below the <%@ Page Language="VB" %> line, add this line of code:
<%@ Register Assembly="FredCK.FCKeditorV2" Namespace="FredCK.FCKeditorV2" TagPrefix="FCKeditorV2" %>
This will register the FredCK.FCKeditorV2.dll in our page. To add the editor to the page itself, add this line of code between the <div> statements:
<FCKeditorV2:FCKeditor ID="FCKeditor1" runat="server"></FCKeditorV2:FCKeditor>
This creates an instance of the editor in our page. If you browse to your page with the URL http://localhost/Edit.aspx, you should see a page something like this:

You can use the control to enter text, format it, and… well, not much else. We need a way to save this text as the Content.txt file we use for our Default.aspx page. You can download the code for our Edit.aspx page from Packt's official web site, or you can type the code in from the following walkthrough of the code:
Creating and Understanding Edit.aspx
Let's walk through the Edit.aspx code, so you can understand the process the code follows. See the following block of code:
<%@ Page Language="VB" Debug="True"%>
<%@ Import Namespace="System.IO" %>
<%@ Register Assembly="FredCK.FCKeditorV2"
Namespace="FredCK.FCKeditorV2"
TagPrefix="FCKeditorV2"
%>
This block of code imports the System.IO namespace that we use to read and write our Content.txt file, just as in our Default.aspx page. See the next line:
<!DOCTYPE html PUBLIC "-//W3C//DTD XHTML 1.0 Transitional//EN"
"http://www.w3.org/TR/xhtml1/DTD/xhtml1-transitional.dtd">
It simply identifies the Doctype for the browser, so it knows how to interpret the rendered HTML. This was the default inserted in our code by Visual Web Developer when we created a new form. If you want to know more about the Doctype specification, you can refer to the Word Wide Web Consortium's list of recommended doctypes at http://www.w3.org/QA/2002/04/valid-dtd-list.html.
Our script block consists of two subroutines. The following snippet is the first subroutine:
<script runat="server">
Sub Page_Load(ByVal sender As Object, ByVal e As EventArgs)
If Not Page.IsPostback Then
Dim Filetext As String = Server.MapPath("Content.txt")
Dim objStreamReader As StreamReader
objStreamReader = File.OpenText(Filetext)
Dim Content As String = objStreamReader.ReadToEnd()
objStreamReader.Close()
FCKeditor1.Value = Content
End If
End Sub
This subroutine is nearly identical to our Default.aspx page code for loading the Content.txt file into the Label control. You will notice the following two changes:
1. We only do this if the page is not a postback from itself, to prevent reading the text file again after we have edited it but not saved it.
2. Instead of setting the text in the Label control to match the
Content.txtfile, we set the Value of the FCKEditor control. This loads theContent.txtfile into the FCKEditor, so we have what already exists and can edit it.
The second subroutine is new to the Edit.aspx page.
Protected Sub Button1_Click(ByVal sender As Object, ByVal e As
System.EventArgs) Handles Button1.Click
Dim Outfile As String = Server.MapPath("Content.txt")
Dim objStreamWriter As StreamWriter
objStreamWriter = File.CreateText(Outfile)
objStreamWriter.Write(FCKeditor1.Value)
objStreamWriter.Close()
Server.Transfer("Default.aspx")
End Sub
</script>
This subroutine is almost the opposite of the first. Instead of a StreamReader object, we use a StreamWriter object, which will write our text to the Content.txt file. The StreamWriter writes the value of the FCKEditor control to Content.txt. The subroutine closes the StreamWriter and uses a Server.Transfer to send the browser back to the Default.aspx page, where the Content.txt file is again read and displayed, this time with the altered content.
Note
Server.Transfer vs HyperLink
ASP.NET provides a number of methods for browsing from one page to another. We've used a HyperLink, which merely sends a request for the new page from the browser, and we now use a Server.Transfer to move back to the Default.aspx page. Using Server.Transfer ends control of the current ASP.NET page and transfers control to the destination page, and can be used to maintain session information between pages. In this case, we are using it simply because it has a slight performance boost over other possible methods, though in this application you would never notice. It is also easier to code in a button_click.
The page code displays our page with the FCKEditor control, the button that activates the subroutine to save the content, and a hyperlink that simply returns the browser to the Default.aspx page without saving anything to the Content.txt file.
<html xmlns="http://www.w3.org/1999/xhtml">
<head runat="server">
<title>Sample CMS Content Editor</title>
</head>
<body>
<form id="form1" runat="server">
<div>
<FCKeditorV2:FCKeditor ID="FCKeditor1"
runat="server"
Height="400"
Width="800">
</FCKeditorV2:FCKeditor>
<br />
<asp:Button ID="Button1" runat="server" Text="Save Content" />
<br />
<asp:HyperLink ID="HyperLink1" runat="server"
NavigateUrl="Default.aspx">
Cancel and Return to Original Page
</asp:HyperLink>
</div> </form>
</body>
</html>
The final Edit.aspx page should look something like:

Let's try out our simple CMS. Change some of the text, add your own, make some of it bold or italics, and save it. Your changes will show in the Default.aspx page. Of course, it's still ugly. Let's give it at least a little formatting, a title, and some structure. In later chapters, we'll deal with much more advanced formatting and design work, but we'll start with a few simple HTML changes for now. In the <body> of your Default.aspx page, add or change the highlighted lines:
<body>
<form id="form1" runat="server">
<table width="500" border="0" cellpadding="4"
cellspacing="0" align="center">
<tr>
<td>
<h1>The World's Simplest CMS</h1>
<hr />
<asp:Label ID="Label1" runat="server"
Width="500"></asp:Label>
<hr />
</td>
</tr>
<tr>
<td align="center">
<asp:Button ID="Button1" runat="server"
Text="Edit Content" />
</td>
</tr>
</table>
</form>
</body>
We have created a table for our page to be displayed in, centered that table, and added a headline. We also added horizontal lines to define our content block, and centered the button used to edit our content. These are some extremely simple changes, using only basic HTML. However, these changes dramatically improve the look of our basic CMS, or at least make it look like we didn't just concentrate on writing code.