Getting started with Flash
Adobe Flash is a multimedia platform that allows us to create animations and rich Internet applications. Each of these applications, created with Flash, is pre-compiled into the Shockwave Flash (SWF) file format. These applications can be embedded within a webpage or used on the desktop for local functionality. These SWF files are read and interpreted using the Flash Player, which must be installed as a plug-in for the browser viewing the page. This is rarely an issue though, since Flash is so widely used by so many web sites that it is rare to not have Flash installed on your visitor's browser.
So, our first task is to install Adobe Flash CS4 onto our computer, so that we are able to walk through the examples in this book. Although Flash CS4 is not a free application, you can easily download the 30-day trial version by going to http://www.adobe.com/go/tryflash and complete this book within that trial period. Once you have Flash CS4 installed on your machine, we are ready to move on.
Note
If you are using Flash CS3, you will still be able to use all of the tutorials in this book. Flash CS3 and CS4 are very similar, so there should not be any discrepancies between the two when following through the examples in this book.
Creating a new Flash project
With Flash CS4 installed on our computer, we can open up the application and create a new project. When the application first comes up, you should see a welcome screen, where we can Create a new project. For all of the examples in this book, we will be using ActionScript 3.0 for our Flash applications. So, we will continue by clicking on the link that says Flash File (ActionScript 3.0), which should then bring up an empty project. Since there are differences in the way that Flash CS3 and Flash CS4 look, our next task is to change the default workspace for Flash CS4 so that it looks like CS3. This will make it easier for everyone to follow every lesson in this book and keep any reference that I make regarding the location of certain tools consistent.
Setting up the workspace
In this step we will set the workspace layout so that it looks identical to the Flash CS3 default. In Flash CS4, we can accomplish this by clicking on the Window menu item. Once this menu item opens up, we will select the Workspace menu item, and then select Classic.
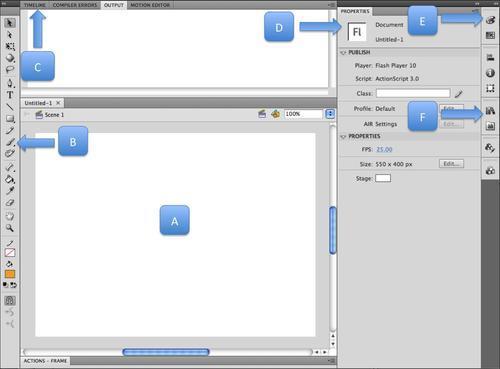
We should now have a workspace that resembles the following diagram. We will take a look at each highlighted section within this workspace, so that we know what they are when they are referenced in this book.
For each of the following sections, simply refer back to this diagram to see where to find the item under discussion.
A: The Stage
With our workspace set up the way that we want, we can shift our focus to the white square in the middle of the screen. This white square region is called the stage and will be referenced quite a bit in this book. The stage is simply the visible window for any object that is placed within our Flash application. By dragging an object off of the stage, we are removing the object from the visible region of our Flash application.
B: The Toolbar
The toolbar presents many of the tools that can be used to create or edit objects on the stage.
C: The Timeline
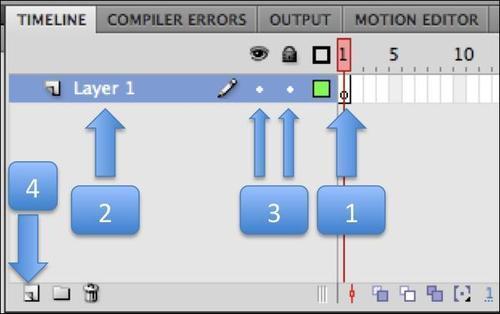
When you click on this tab, you should see the timeline for our Flash application. The timeline is a very important aspect in Flash since it allows us to create objects that can change in time. There are many elements within the timeline that will be important for us in this book, and each of these items is described as follows:
Within the timeline, there are a series of white blocks that span the width of the timeline. Each of these little white blocks are called frames. A frame is a snapshot in time for our Flash application. We can combine a series of frames to create an animation (where an object moves for each new frame), or define different states for our objects, where each frame shows a different state for our object.
Another important feature of the timeline is the ability to define multiple layers. We will use this quite often in this book since it not only allows us to control which objects are on top of other objects, but it also serves as a great way to organize our Flash applications for ease of use.
Having each object within its own layer also gives us the power to hide or lock each layer. This can be done by clicking on the dot within the column (visibility) or the column (lock). This will help us to keep other objects unaffected when we are working on a different layer.
We can also create new layers by clicking on the column (visibility) or the symbol. Once we have created a new layer, it is best practice to name that layer by clicking on the name until it turns into an edit box, where we can then provide any name we would like.
D: The Properties panel
The properties panel is used to describe the object that is currently selected. We will use this panel quite often in order to change the width and height, and to give names to our object's instance.
E: The Color Palette
We will use this tool to change the fill colors for the objects that we create. We will also use this tool to create gradients to give our application depth and character.
F: The Library
This tool is used to keep track of all objects that we have created within our Flash application. We will use this to edit existing objects as well as to create new objects that will be used in our Flash application.
Now that we are familiar with the Flash Integrated Development Environment (IDE), we can create something within Flash and then embed that within Drupal.