
Nothing is more exciting than setting up a new project in our favourite framework. Every time we start a new project we begin with a clean slate.
Before you can set up a new Zend Framework 2 application you need to make sure you have the following items ready:
A web server such as Apache running PHP Version 5.3.3 or higher that you can reach from a web browser
Git
If you don't have everything ready as mentioned, you are best off reading the topics mentioned in the See also section of this recipe (every topic we explain in this chapter is called a recipe) before you continue reading here.
We are assuming that Zend Framework 2 will be used on a Linux-based platform running an Apache 2 web server; this means that commands might not directly work on a Windows platform. Windows users, however, can set up a virtual machine with Linux on it to make full use of the book.
To install a virtual machine on Windows, we can use an application called Oracle VM VirtualBox, which is freely available. We can go to www.virtualbox.org and download plus install the latest version of VirtualBox, we can go to VirtualBoxes (http://virtualboxes.org/images/ubuntu) and download a preconfigured virtual machine from there.
All we have to do on the VirtualBoxes website is click on the latest Ubuntu (which is a distribution of Linux) link in the list, please take note of the username and password displayed there as we will need it later to login. Once the image is downloaded, it can be made ready by following the instructions in the documentation that can be found on the VirtualBoxes site (http://virtualboxes.org/doc/register-and-load-a-downloaded-image).
Assuming the image is imported we can easily start up the virtual machine and put in our username and password that has been supplied with the downloaded virtual machine.
Once logged in to the virtual machine we need to make sure Git is installed, which can be done easily by typing in the following command (mind that the dollar sign is the command prompt, and not the command we actually need to type):
$ sudo apt-get install git
If Git wasn't installed, the system will ask you to install Git, which can be done by pressing the Y key, followed by the Enter key, on the other hand if Git was already installed, than it will not do anything and tell you it already is installed.
First of all, we need the Zend Framework 2 skeleton so we can easily create a new project. A skeleton is a template structure that can be used to start developing with an application, and in this case it creates a template for us to develop within Zend Framework. Fortunately doing this is relatively easy, and almost never causes any problems, and when it does, it is usually related to Git not being able to retrieve the code. When Git isn't able to retrieve the skeleton, please make sure there are no spelling mistakes in the command, and that Git has outside access (we can test this by typing ping Github.com and see whether we get a response back).
The method we are going to use to retrieve the skeleton is called cloning, through a version control system called Git. Cloning the source code will make sure we always get the latest version that the developer (in this case Zend itself) has put online.
We can clone the skeleton—and almost everything else on Github for that matter — through use of the following command:
$ git clone git://github.com/zendframework/
  ZendSkeletonApplication.git
Once finished we can go into the newly created folder called ZendSkeletonApplication, and copy and paste everything in there over to our web server document root. On a Linux system this is usually /var/www (this is also the case when we use Zend Server, as described in the Appendix, Setting up the Essentials). We can do this, for example, by typing the following commands:
$ cd ZendSkeletonApplication
$ mv ./* /var/www –f
$ cd /var/www
When everything is copied over, we are going to initialize the project by typing the following command:
$ php composer.phar install
Now the Command Line Interface (CLI) of PHP executes composer.phar, which will in this instance, download and install the Zend Framework 2 library and set up a simple project for us to be able to work in.
This command can take a long time before it is successfully executed, as Composer needs to do a lot of things before it tells you that Zend Framework 2 is ready for use, we won't go into the details of the workings of Composer here, as it is already discussed in the Appendix, Setting up the Essentials.
Once this command has been completed we need to make sure our web server document root is changed to match the layout of the skeleton. It is common practice that Zend Framework 2 uses the public folder as a main landing point for the application. The structure of the Zend Framework 2 skeleton allows us to bind the user to the public folder, while all our logic is safely outside the public area.
In essence this means we need to root or jail the web server in using the public folder first before we can actually see anything that we just installed. We want to root or jail the web server because we don't want the outside world to be able to abuse our web server more than necessary, and rooting or jailing makes sure that the web server itself has no access to any other folders than what it is jailed to, thus making our server a bit more secure.
In my personal case this means changing the Apache 2 configuration. In most Linux-based systems it will be the Apache web server that is serving our web requests.
The easiest thing that you can do is find your web server configuration (usually located in /etc/apache2 and append the DocumentRoot with /public. For me this would change the document root from /var/www' to '/var/www/public.
Tip
If you are using Apache, you need to check if the AllowOverride setting is set correctly, this can be found in the same section as your document root and should reflect the following:
AllowOverride FileInfo
Finally we need to restart the Apache web server, which can be done by the following command if you are logged in as a root user or invoke it by prepending the command with sudo, which tells the server that we want to execute it as a super user.
$ apache2ctl restart
Now we are able to check our browser and see what we have actually done. We now simply go with a web browser to the project created by typing in the URL, in my case this would be the following:
http://localhost/
This will result in the following screen:
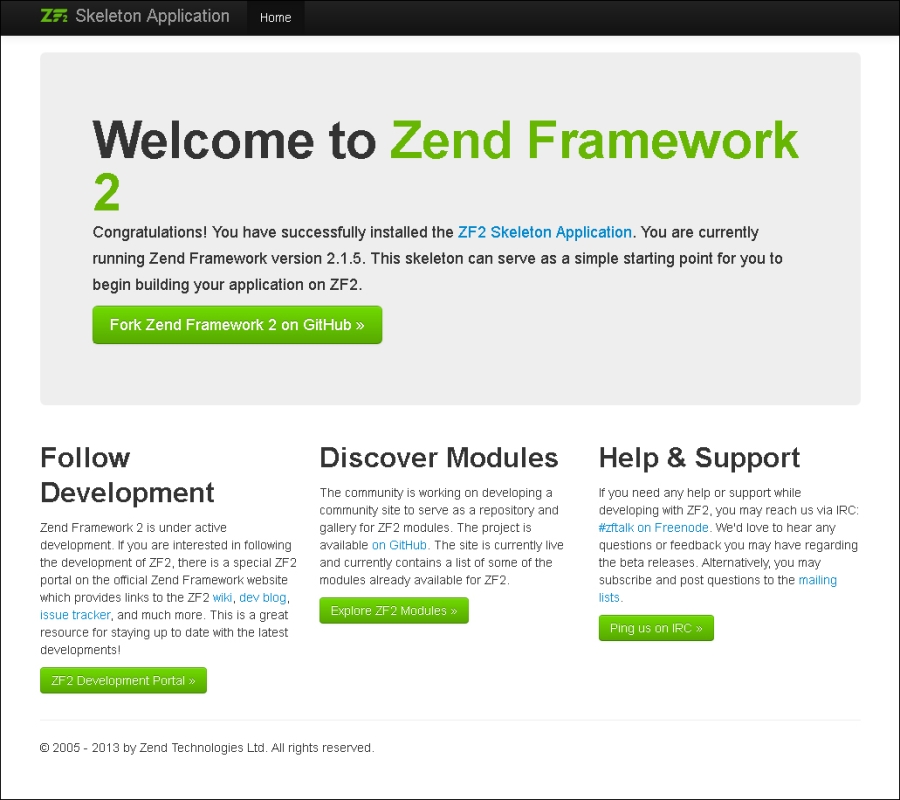
Congratulations, you have now set up a basic Zend Framework 2 application.
After getting the basic Zend Framework 2 skeleton working, it is the perfect time to install the ZFTool. The ZFTool is a utility module that comes in handy when we want to list the current modules in our project, or add a new module, or even set up a new project. It also contains an extremely useful class-map generator that we can use in the somewhat more advanced areas of Zend Framework 2.
We can install this utility by using the following commands:
$ cd /var/www
$ mkdir -p vendor/zftool
$ cd vendor/zftool
$ wget https://packages.zendframework.com/zftool.phar
Although we already set up our Zend Framework 2 skeleton through the composer, it might be a fun thing to show you how you can easily set up a new project through the ZFTool.
$ cd /var/www
$ php vendor/zftool/zftool.phar create project new-project
The preceding command will create a new Zend Framework 2 skeleton project in the folder /var/www/new-project. In turn this means that the document root for our new project should be set to /var/www/new-project/public.
To complete the Zend Framework 2 application in our new-project, we can simply go to the new-project directory and execute the following command:
$ cd new-project
$ php composer.phar install
Another handy command of the ZFTool is the creation and display of modules in our project. The ZFTool can easily display a list of modules that we currently use (with larger applications we tend to lose sight of the modules) and the ability to create a new skeleton module for our application. To see a list of the current modules used in our application we can use the following command:
$ php ../vendor/zftool/zftool.phar modules
To create a new module named wow-module in our project based in the directory /var/www/new-project we can use the following command:
$ php ../vendor/zftool/zftool.phar create module wow-module
  /var/www/new-project
Giving the path to the application is optional, but if we are using it with multiple projects on the same machine, it is best to make sure that we have the right path for our project.
And now for the last and probably the most useful command in the ZFTool box, the class-map generator. A class-map file is a file that has all the classes of a project with their respective paths declared, which makes it easier for the PHP auto loaders to load the class file. Normally class files are found in paths that we know of, creating a small lag because the auto loader actually needs to search for the file. With a class-map file, however, this is not the case as the auto load can immediately find the file required.
Class-mapping is a big issue in Zend Framework 2 because a bad class mapping can make a good application terribly slow, and to be completely fair Zend Framework 2 can use all the speed it can get.
What the class-map generator does is create a file that contains all the classes and paths that can be autoloaded. That way we don't have to worry about where the classes are located.
To generate a new class-map file, we can use the following command:
$ php zftool.phar classmap generate <directory> <file> -w
The command requires us to give in two different parameters:
<directory>: The directory that needs to have the classes indexed. For example, this can be a new library you added to thevendordirectory.<file>: This is the class-map file the ZFTool needs to generate. Our auto loader in Zend Framework 2 needs to pick this file up, so we need to make sure that the ZFTool can find the file. If you don't specify a file, it will create a file calledautoload_classmap.phpin the current working directory.
Most of the time it is necessary to append a class-map file instead of overwriting it, if you want to append it you can simply change -w with -a.
An example of a class-map file is the autoload_namespaces.php file in the vendor/composer directory, and it looks a little bit like this:
<?php
return array(
  // Every class beginning with namespace Zend\ will be
  // searched in this specific directory
  'Zend\\' => array(
    __DIR__ . '/../zendframework/zendframework/library'
  ),
  'ZendTest\\' => array(
    __DIR__ . '/../zendframework/zendframework/tests'
  ),
);
Tip
Downloading the example code
You can download the example code files for all Packt books you have purchased from your account at http://www.packtpub.com. If you purchased this book elsewhere, you can visit http://www.packtpub.com/support and register to have the files e-mailed directly to you.
There are also other ways of installing the ZFTool, some are just as easy as using the composer, so we'll cover two other methods of installing the ZFTool. That way we give ourselves the broadest options available to use.
Another method of installing ZFTool is by utilizing git, and thus cloning the source code from the repository itself. This however gets the current master version, which can be a bit buggy.
$ cd vendor
$ git clone https://github.com/zendframework/ZFTool.git
$ cd ZFTool
$ php ./zf.php
Instead of zftool.phar we have now got the zf.php file at our disposal, which can be used in exactly the same way. Now we have covered all the different options on installing ZFTool.
The Making sure you have all that you need recipe in the Appendix, Setting up the Essentials
The Downloading Zend Framework 2 and finding its documentation recipe in the Appendix, Setting up the Essentials
The Composer and its uses within Zend Framework 2 recipe in the Appendix, Setting up the Essentials
Apache web server http://apache.org/
PHP website http://php.net