

In this section, we'll have a good time looking into the files that have been generated while creating our project.
First of all, we should wonder what is responsible for taking a URL and deciding what is to be done with it. That's done through routing.
As discussed earlier, we went to the root path of our running application (http://localhost:9000/). What we got was an HTML page containing information and links to some documentation—the welcome page.
What happened is that the browser took a URL and sent a GET request targeting the / path of our server.
At this stage, Play! Framework 2 enters the game; it will try to find an action somehow related to the received request using two pieces of information: a method (GET) and a path (/).
For that, Play! uses a kind of mapping file, routes, that can be found under the conf folder. Let's see what it looks like so far:
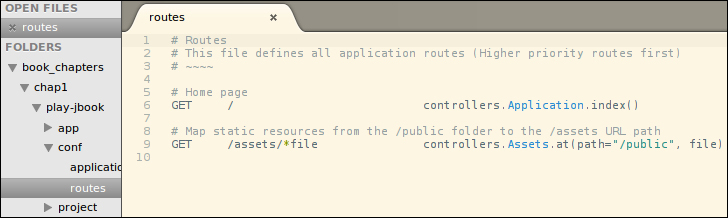
As we can see, the comments begin with the hash character (#), and the relevant information is in the lines with three columns, as we can see in the following screenshot:

Indeed, each row defines how to access server-side functionalities using HTTP, and is composed of three columns:
GET: This is the first column that contains the method used in the request/: This second column contains a relative path (to the application context, which is void in our case)controllers.Application.index(): This third column is reserved for the action to be invoked
So, when the Play! application is asked for a route, it looks in its defined mapping to find the perfect match using the method (GET) and the path (/). In this case, it will stop at the first line.
Having found a definition, Play! will call the action (third column): controllers.Application.index(), which calls the index method in the Application class that resides in the controllers package. We'll cover the action part in detail in the next section.
Now let's have a look at the second line of the routes file:

What it does is map all of the GET requests on the paths that start with /assets/. And the next portion, *file, stands for: all next characters (*) must be kept in a resulting string that will be named file. This variable is very important because it can be used in the action part of the mapping to initialize data. Let's read ahead for more.
An example of matching requests would be the one that asks for the jQuery asset (the version 1.7.1 is available by default): http://localhost:9000/assets/javascripts/jquery-1.7.1-min.js
Looking at the mapping, it says that the file variable will hold the javascripts/jquery-1.7.1.min.js string. Let's see how this value can be used in the action.
In the second line, the action is the at method in the controllers.Assets class; its signature has two parameters:
path: This is the source folder that will be the rootfile: This is the path to the wanted file, which is relative to the previously defined root folder
To check which file will be retrieved, let's have a look at the source under public/javascripts and verify that the jquery-1.7.1.min.js file is present.

We'll see in the later chapters how we can define a more advanced matching system that involves type checking, conditional data extraction, using HTTP methods other than GET, defining HTTP query parameters, and so on.
An action in Play! Framework 2 is the business logic that defines an HTTP request. It's a simple method that has a defined route declaring it as the code to be executed when a matching request arrives.
The action methods are declared in a container
(a class in Java) that extends the Controller type (either in Java or Scala). Such a container is itself usually called a controller. Roughly, a controller is a bunch of methods that respond to the HTTP requests.
Controllers are, by convention at least, defined in the controllers package under the source root—the app folder.
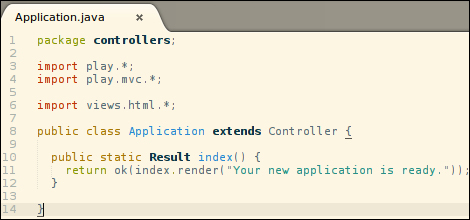
If we look back at the first route, its action was controllers.Application.index(); it leads us to have a look at the code now.
Note
What I'll propose is to review the next listing in both Java and Scala, because they are really simple and can be an intuitive introduction to the Scala syntax. However, in the rest of the book, the code will be mostly presented in Java and sometimes in Scala. In all cases, we can find both versions in the code files of the book.
We'll start by looking at the Java version:
Now lets take a look at the Scala version. We can see that at this stage, both are looking pretty much the same.

Having seen both versions, it'll be interesting to point out where they differ. But first, let's see what's common between them.
A controller is a type that extends a Controller structure provided in the play.api.mvc package. Now it would seem obvious that the MVC pattern is implemented by Play! 2, and we're just looking at the C part.
After this, we notice that a method, index, is defined. It means something similar in both languages and could be phrased as follows: inform the client that the response is OK with an HTML content rendered from something in the views package named index and using a string parameter.
The sentence is enough representative information to figure what an action is in Play! 2, but some keywords may require a bit more explanation:
Response: An action is something that always returns an HTTP response, which is represented in Play! 2 by the
Resulttype.Ok: The
Resulttype must be a valid HTTP response, so it must include a valid HTTP status code. HenceOkis setting it to 200.Rendered something: This seemingly esoteric portion of the phrase is only referencing what is called a template file in Play! Framework 2. In other words, this is about the V part of the MVC pattern.
String parameter: A template can take parameters to adapt itself to predictable situations. Here we may feel that these template parameters are just like method parameters; perhaps because they are.
Now that we've tackled the similarities, what about the differences? The very first noticeable distinction is the following one:
In Java, a controller is a class
In Scala, a controller is an object
To illustrate this difference, we must know that an object in Scala can be thought of as a classical singleton. And actually, our Java class is a bit special due to this next distinction:
In Java, an action is a static method
In Scala, an action is a function
Strictly, a controller in Java is nothing more than a bunch of static methods, and is a convenient way to force a totally stateless code, which offers common functionalities. We're approaching the notion of a singleton without static reference to an instance (non-static getInstance method), because the singleton instance will be created and held by the Play! 2 internals.
The Scala action definition is simply defining a new function—an object's method. If we omit the pure syntactical differences (the return type and keyword are missing in Scala), the last interesting difference is that Scala uses an additonal structure: Action.
Such Action can be thought of as a block of code executor within an HTTP context that could be synchronous or even asynchronous (this will be covered in Chapter 7, Web Services – At Your Disposal).
So far we have learned how to map a request to some server-side code, and how to define such server-side code as an action in a controller. In this section, we'll learn what a view looks like in Play! Framework 2.
Actually, starting from version 2, templates (or views) are Scala based (whereas in version 1 they were based on Groovy). That is to say, a template file is HTML mixed with Scala code that can manipulate the server-side data.
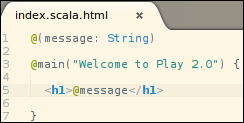
As an introduction for those unfamiliar with what we covered earlier, we'll step into the template we saw in the Action section: views.html.index. This file is located under the app/views/ folder, and is named index.scala.html.
Here again we'll see that Play! is perfectly well integrated with Java or Scala, showing that the templates are exactly the same in both versions. The following screenshot shows what it looks like in Java:

Next, we can check what the Scala version has defined:

OK, they are not exactly the same (at first glance), but that's where it becomes really interesting. First of all, where is the HTML? We've just learned that a Scala template is a mixture (Scala and HTML), while what we have here seems to be something like Scala prefixed by @ ("magic character"). Actually, it's true, the magic character tells the compiler that a Scala instruction is about to be defined in the very next block.
So, before talking about the difference (type = "Java"), we'll have a quick review of the rest. The template starts with a parameter between the parentheses (...) and is prefixed with an @ character. This parameter is defining the signature of the template. Then we have a new expression composed of two parts:
The first part is invoking a certain function named
mainwith one string argumentThe second part is a curly brace block (
{...}) containing another block of code
In fact, these two parts together compose the invocation of the main function, which are Scala features:
A function can have several blocks of parameters
A block of parameters can be defined using either parenthesis or curly braces
The last portion to be reviewed is the content of the last parameter block. Since it starts with an @ character, we know that it will be Scala code.
Confused? Actually, in a Scala template, a curly brace is opening a staged box in which we can define a new output. In our case, the output is an HTML page. But the default index page will delegate its content generation to another function named welcome, located in a self-descriptive play2 object (provided by the framework). As Scala code is not HTML, we must use the magic character. The content rendered by the welcome function is what we saw while testing http://localhost:9000/—an HTML page with documentation. But, what the heck are these functions! Still no HTML? Strictly speaking, a Scala template is compiled into a function, that's all. Keeping this in mind, we'd better look at a file named main.scala.html that should be located in the same folder as index.scala.html, since no import has been used at all. Indeed, there is (HTML) and it is shown as follows:

As we can see, this new template contains things such as parameters, magic characters, and so on. If we keep aside the link and script tags, we have an excerpt of HTML with an almost empty body.
Back to the parameters; we can see two blocks (similar to what we saw in the index.scala.html template), where the first block is declaring a title and the second one content. They are used to set the HTML title and the body content respectively.
Note
The type of content is Html, which is the Scala structure that can be written as HTML when invoked by the template. Thus, @content is a parameter that represents valid HTML to be written in the body of the document.
Both the Java and Scala versions of main.scala.html are exactly the same.
This leads us to remind ourselves of the difference we saw between the index templates. The Java version is calling the welcome template with an extra parameter (given by name—another Scala feature) telling the template that the current project is a Java one.
This style parameter will be used by the welcome template to show specific links to documentation, depending on the language. For instance, we can recall that earlier we got a direct link to the Java API documentation. The Scala version is not initializing this argument because its default value is Scala.
Modifying the code and experimenting with the tool is probably the most fun part for developers like us. In the next sections, we'll try to adopt what we have learned so far to see what kind of results we can get very easily.
Let's start with the view part.
We'll first try to slightly modify the index.scala.html template in order to replace the default welcome page with a bunch of self-coded HTML.
To keep it very simple, that is, without modifying anything else other than the index template itself, we'll try to disPlay! the given message in a header. For that, the first thing to do is to remove the call to welcome:

That was very simple. Now, to render some HTML, we'll have to fill in an Html value in the second parameter—the curly braces block:
We've just written the most common HTML body ever, but also asked Play! to echo the content of the message variable. This message variable came from the controller with the Your new application is ready. value. If we check http://localhost:9000 again, the following screenshot is what we should get:
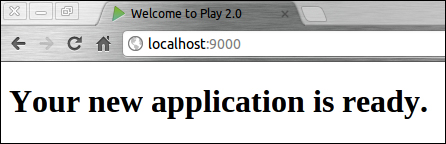
Not pretty, but at least we've made it ourselves. However, did you notice one thing? We don't have to package the template to compile it, or whatever a "classic" Java web application would require. What we have to do is simply save the file and check in the browser because, in Play! 2, everything is compiled or packaged on the fly when developing. And that's awesome!
The actual Application controller has only one action saying that our application is ready. We'd now like to show in the view the well-known "It works!" message coming from Apache 2.
For that, open the Application controller and simply change the value of the argument of index:

Now let's check it in the browser:
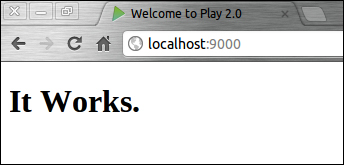
Feels nostalgic!
Again, no compilation or action is required to update the running code. Play! 2 does the boring work for us.
There's another easy thing that can be done: changing the HTML title, which is left as an exercise.
Just to show how easy it is to deal with the content type, we'll see how to render a JSON response to the client.
All we have to do is to modify the index action and nothing else. Tasks such as binding and creating a specific template are handled by Play! 2 for us.
As done earlier, we'll start with the Java version:

Followed by the Scala one:

A quick check in the browser should disPlay! the following screenshot:

As we can see, the browser has rendered the response as JSON because its content type was set by Play! with the application/json value. This content type has been automatically inferred from the data type given to the OK response (a JSON object). The content-type value can be checked in the browser console, as shown at the bottom of the previous screenshot (see the Type column).
Until now, all our changes have been successfully applied. Unfortunately, we can sometimes make errors or typos.
The good thing is that Play! is well integrated, even for errors. This would be quite disappointing for some, but not much for those coming from the "classical LAMP stack world" for instance.
This integration is another feature that makes Play! 2 different from the other Java frameworks. Everything is compiled code—views, even assets (CoffeeScript, LESS)—and every compile-time error is just disPlay!ed in the browser when reloading the page.
This leads us to launch the application at start from the console and it'll probably be the last time we'll interact with this console. The only tools that a Play! 2 developer needs is an editor and a browser.
It's quite easy to imagine the kind of errors that can be made and how. So, let's see a few screenshots showing the result of applications presenting some of the errors encountered.
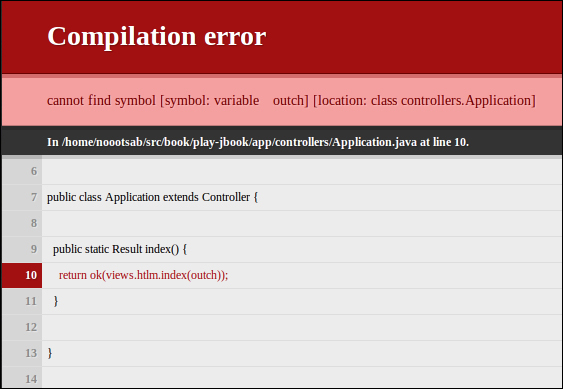
A Java error: forgot the double quotes
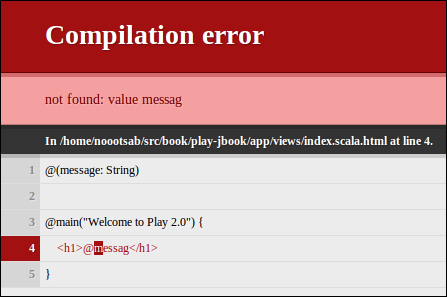
A Scala error: the messag variable is not defined
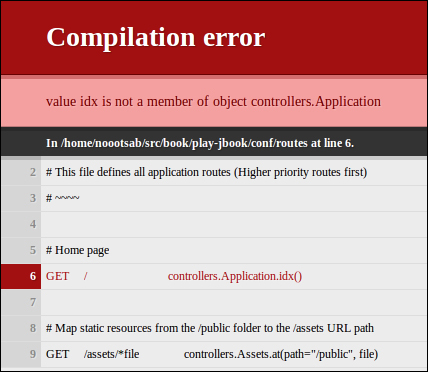
A routes error: the idx action doesn't exist

A CoffeeScript error: forgot the last parenthesis
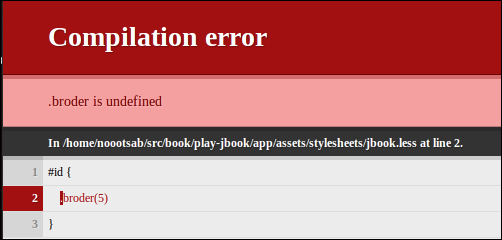
A LESS error: macro not defined