

As you start to use Laravel, you will realize that it provides a wide variety of functionality. We've taken the time to describe the five most vital components that we haven't covered in the Quick start section. Gaining mastery over these five components gives you the power to make amazing web applications with Laravel.
Eloquent is Laravel's native ActiveRecord implementation. It is built upon Laravel's Fluent Query Builder. Due to the way in which Eloquent operates with Fluent, complex queries and relationships are easy to describe and understand.
ActiveRecord is a design pattern that describes an object-oriented way of interacting with your database. For example, your database's users table contains rows and each of these rows represents a single user of your site. Your User model is a class that extends the Eloquent Model class. When you query a record from your database, an instantiation of your User model class is created and populated with the information from the database.

A distinct advantage of ActiveRecord is that your data and the business logic that is related to the data are housed within the same object. For example, it's typical to store the user's password in your model as a hash, to prevent it from being stored as plaintext. It's also typical to store the method, which creates this password hash within your User class.
Another powerful aspect of the ActiveRecord pattern is the ability to define relationships between models. Imagine that you're building a blog site and your users are authors who must be able to post their writings. Using an ActiveRecord implementation, you are able to define the parameters of the relationship. The task of maintaining this relationship is then simplified dramatically. Simple code is the easy code to change. Difficult to understand code is the easy code to break.
As a PHP developer, you're probably already familiar with the concept of database normalization. If you're not, normalization is the process of designing databases so that there is little redundancy in the stored data. For example, you wouldn't want to have both a users table which contains the user's name and a table of blog posts which also contains the author's name. Instead, your blog post record would refer to the user using their user ID. In this way we avoid synchronization problems and a lot of extra work!
There are a number of ways in which relationships can be established in normalized database schemas.
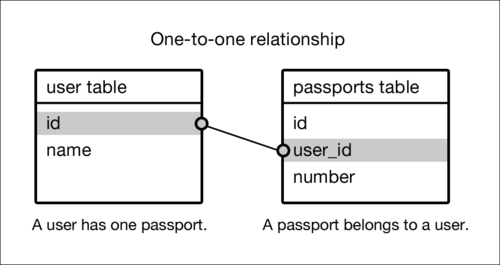
When a relationship connects two records in a way that doesn't allow for more records to be related, it is a one-to-one relationship. For example, a user record might have a one-to-one relationship with a passport record. In this example, a user record is not permitted to be linked to more than one passport record. Similarly, it is not permitted for a passport record to relate to more than one user record.
How would the database look? Your users table contains information about each user in your database. Your passports table contains passport numbers and a link to the user which owns the passport.

In this example, each user has no more than one passport and each passport must have an owner. The passports table contains its own id column which it uses as a primary key. It also contains the column user_id, which contains the ID of the user to whom the passport belongs. Last but not least, the passports table contains a column for the passport number.
First, let's model this relationship in the User class:
class User extends Eloquent
{
  public function passport()
  {
    return $this->has_one('Passport');
  }
}
We created a method named passport() that returns a relationship. It might seem strange to return relationships at first. But, you'll soon come to love it for the flexibility it offers.
You'll notice that we're using the has_one() method and passing the name of the model as a parameter. In this case, a user has one passport. So, the parameter is the name of the passport model class. This is enough information for Eloquent to understand how to acquire the correct passport record for each user.
Now, let's look at the Passport class:
class Passport extends Eloquent
{
  public function users()
  {
    return $this->belongs_to('User');
  }
}
We're defining the passport's relationship differently. In the User class, we used the has_one() method. In the Passport class we used belongs_to().
It's vital to identify the difference early so that understanding the rest of the relationships is more simple. When a database table contains a foreign key, it is said that it belongs to a record in another table. In this example, our passports table refers to records in the users table through the foreign key user_id. Consequently, we would say that a passport belongs to a user. Since this is a one-to-one relationship the user has one (has_one()) passport.
Let's say that we want to view the passport number of the user with the id of 1.
$user = User::find(1);

If(is_null($user))
{
  echo "No user found.";
  return;
}

If($user->passport)
{
  echo "The user's passport number is " . $user->passport->number;
}
else
{
  echo "This user has no passport.";
}
In this example, we're dutifully checking to make sure that our user object was returned as expected. This is a necessary step that should not be overlooked. Then, we check whether or not the user has a passport record associated with it. If a passport record for this user exists, the related object will be returned. If it doesn't exist, $user->passport will return null. In the preceding example, we test for the existence of a record and return the appropriate response.
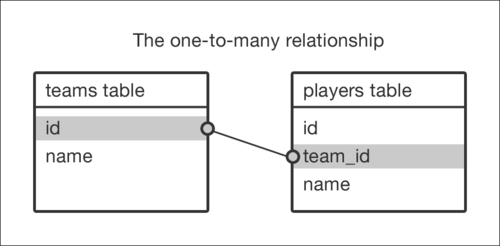
One-to-many relationships are similar to one-to-one relationships. In this relationship type, one model has many of other relationships, which in turn belongs to the former. One example of a one-to-many relationship is a professional sports team's relationship to its players. One team has many players. In this example, each player can only belong to one team. The database tables have the same structure.
Now, let's look at the code which describes this relationship.
class Team extends Eloquent
{
  public function players()
  {
    return $this->has_many('Player');
  }
}

class Player extends Eloquent
{
  public function team()
  {
    return $this->belongs_to('Team');
  }
}
This example is almost identical to the one-to-one example. The only difference is that the team's players() relationship uses has_many() rather than has_one(). The has_one() relationship returns a model object. The has_many() relationship returns an array of model objects.
Let's display all of the players on a specific team:
$team = Team::find(2);

if(is_null($team))
{
  echo "The team could not be found.";
}

if(!$team->players)
{
  echo "The team has no players.";
}

foreach($team->players as $player)
{
  echo "$player->name is on team $team->name. ";
}
Again, we test to make sure that our team could be found. Then, we test to make sure that the team has players. Once we know that for sure, we can loop through those players and echo their names. If we tried to loop through the players without first testing and if the team had players, we'd get an error.
The last relationship type that we're going to cover is the many-to-many relationship. This relationship is different in that each record from each table could potentially be tied simultaneously to each record in another. We aren't storing foreign keys in either of these tables. Instead, we have a third table that exists solely to store our foreign keys. Let's take a look at the schema.
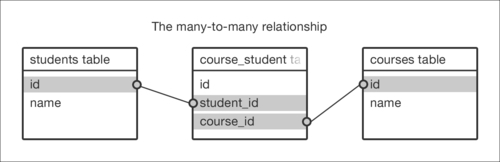
Here we have a students table and a courses table. A student can be enrolled in many courses and a course can contain many students. The connection between students and courses is stored in a pivot table.
A pivot table is a table that exists to connect two tables specifically for many-to-many relationships. Standard convention for naming a pivot table is to combine the names of both of the related tables, singularized, alphabetically ordered, and connected with an underscore. This gives us the table name course_student. This convention is not only used by Laravel and it's a good idea to follow the naming conventions covered in this document as strictly as possible as they're widely used in the web-development industry.
It's important to notice that we're not creating a model for the pivot table. Laravel allows us to manage these tables without needing to interact with a model. This is especially nice because it doesn't make sense to model a pivot table with business logic. Only the students and courses are a part of our business. The connection between them is important, but only to the students and to the course. It's not important for its own sake.
Let's define these models, shall we?
class Student extends Eloquent
{
  public function courses()
  {
    return $this->has_many_and_belongs_to('Course');
  }
}

class Course extends Eloquent
{
  public function students()
  {
    return $this->has_many_and_belongs_to('Student');
  }
}
We have two models, each with the same type of relationship to each other. has_many_and_belongs_to is a long name. But, it's a fairly simple concept. A course has many students. But, it also belongs to (belongs_to) student records and vice-versa. In this way, they are considered equal.
Let's look at how we'll interact with these models in practice:
$student = Student::find(1);

if(is_null($student))
{
    echo "The student can't be found.";
    exit;
}

if(!$student->courses)
{
    echo "The student $student->name is not enrolled in any courses.";
    exit;
}

foreach($student->courses as $course)
{
    echo "The student $student->name is enrolled in the course $course->name.";
}
Here you can see that we can loop through the courses much the same way we could with the one-to-many relationship. Any time a relationship includes the word many, you know that you'll be receiving an array of models. Conversely, let's pull a course and see which students are a part of it.
$course = Course::find(1);

if(is_null($course))
{
    echo "The course can't be found.";
    exit;
}

if(!$course->students)
{
    echo "The course $course->name seems to have no students enrolled.";
    exit;
}

foreach($course->students as $student)
{
    echo "The student $student->name is enrolled in the course $course->name.";
}
The relationship functions exactly the same way from the course side.
Now that we have established this relationship, we can do some fun things with it. Let's look at how we'd enroll a new student into an existing course:
$course = Course::find(13);

if(is_null($course))
{
    echo "The course can't be found.";
    exit;
}

$new_student_information = array(
    'name' => 'Danielle'
);

$course->students()->insert($new_student_information);
Here we're adding a new student to our course by using the method insert(). This method is specific to this relationship type and creates a new student record. It also adds a record to the course_student table to link the course and the new student. Very handy!
But, hold on. What's this new syntax?
$course->students()->insert($new_student_information);
Notice how we're not using $course->students->insert(). Our reference to students is a method reference rather than a property reference. That's because Eloquent handles methods that return relationship objects differently from other model methods.
When you access a property of a model that doesn't exist, Eloquent will look to see if you have a function that matches that property's name. For example, if we try to access the property $course->students, Eloquent won't be able to find a member variable named $students. So it'll look for a function named students(). We do have one of those. Eloquent will then receive the relationship object from that method, process it, and return the resulting student records.
If we access a relationship method as a method and not as a property, we directly receive the relationship object back. The relationship's class extends the Query class. This means that you can operate on a relationship object in the same way that you can operate on a query object, except that it now has new methods that are specific to the relationship type. The specific implementation details aren't important at this point. It's just important to know that we're calling the insert() method on the relationship object returned from $course->students().
Imagine that you have a user model and it has many relationships and belongs to a role model. Roles represent different permission groupings. Example roles might include customer, admin, super admin, and ultra admin.
It's easy to imagine a user form for managing its roles. It would contain a number of checkboxes, one for each potential role. The name of the checkboxes is role_ids[] and each value represents the ID of a role in the roles table.
When that form is posted we'll retrieve those values with the Input::get() method.
$role_ids = Input::get('role_ids');
$role_ids is now an array that contains the values 1, 2, 3, and 4.
$user->roles()->sync($role_ids);
The sync() method is specific to this relationship type and is also perfectly suited for our needs. We're telling Eloquent to connect our current $user to the roles whose IDs exist within the $role_ids array.
Let's look at what's going on here in further detail. $user->roles() is returning a has_many_and_belongs_to relationship object. We're calling the sync() method on that object. Eloquent now looks at the $role_ids array and acknowledges it as the authoritative list of roles for this user. It then removes any records that shouldn't exist in the role_user pivot table and adds records for any role that should exist in the pivot table.
Laravel helps you to handle the typical tasks of logging users in and out as well as makes it easy to access the user record of the currently authenticated user.
First, we'll want to configure authentication for our site. The authentication configuration file can be found at application/config/auth.php.
Here we are presented with a number of configuration options. Primarily, we must choose which Auth driver we use. If we choose the Fluent driver, the authentication system will use the table configuration option to find users and will return dumb objects (objects that contain only data) when we request the currently authenticated user. If we use the Eloquent driver, the authentication system will use the model listed in the model option for querying users and Laravel will return an instance of that model when we request the currently authenticated user. Additionally, you can choose which fields Laravel will authenticate against by changing the username and password options. Typically, you'll be using the Eloquent driver.
Let's continue our example from the Quick start section. We already have a User model, so let's set the driver option to Eloquent. We think that logging in with your e-mail address and password is good, so we'll set the username option to email and we'll leave the password option set to password. We'll also leave the model set to User.
That's it, we're all configured. Let's implement login! First, let's create a new controller for authentication. We'll store it in application/controllers/auth.php.
<?php

class Auth_Controller extends Base_Controller
{

  public function get_login()
  {
    return View::make('auth.login');
  }

}
We'll need to route this and since we typically don't want to go to http://myfirst.dev/auth/login, let's manually set up a route. Add this to your application/routes.php.
Route::any('login', 'auth@login');Finally, create a login form at application/views/auth/login.blade.php:
{{ Form::open() }}
  Email: {{ Form::text('email', Input::old('email')) }}<br />
  Password: {{ Form::password('password') }}<br />
  {{ Form::submit('Login') }}
{{ Form::close() }}
That's it! Now, let's just navigate our browsers to http://myfirst.dev/login. We see our nice new login form!
Now, we just need to be able to submit our form. Let's add a new action to our Auth controller:
public function post_login()
{
  $credentials = array(
    'username' => Input::get('email'),
    'password' => Input::get('password'),
  );

  if(Auth::attempt($credentials))
  {
    return "User has been logged in.";
  }
  else
  {
    return Redirect::back()->with_input();
  }
}
With the addition of this method, we now have a functioning login form. Feel free to go ahead and try it out!
Let's look at how we validate a user's e-mail and password. First, we create an array that contains the credentials received from the login form. Notice that we're storing e-mail and password by using the keys username and password. Despite the fact that we're using e-mail for authentication, Laravel always receives authentication credentials with the keys username and password. This is because the username and password fields are configurable in the auth config file.
Then, we pass the credentials to the Auth::attempt() method. This method takes care of the rest of the process. It'll compare our records in the database against the credentials that we have passed. If the credentials match up, it'll create a cookie in the user's browser and the user will officially be logged in. Auth::attempt() returns true if a successful login has taken place, and false if it failed. If the authentication attempt fails, we redirect the user back to the form and repopulate the email field.
Now, let's add logout functionality. Add the following method to your Auth controller:
public function get_logout()
{
  Auth::logout();

  return Redirect::to('');
}
Finally, add the following line to your routes.php file:
Route::get('logout', 'auth@logout');That's all! Now, when we go to http://myfirst.dev/logout, we'll be logged out and redirected to our site's index page.
So, how can we find out if someone is logged in? The Eloquent and Fluent Auth drivers contain two methods for handling this, check() and guest(). Let's look at each of these in turn:
Auth::check()returnstrueif a user is currently logged in, andfalseotherwise.Auth::guest()is the opposite ofAuth::check(). It returnsfalseif a user is logged in, andtrueotherwise.
Once you've made sure that a user is logged in, you can use Auth::user() to return the user record. If you're using the Fluent driver, Auth::user() will return a dumb object containing the appropriate values from the users table. If you're using the Eloquent driver, Auth::user() will return an instance of your User model. This is very powerful. Let's look at an example:
@if(Auth::check())
  <strong>You're logged in as {{ Auth::user()->real_name }}</strong>
@endif
As you've seen, Laravel's authentication system is driver-based. In this example, we used the Eloquent driver. However, you also have the ability to create custom authentication drivers. This gives you the power to authenticate users with different means and return different types of data with the standard Auth class' API. Covering the development of custom drivers is outside the scope of this document. However, it's simple and powerful. Be sure to look into the Laravel documentation for more information.
Now that we have a user administration site with authentication, we need to restrict some pages on our site to users who have successfully authenticated. We'll do that by using filters.
Filters are functions that can be run before or after routed code. A filter that runs before the routed code is called a before filter. Similarly well-named is the after filter, which runs after routed code.
Filters are often used for enforcing authentication. We can create a filter that detects if a user is not logged in, then redirect him/her to the login form. Actually, we don't need to make this filter at all. Laravel ships with this filter already written. You can find it in your application/routes.php.
Let's take a look:
Route::filter('auth', function()
{
  if (Auth::guest()) return Redirect::to('login');
});
You can see that a filter is registered with the Route::filter() method. The typical location to store filter registrations is within your application/routes.php file.
The Route::filter() method takes two parameters. The first is a string containing the name of the filter. The second is the anonymous function that will be run when the filter is activated.
In this example, the anonymous function will check if a user is logged in using the Auth::guest() method. If the user is not logged in, the filter returns a response object that tells Laravel to redirect the user to the login page.
It's important to note that while you can return response objects from before filters, it's not possible to redirect from after filters as at this point it's too late.
Now that we have the auth filter, how do we tell Laravel when to run it? The correct algorithm is situational.
The following is an example of applying a filter to a routed function:
Route::get('admin', array('before' => 'auth', function()
{
  return View::make('admin.dashboard');
}));
In this example, we want to provide an admin dashboard for users who have successfully authenticated. You may notice that our Route::get() declaration has changed. Our first argument is still the route's URI. However, our second argument is no longer an anonymous function, it's now an array. This array provides a method for configuring our route registration. Laravel knows that when you pass a key/value pair, it should be used as configuration and that when you pass an anonymous function, it should be used as the target function for the route.
In this example, we're only using one key/value pair for configuring our route. We use the key before to tell Laravel that our route uses a before filter. The value associated with the before key is the name of the filter, which should be run before our anonymous function is executed.

Controllers are groups of routable methods that are similar and are therefore uniquely convenient to filter upon. Often the same set of filters that is appropriate for one action in a controller is appropriate for the rest. Filtering at the controller level gives you more flexibility and less redundancy than defining your filters in each route declaration. Let's look at securing our users controller.
class Users_Controller extends Base_Controller
{

  public function __construct()
  {
    parent::__construct();

    $this->filter('before', 'auth');
  }
Here we're looking only at the top-most section of our users controller. The rest of the controller is identical to what we created in the Quick start section.
As you may have noticed, we've declared a constructor for our Users_Controller class. A constructor is a method that is run immediately once our class is instantiated as an object. We use a controller class' constructor to define filters for that controller's actions. It's also important to notice that we first call the parent::__construct() method. It is important for Laravel's Controller class to have its constructor executed so that it can initialize itself and be ready for action.
Then, we tell our controller that for every request to one of its actions we want to run the before filter auth. Now, this controller is completely protected behind your authentication implementation. You will be unable to access the actions within this controller until you've successfully logged in. If you try to access one of the controller's actions, you will be redirected to the login page.
Now, thanks to a combination of Laravel's Auth class and its auth filter, you now have a properly secured admin site.
Unfortunately, a complete description of Laravel's filter functionality is outside the scope of this book. Thankfully, Laravel's documentation is a great resource for learning more about what you can do with filters.
Laravel provides a Validator class full of functionality to help with validating forms, database models, or anything that you'd like. The Validator class allows you to pass any input, declare your own rules, and define your own custom validation messages.
Let's take a look at an example implementation for our create users actions.
public function post_create()
{
  // validate input
  $rules = array(
    'real_name' => 'required|max:50',
    'email'     => 'required|email|unique:users',
    'password'  => 'required|min:5',
  );

  $validation = Validator::make(Input::all(), $rules);

  if($validation->fails())
  {
    return Redirect::back()->with_input()->with_errors($validation);
  }

  // create a user
  $user = new User;

  $user->real_name = Input::get('real_name');
  $user->email = Input::get('email');
  $user->password = Input::get('password');

  $user->save();

  return Redirect::to_action('users@index');
}
First, we create an array that defines our validation rules. Validation rule arrays are key/value pairs. Each key represents the field name that it will be validating and each value is a string that contains the validation rules and their configurations. Validation rules are separated by the pipe character (|) and a validation rule's configuration parameters are separated from the name of the rule by a colon (:).
The required rule ensures that input has been received for its fields. The max and min rules can ensure that strings are no longer or shorter than a specific length. The length for min and max are passed as parameters and are therefore separated from the rule name with a colon. In the real_name example, we're ensuring that it's no longer than 50 characters. We also want to ensure that the user's password is no less than five characters in length.
Since we're using e-mail for authentication, we should make sure that it's a unique address in our database. So, for our email field, we define the unique rule and tell it to compare it against other values in the users database table. If it finds another e-mail address that matches the address from our create users form, it will return an error.
Next, we create the validation object by using the Validator::make() method. We are providing the form's input as our first argument and our $rules array as the second.
We can now check to see if the validation passes by using the $validation->passes() method or if the validation fails by using the $validation->fails() method.
In this example, if our validation fails, we redirect the user back to the form with the input data for repopulating the form as well as the error data from our $validation object. With this error data, we can populate our form with errors so that our user knows why our form didn't validate.
View objects have a special $errors variable that is typically empty. When a user is redirected back to another action with_errors($validation), the special $errors variable is populated with the errors from the validation object. Let's look at an example of how we can display an error for the email field:
{{ $errors->first('email', '<span class="help-inline">:message</span>') }}Here we're displaying the error message from the first validation rule that didn't pass on the email field. Our second argument is a formatting string. The error message will replace the :message symbol in the string. If the email field has no validation errors, none of the formatted string will be returned. This makes this algorithm ideal for creating forms with individual feedback per field.
A complete list of validation rules can be found in the Laravel documentation in your project at http://myfirst.dev/docs.
In a typical web application, validation occurs on both forms and data models. Form validation ensures that the data retrieved from the user meets certain criteria. Data model validation ensures that the data that is being inserted into the database is adequate, relationships are maintained, field uniqueness is maintained, and so on.
Our validation example functions. But, for brevity, we coded it directly inside of our controller. A more appropriate place to store form validation rules is within a model specific to that form. Likewise, a more appropriate place to store database model validation rules is within an Eloquent model.
A major selling point for the Laravel framework is the way in which it handles modular code. Any functionality that can be written within Laravel can be bundled. Controllers, models, views, libraries, filters, config files, routing, and migrations can all be packaged as a bundle and either re-used by you and your team or distributed to be used by others. It may excite you to know that Laravel's application folder is considered to be its default bundle. That's right, all web-application code written with Laravel runs within a bundle.
As a result of bundles being a first-class citizen within Laravel, they are useful for a wide variety of applications. Bundles can be used to add something as simple as a vendor library or helper functions. Bundles are also often used to package up entire web-app subsystems. For example, it's very reasonable to be able to drop a blog bundle into your application, run migrations to create your blog database tables, and then have the URLs http://myfirst.dev/blog and http://myfirst.dev/admin/blog automatically start working. Bundles are amazingly powerful.
Your application's bundle configuration can be found in the bundles.php file that sits in the root directory of your Laravel installation. Let's look at our web applications' bundles.php file right now:
return array(

  'docs' => array('handles' => 'docs'),

);
Oh look here, we already have a bundle installed. The docs bundle contains the current version of the Laravel documentation. It's because the docs bundle handles the docs route that you can go to http://myfirst.dev/docs and view the Laravel documentation. You can comment out or remove the line that configures the docs bundle to prevent your users from accessing the docs route on your production site.
Laravel has a public online bundle repository, which can be found at http://bundles.laravel.com. Users are free to create and add their own bundles to this repository. We can then install their bundles into our own application.
There are a few ways in which you can install bundles.
Installing bundles with Artisan is generally the preferred method to install bundles from the repository. Simply use Artisan's bundle:install task, and the bundle that you request will be downloaded from the Laravel bundle repository and installed into your bundles directory. Let's give this a shot.
# php artisan bundle:install swiftmailer
Fetching [swiftmailer]...done! Bundle installed.
We told Artisan that we wanted to install the swiftmailer bundle from the bundle repository. It downloaded the bundle and now we have a directory bundles/swiftmailer, which contains the swiftmailer vendor library as well as the bundle's start.php file. start.php is the file responsible for loading the contents of the bundle and making it ready to be used; it is run when the bundle is first started.
You could accomplish the same without Artisan. The bundle repository functions by using GitHub. Therefore, all bundles in the repository can be found on GitHub. You could easily go to https://github.com/taylorotwell/swiftmailer and download the code into your bundles directory. This accomplishes the same as doing it with Artisan with only a little more elbow-grease required.
Once you've installed your bundle, you must add it to the bundle configuration file before it can be used. Let's add configuration for our swiftmailer bundle to our bundles.php file and look at the results.
return array(

  'docs' => array('handles' => 'docs'),
  'swiftmailer',

);
It is unnecessary for us to add any additional configuration parameters in order to make our swiftmailer bundle work. Within our code we would simply run Bundle::start('swiftmailer'), and proceed to use it. Alternatively, if you wish to automatically start a bundle, you can simply add the autoconfiguration to your bundles.php file.
return array(

  'docs' => array('handles' => 'docs'),
  'swiftmailer' => array('auto' => true),

);
Now, it's entirely unnecessary to start the bundle manually. It will be started automatically before your routed code is executed.
The core purpose behind the existence of bundles is code re-use. On the road to mastering Laravel, we recommend implementing new code first without bundles. Then, once you find a need to re-use that code, you may then prefer to bundle the code up and refactor it as necessary. This prevents you from being slowed down by both learning how bundles are put together and by implementing code for the first time in Laravel.
After you have gained the experience of making a few bundles, you'll find that they're very easy to design. Until you gain this experience, you may find that you're burning through precious development hours refactoring your code.
You're now aware of all of the most fundamental components of developing with Laravel. As you continue gaining mastery, you'll discover more advanced features such as the Inversion of Control container, view composers, events, and much more. Laravel provides a unique platform in the world of PHP. You're given the chance to implement your own software architecture design without having to destructively modify the core to support it. We highly recommend that if you continue your education in design patterns as you are now working within a platform that truly supports the implementation of your own unique architectures.