
The Yii website contains, among its wonderful documentation, a tutorial on how to build a basic blog application, which is one of the included demos in the framework source. It's in Tutorials | The Yii Blog Tutorial section. The direct URL is http://www.yiiframework.com/doc/blog/.
Let's use this example while we explain the aspects of Yii-based applications. We will not repeat the complete example here, of course, because you can read it in full on the website.
When you write a real application, you should start with the requirements regarding application functionality. For the blog example, this is described in the Getting Started: Requirements Analysis section at the very beginning of the tutorial. The direct URL is http://www.yiiframework.com/doc/blog/1.1/en/start.requirements.
After you have written all the desired features, you basically start implementing them one by one. Of course, in serious software development there's a lot of gotchas included, but overall it's the same.
The blog example is a database driven application, so we need to prepare a database schema beforehand. Here's what they came up with for the blog demo:
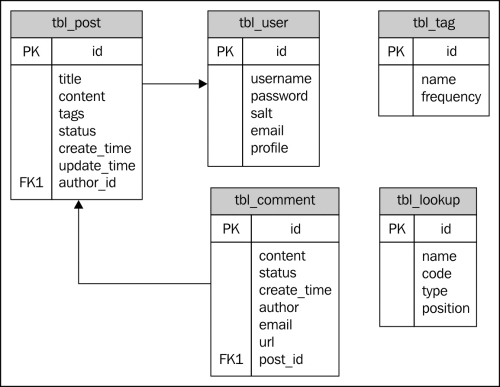
This image is a verbatim copy from the blog example demo. Note that there are two links missing. The posts table has a tags field, which is the storage area for tags written in raw and is not a foreign key to the tags table. Also, the author field in comment should really be the foreign key to the user table. Anyways, we'll not cover the actual database generation, but I suggest you do it yourself. The blog tutorial at the Yii website has all the relevant instructions addressed to total newbies.
Next in this section, we will see how easy it is with Yii to get a working user interface that will be able to manipulate our database.
Once you design and physically create the database in some database management system like MySQL or maybe SQLite, you are ready to configure your app to point to this database. The skeleton app generated by the ./yiic webapp command needs to be configured to point to this database. To do this, you need to set a db component in the main config file located at protected/config/main.php. There is a section that contains an array of components. Following is the setup for a MySQL database located at the same server as the web application itself. You will find a commented-out template for this already present when you generate your app:
/protected/config/main.php

'components'=>array(
    /* other components */
    'db'=>array(
        'connectionString' => 'mysql:host=localhost;dbname=DB_NAME,
        'emulatePrepare' => true,
        'username' => YOUR_USERNAME,
        'password' => YOUR_PASSWORD,
        'charset' => 'utf8',
    ),
    /* other components */
),
This is a default component having a CDbConnection class and is used by all of our ActiveRecord objects which we will create later. As with all application components, all configuration parameters correspond to the public properties of the component's class;so, you can check the API documentation for details.
By the way, you really need to understand more about the main application config. Read about it in the Definitive Guide to Yii on the official website at Fundamentals | Application | Application Configuration. The direct URL is http://www.yiiframework.com/doc/guide/1.1/en/basics.application#application-configuration.
Just remember that all configuration parameters are just properties of the CWebApplication object, which you can read about in the API documentation; the direct URL is http://www.yiiframework.com/doc/api/1.1/CWebApplication.
Now that we have our app linked up to a fully built database, we can start using one of Yii's greatest features: automatic code generation. To get started, there are two types of code generation that are necessary:
Generate a model class based on the tables in your database
Run the CRUD generator that takes a model and sets up a corresponding controller and a set of views for basic listing, creating, viewing, updating, and deleting from the table
There are two ways to go about automatic code generating. Originally, there was only the yiic tool used earlier to create the skeleton app. For the automatic code generation features, you would use the yiic shell index.php command, which would bring up a command-line interface where you could run subcommands for modeling and scaffolding.
$ /usr/local/yii/framework/yiic shell index.php
Yii Interactive Tool v1.1 (based on Yiiv1.1.13)
Please type 'help' for help. Type 'exit' to quit.
>> model Post tbl_post
   generate models/Post.php
   unchanged fixtures/tbl_post.php
   generate unit/PostTest.php
The following model classes are successfully generated:
    Post
If you have a 'db' database connection, you can test these models now with:
    $model=Post::model()->find();
    print_r($model);

>> crud Post
   generate PostController.php
   generate PostTest.php
mkdir /var/www/app/protected/views/post
   generate create.php
   generate update.php
   generate index.php
   generate view.php
As you can see, this is a quick and easy way to perform the model and crud actions. The model command produces just two files:
For your actual model class
For unit tests
The crud command creates your controller and view files.
Console tools may be the preferred option for some, but for developers who like to use graphical tools, there is now a solution for this, called Gii.
To use Gii, it is necessary to turn it on in the main config file: protected/config/main.php. You will find the template for it already present, but it is commented out by default. Simply uncomment it, set your password, and decide from what hosts it may be accessed. The configuration looks like this:
'gii'=>array(
    'class'=>'system.gii.GiiModule',
    'password'=>'giiPassword',

    // If removed, Gii defaults to localhost only.
    // Edit carefully to taste.
    'ipFilters'=>array('127.0.0.1','::1'),

    // For development purposes,
    // a wildcard will allow access from anywhere.
    // 'ipFilters'=>array('*'),
),
Once Gii is configured, it can be accessed by navigating to the app URL with ?r=gii after it, for example, http://www.example.com/index.php?r=gii. It will begin with a prompt asking for the password set in the config file. Once entered, it will display a list of generators. If the database is not set in the config file, you will see an error when you attempt to use one.
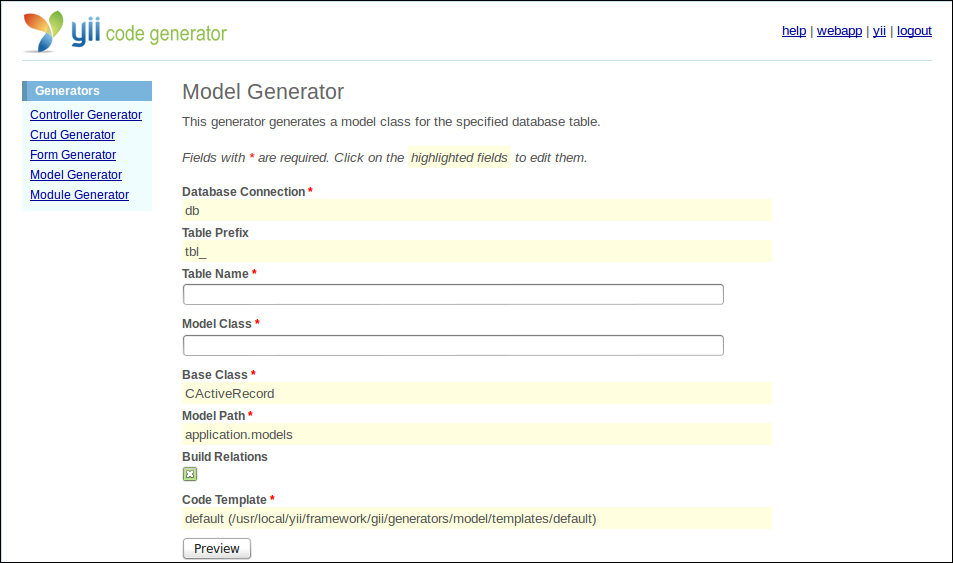
The most basic generator in Gii is the model generator. It asks for a table name from the database and a name to be used for the PHP class.
Note that we can specify a table name prefix, which will be ignored when generating the model class name. For instance, the blog demo's user table is tbl_user, where the tbl_ is a prefix. This feature exists to support some setups, especially common in shared hosting environments, where a single database holds tables for several distinct applications. In such an environment, it's a common practice to prefix something to names of tables to avoid getting into naming conflict and to easily find tables relevant to some specific application. So, as these prefixes don't mean anything in the application itself, Gii offers a way to automatically ignore them. Model class names are being constructed from the remaining table names by the obvious rules:
Underscores are converted to uppercasing the next letter
The first letter of the class name is being uppercased as well
The first step in getting your application off the ground is to generate models for all the entity tables in your database. Things such as bridge tables will not need models, as they simply relate two entities to one another rather than actually being a distinct thing. Bridge tables are being used for generating relations between models, expressed in the relations method in model class.
For the blog demo, the basic models are User, Post, Comment, Tag, and Lookup.
The second phase of scaffolding is to generate the CRUD code for each of these models. This will create a controller and a series of view templates. The controller (for example, PostController) will handle routing to actions related to the given model. The view files represent everything needed to list and view entities, as well as the forms needed to create and update individual entities.
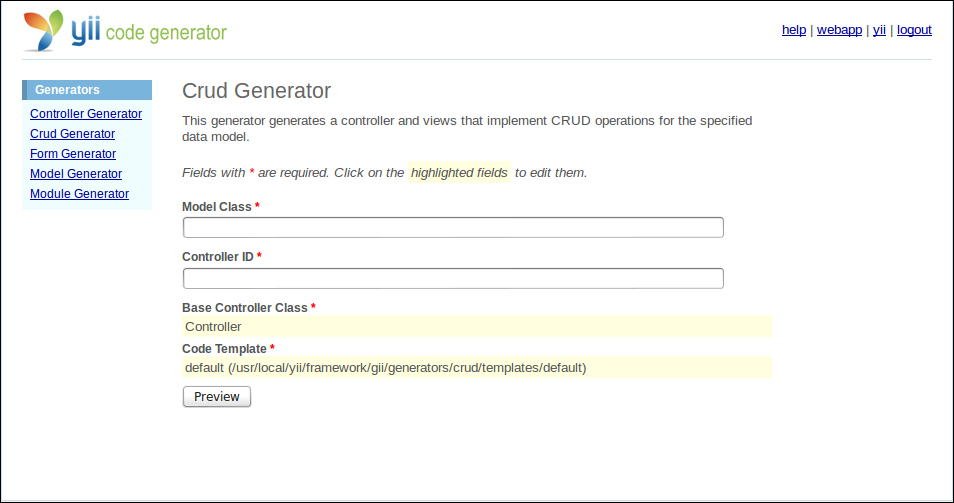
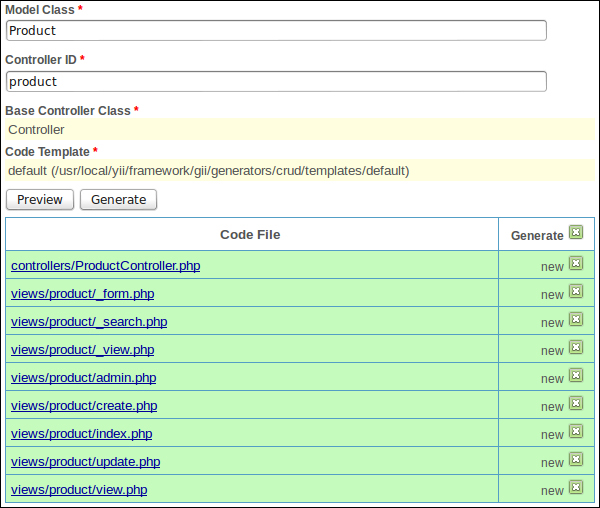
For all the generators, you will start with a form where you fill in either a Table Name field for the Model Generator page, or a Model Class field for the Crud Generator page. Afterward, you will have to hit the Preview button, which will show you exactly what files will be created. Finally, you must hit the Generate button for the actions to take place.
So now that you've seen the basics of what is being created here, let's take a deeper look at these components.
Yii's models are just PHP classes that extend from the CModel base class. The framework already contains two helper subclasses of CModel: CFormModel and CActiveRecord.
While CFormModel is just a semantic wrapper around the concept of a user-submitted HTML form, CActiveRecord is a complete implementation of an ActiveRecord design pattern.
It is a well known and commonly used pattern for database driven applications. Yii got a lot of inspiration in this area from the Rails framework for Ruby, which has what is widely considered to be one of the best implementations of ActiveRecord. As with any other design pattern (even MVC), you can read about it in the definitive book Design Patterns: Elements of Reusable Object-Oriented Software by Ralph Johnson.
To make things simple, ActiveRecord is an object-oriented pattern that calls for a one-to-one mapping of database tables to classes (for example, tbl_post to Post model, tbl_comment to Comment model). In its original definition, ActiveRecord is not really a one-to-one mapping (one class can use any number of tables for storing data), but ActiveRecords in Yii work this way.
Instances of a model class will have properties that correspond to fields in the table, as well as methods that correspond to database transactions, such as save, delete, and various lookup options:
$post->title = 'Post Title';
$post->body = 'Post body content';
$post->save();
Almost all of our models will be the ancestors of the CActiveRecord class.
In the Yii blog demo, if we look at the Post model, we will see that it contains rules for each field based on the database constraints. It knows which fields are integer or text-based, as well as length and null requirements. These control the validations Yii will perform when attempting to save records.
/* protected/models/Post.php */
public function rules()
{
    // NOTE: you should only define rules for those
    //attributes that will receive user inputs.
    return array(
        array('title, content, status', 'required'),
        array('status', 'in', 'range'=>array(1,2,3)),
        array('title', 'length', 'max'=>128),
        array('tags', 'match',
            'pattern'=>'/^[\w\s,]+$/',
            'message'=>'Tags can only contain word characters.'),
        array('tags', 'normalizeTags'),
        array('title, status', 'safe', 'on'=>'search'),
    );
}
Another important thing that Yii will set up based on the database table is any foreign key relationship it finds. For the blog demo, a post will have a single author that it belongs to and a number of comments that belong to the Post. As we can see in the following example, these relationships can be quite sophisticated. Just have a look at the official documentation for the CActiveRecord.relations method (http://www.yiiframework.com/doc/api/1.1/CActiveRecord#relations-detail). The comments have been filtered to only show approved comments and to retrieve comments with a particular sort order. Yii also allows statistical relationships, so you can get a count of related items such as the count of all the approved comments:
public function relations()
{
    // NOTE: you may need to adjust the relation name and the related
    // class name for the relations automatically generated below.
    return array(
        'author' => array(self::BELONGS_TO, 'User', 'author_id'),
        'comments' => array(self::HAS_MANY, 'Comment', 'post_id',
            'condition'=>'comments.status='.Comment::STATUS_APPROVED,
            'order'=>'comments.create_timeDESC'),
        'commentCount' => array(self::STAT, 'Comment', 'post_id',
            'condition'=>'status='.Comment::STATUS_APPROVED),
    );
}
Beyond rules and relationships, the model defaults to having a section for user-friendly labels for attributes, which default to being only slightly cleaner than the actual table names, but can be changed to fit your application needs:
public function attributeLabels()
{
    return array(
        'id' => 'Id',
        'title' => 'Title',
        'content' => 'Content',
        'tags' => 'Tags',
        'status' => 'Status',
        'create_time' => 'Create Time',
        'update_time' => 'Update Time',
        'author_id' => 'Author',
    );
}
There is also a search method, which is intended for use on list pages.
Please note that this method is not important to the functionality of the model per se; it is just a helper method. It returns an instance of CDataProvider, which is used by virtually all list and table widgets in Yii; so, the authors of the framework decided to include this method in the model being autogenerated to further reduce the need to write scaffolding code. The developer can decide to feed hand crafted data providers to the widgets or instead use some other helpers.
Yii has widgets for displaying and paging through records, such as CGridView or CListView. These will use the search method to create a data provider object for this interaction. Again, you can customize the behavior of the way records are retrieved with this method. The Post model has been set to add some default sorting options and ignore some fields:
public function search()
{
    $criteria=new CDbCriteria;
    $criteria->compare('title',$this->title,true);
    $criteria->compare('status',$this->status);
    return new CActiveDataProvider('Post', array(
        'criteria'=>$criteria,
        'sort'=>array(
            'defaultOrder'=>'status, update_time DESC',
        ),
    ));
}The job of a controller is to deal with incoming requests, identify the appropriate action method, and ultimately render a view to return to the user. When a request comes in to Yii, the URL dictates which controller and action has been called for. All requests are first handled by the index.php file in the root of your website. This file starts loading your application by instantiating Yii and referencing your configuration file. It then looks at the rest of the URL to determine which controller should run. There is a route parameter r that is checked. The appropriate use is index.php?r=controller/action.
By default, applications generated by the ./yiic webapp console tool have a SiteController controller, which handles standard actions such as presenting a default homepage or dealing with login/logout actions. This controller will be called when you bring up your app without any URL parameters.
If we elaborate on that, then what is really happening is that when Yii gets a request without a controller specified, it will forward this request to the controller whose name is set in the defaultController configuration parameter (see http://www.yiiframework.com/doc/api/1.1/CWebApplication#defaultController-detail), and it's default value is site.
As you probably guessed already, if the request doesn't specify the action, then the defaultAction will be called. Of course, it's defined not as the global configuration parameter but separately in each controller as its class property (see http://www.yiiframework.com/doc/api/1.1/CController#defaultAction-detail). The default value for the defaultAction property is index.
So, since site/index is the default behavior when no r parameter is given, going to www.yoursite.com is the equivalent of going to www.yoursite.com/index.php?r=site/index. By default, with a model such as Post, you would expect to see routes like this:
www.yoursite.com/index.php?r=post/indexwww.yoursite.com/index.php?r=post/create
…and so on.
You can see that the actual blog demo does not follow this pattern though. Instead, its paths look like www.yoursite.com/posts and www.yoursite.com/post/create. Ultimately, you can make any kind of custom URLs with Yii. Later in this book, we will look at ways to change the way your URL looks, which are cleaner, but still resolve to the same thing.
If you take a look at one of your controller files in protected/controllers/, you will see that it has a number of methods that look like: actionCreate, actionIndex, actionUpdate, and so on. The second half of these names correspond to the action that would be in the URL. For example, in PostController, actionCreate corresponds to the URL index.php?r=post/create. The view and update actions expect an additional parameter for the ID of the specified entity. By default, this URL would look like index.php?r=post/view&id=1, where 1 is the primary key ID of a single post.
All of this means that actionLogin, actionLogout, and other actions generated for you by Gii in SiteController are just example scaffolding, and if you need to, you can make a completely different structure of controllers and actions.
To better understand how these actions work, let us examine a couple of actions in detail. For most entities, one of the simplest actions is to view a single item, because it does only one thing, which is to respond to GET requests and show the view template. Other actions are more complicated due to the fact they can respond to GET or POST actions. For example, update will simply return the form if the method is GET, but when you post data to this same action, it attempts to save the item and redirect you to the view screen.
public function actionView($id)
{
    $model=$this->loadModel($id);
    $this->render('view',array(
        'model'=>$model,
    ));
}
What the preceding code does is that it starts by running the loadModel() method, which is found at the bottom of the controller code. This method looks for a URL parameter called id and does a lookup using ActiveRecord methods. It throws the 404 exception if it fails to find a corresponding record, which is appropriate since 404 is generally used for Page-Not-Found situations:
public function loadModel($id)
{
    $model=Post::model()->findByPk($id);
    if($model===null)
        throw new CHttpException(
            404,
            'The requested page does not exist.'
        );
    return $model;
}
If a model is found, the action method continues and all it has left to do is pass that model on to the view with the render function:
public function actionUpdate($id)
{
    $model=$this->loadModel($id);

    if (isset($_POST['Post']))
    {
        $model->attributes=$_POST['Post'];
        if ($model->save())
            $this->redirect(array('view','id'=>$model->id));
    }

    $this->render('update',array(
        'model'=>$model,
    ));
}
The Update action, unlike View, does two things. It will respond to both HTTP GET and POST requests. The middle section of the function pertains only to the condition of receiving a POST, so it will be skipped over. In the case of a regular GET, this looks identical to how the View behaves; it simply loads the model based on an expected ID parameter and renders a view file with that model. The interesting part is when you post the form contained on the Update view back to this action. In that case, the old model state is loaded, then its attributes are overwritten with values from the $_POST array, which contains the form body from the HTML. On the condition that this saves without violating any validation or rules set in the model class, the request is then forwarded to the View page, so see the newly-saved version of the item. If for some reason the save method fails, the code will fall through and render the Update form again. The only difference here is that since the model failed to save, it now contains information about the reasons why it has failed. $model->getErrors() will return an array of problems that prevented the save from succeeding. When the Update form is rendered again, these errors will appear at the top of the form, making it simple for the user to correct their mistakes.
Yii's views are typically put together with at least two parts. There is a main site layout.php view, which is a wrapper for different views when the controller's render method is called. The benefit of this is that your overall site design is contained in one place and individual views only need to consist of the relevant content for the body of the page. You can also have more than one standard layout such as a two or a three column format. You can also have a layout included in another layout, by means of the beginContent method; see http://www.yiiframework.com/doc/api/1.1/CBaseController#beginContent-detail. You'll find the layout file in views/layouts. You can also have a different layout assigned to different controllers; see http://www.yiiframework.com/doc/api/1.1/CController#layout-detail. All other views should be contained within a folder that corresponds to the controller they belong to. By default, there are just two folders: layouts and site. For each additional model, your CRUD will create another folder.
At this point, we have talked about our database design and how to automatically generate ActiveRecord models for each of our important or entity-class tables. Then, we created controllers and views with the CRUD generator. At this point, we should have a basic database interface. Unfortunately, that's not quite a full-blown web application, because we are not writing the user interface for database administration here, but instead we are building a blog. We'll cover a lot of great features further on in this book, but one more really important step in getting started is to alter the authentication process to use your actual users table/model.
Now that the database is configured, one of the first steps you'll want to take is to make the site use your users table for authentication. The control for this is contained within the file protected/components/UserIdentity.php. By default, this file has two hard-coded user account/password combinations. Replace the content of this file with the following code:
<?php
class UserIdentity extends CUserIdentity
{
    private $_id;

    public function authenticate()
    {
        $username=strtolower($this->username);
        $user=User::model()->find(
            'LOWER(username)=?',
            array($username)
        );
        if($user===null)
            $this->errorCode=self::ERROR_USERNAME_INVALID;
        else if(!$user->validatePassword($this->password))
            $this->errorCode=self::ERROR_PASSWORD_INVALID;
        else
        {
            $this->_id=$user->id;
            $this->username=$user->username;
            $this->errorCode=self::ERROR_NONE;
        }
        return $this->errorCode==self::ERROR_NONE;
    }

    public function getId()
    {
        return $this->_id;
    }
}
What you see in here is pretty standard code to authenticate users by login/password pairs stored in the database. If you follow the code, which is intimidating only at first glance, you see that it does the following:
Tries to find in the DB the record about user having the username specified.
If no user with this username is recorded, it sets the error code to
ERROR_USERNAME_INVALIDand proceeds to the end of the procedure.If the user exists, validate password specified using whichever method is defined for validation in the user model.
If validation is unsuccessful, set error code to
ERROR_PASSWORD_INVALIDand proceed to the end of the procedure.If validation is successful, set the error code to
ERROR_NONEand proceed to the end of the procedure.The user is authenticated if the error code is
ERROR_NONE.
Note the highlighted line in the code. It means that we need to modify the user model as well. Put the two following functions into it:
    public function validatePassword($password)
    {
        return crypt($password, $this->password)===$this->password;
    }

    public function hashPassword($password)
    {
        return crypt($password, $this->generateSalt());
    }
The function named validatePassword, as we already saw, was used in the authentication process. The function named hashPassword should be used when the new user model is saved to the database.
The idea is as follows: we do not store whole passwords as plain text. We hash them using the built-in PHP function crypt and store these hashes instead. The implementation of crypt has a very important and useful property. When we pass it the desired password as the first argument, and the already made hash of the same password as the second argument (which is the salt of the encryption), it produces the same hash as provided as the second argument. This property is exactly what is used in the validatePassword() function.
OK, now about what is the salt. For our purposes, you can just think of salt as a special string that tells crypt how exactly to encrypt the string provided. The exact rules are written in the official PHP documentation for crypt, accessible on the website here: http://www.php.net/manual/en/function.crypt.php.
So, there's still a generateSalt function that needs to be implemented. You can just use the following implementation verbatim:
/**
 * Generate a random salt in the crypt(3) standard Blowfish format.
 *
 * @param int $cost Cost parameter from 4 to 31.
 *
 * @throws Exception on invalid cost parameter.
 * @return string A Blowfish hash salt for use in PHP's crypt()
 */
private function generateSalt($cost = 13)
{
    if (!is_numeric($cost) || $cost < 4 || $cost > 31) {
        throw new Exception(
            "cost parameter must be between 4 and 31"
        );
    }
    $rand = array();
    for ($i = 0; $i < 8; $i += 1) {
        $rand[] = pack('S', mt_rand(0, 0xffff));
    }
    $rand[] = substr(microtime(), 2, 6);
    $rand = sha1(implode('', $rand), true);
    $salt = '$2a$' . sprintf('%02d', $cost) . '$';
    $salt .= strtr(
        substr(base64_encode($rand), 0, 22),
        array('+' => '.')
    );
    return $salt;
}
This way you have the complete implementation of user authentication made using the current best practices in this field.
You should note, though, the precise reasons for this implementation.
First of all, we don't store the passwords as the user entered them. This is a security precaution in case the password database will be accessed by a malicious user.
Secondly, we use a pretty hardcore Blowfish algorithm, which is very, very slow to run. This is a second precaution in case the malicious user tries to guess the passwords using brute force, for example, encrypting some arbitrary strings the same way we did and comparing the result with the values in our database. If we used something fast, such as the MD5 algorithm, then it would be a lot easier on modern high-performance hardware.
You probably want to look at the detailed description of what's going on here on the relevant tutorial at the Yii website. This particular authentication scheme is described on the blog demo at Initial Prototyping | Authenticating User. The direct URL is http://www.yiiframework.com/doc/blog/1.1/en/prototype.auth.