

As we saw in the previous section, it's easy to quickly set up forms and views for the basic CRUD operations. However, if you look more closely, you'll find that every form element is either a text box or a text area. That's fine for fields such as Title and Body, but not for other things such as foreign key relationships, date fields, and values for which you might want to use a more specialized widget, such as a slider. These alternative input choices are vital, because you obviously can't expect your users to set something like the category ID for a post by knowing the primary key of the category they want, or the exact date format you want to use.
For displaying user data, run it through the CHtmlPurifier filter:
<?php $this->beginWidget('CHtmlPurifier'); ?>
<?php echo $model->content; ?>
<?php $this->endWidget(); ?>
When receiving user input, the easiest way to use it on a single field is illustrated as follows, and we will revisit this topic in the following section:
$p = new CHtmlPurifier();
$model->content = $p->purify($_POST['Model']['content']);
The CSRF option goes into the components section of the main.php config file:
//protected/config/main.php
'components'=>array(
  'request'=>array(
    'enableCsrfValidation'=>true,
  ),
);
CHtml is the basic helper class to output HTML tags. CActiveForm was added later to make it even easier to set up forms and bind model properties to input elements. Additionally, CHtml and CActiveForm contain a number of useful helper functions. Zii is a set of widgets for things such as menus, lists, and grid elements. Zii also provides wrappers for jQuery UI widgets such as Accordion, DatePicker, ProgressBar, Slider, Tabs, and so on. Let's take a look at how we can use these items to enhance CRUD forms.
The core form created by the CRUD generator (_form.php) will be used by both the Create and Update actions. In the views/{controller}/ directory, you will find create.php, update.php, and _form.php. The Create and Update actions render create.php and update.php respectively, but what you will notice is that each of these is really just a wrapper for _form.php. Inside, they both contain a renderPartial() call, which pass the model to the _form.php view.
Whereas render() incorporates the site layout, renderPartial() only produces the content of the specified template.
This is something to keep in mind while building your forms. You can use renderPartial to separate out pieces of templates should you need to reuse them in multiple views, or if you wish to reduce the size of your individual view files.
Another useful tip when working with _form.php is to know whether or not you are on the Create or Update view. This determination can be easily made by checking the model property isNewRecord, as you will find they have done with the form submit button. This button will display different text based on whether you are adding a new item or saving changes to an existing one.
echo CHtml::submitButton($model->isNewRecord ? 'Create' : 'Save');
So, let's say we have a simple blog system. Our posts only have Title and Content objects, but then we might also want a foreign key relationship to a category entity. The category CRUD form is simple if we only want a category name (and a primary key ID for referencing). This form will be generated ready to go out of the box, because all we need is a single text box for a category name. The heart of the category form would look like this:
<div class="row">
<?php
    echo $form->labelEx($model,'name');
    echo $form->textField(
        $model, 'name',
        array('size'=>60,'maxlength'=>90)
    );
    echo $form->error($model,'name');
?>
</div>

<div class="row buttons">
<?php
    echo CHtml::submitButton(
        $model->isNewRecord ? 'Create' : 'Save'
    );
?>
</div>
Yii is smart enough to know that a primary key doesn't show up as a form element, so there's only one field in the form. We can use this CRUD immediately to populate a few categories for use on the POST form.
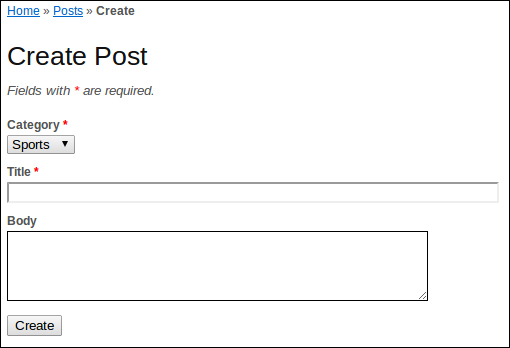
Moving on to the POST form, we'll probably want to use an HTML select element for this, unless there are only two or three, where radio buttons might make more sense.
Here's what the POST form looks like by default:
<div class="row">
<?php
    echo $form->labelEx($model,'category_id');
    echo $form->textField($model,'category_id');
    echo $form->error($model,'category_id');
?>
</div>

<div class="row">
<?php
    echo $form->labelEx($model,'title');
    echo $form->textField(
        $model, 'title',
        array('size'=>60,'maxlength'=>120)
    );
    echo $form->error($model,'title');
?>
</div>

<div class="row">
<?php
    echo $form->labelEx($model,'cotent');
    echo $form->textArea(
        $model, 'content',
        array('rows'=>6, 'cols'=>50)
    );
    echo $form->error($model,'content');
?>
</div>

<div class="row buttons">
<?php
    echo CHtml::submitButton(
        $model->isNewRecord ? 'Create' : 'Save'
    );
?>
</div>
Notice how the first row is only using textField for category ID (category_id). This is what we want to fix.
You can use CHtml or CActiveForm to accomplish this, but as long as the option is available in CActiveForm, that is what we should use. The change is simple. In essence, all you need to do is swap $form->textField with $form->dropDownList. However, that's not quite enough. A drop-down list requires just a little bit more information. It would be safe enough for Yii to assume you want the primary key of the related model, but it has no way to know what field is the actual display field. Here's where we use one of the static CHtml helper methods to set up an associated array of keys and values to be used in the building of the select options.
The final product looks like the following code:
<?php
    echo $form->dropDownList(
        $model,'category_id',
        CHtml::listData(
            Category::model()->findAll(),
            'id', 'name'
        )
     );
?>
CHtml::listData expects an array of models. It doesn't matter how this is retrieved. If you need to filter these items, you may do so before passing the final result to this call. The next two parameters are the key and display values to be used for each option.
Now, the form should show a nice, clean select box showing all the available categories:
For the sake of argument, let's assume our posts can have a publish date field that we might use to prevent items from showing up on the list until the desired date. By default, this would show up as textField, just like the category ID. Replacing it with the Zii wrapper of the jQuery UI DatePicker, aptly named CJuiDatePicker, would look like the following code:
// replace this:
<?php echo $form->textField($model, 'publish_date'); ?>

// with this:
<?php $this->widget('zii.widgets.jui.CJuiDatePicker',array(
            'model'=>$model,
            'attribute'=>'publish_date',
            'options'=>array(
                'showAnim'=>'fold',
            ),
            'htmlOptions'=>array(
                'style'=>'height:20px;'
            ),
        )); ?>
If you want to follow the ActiveForm style, you must specify the model and attribute options as shown in the preceding code. To simply pass a date value with your form, replace the model and attribute with a name value that will correspond to the input name.
Unfortunately, we're not quite done with the date field here. Dates are always a tricky subject on the web. Odds are, the default format that the picker gives you isn't the way your database will want to store it, or maybe it's not the display style desired for your applications. In most cases, you will need to address this on the server side when receiving posted values and when pushing dates out.
As far as displaying different date formats, this can easily be handled by adding the dateFormat element to the options array. For example, the default would be 03/16/2013 (the day this sentence was written). The date format for this is mm/dd/yy. If you don't want two column values for single digits and just the last two digits for the year, use m/d/y. Or, if you want something that looks like the MySQL date format, use yy-mm-dd. That will take care of the value you see when selecting something from the picker.
The specification that Yii uses for date formats is described here: http://www.unicode.org/reports/tr35/tr35-dates.html#Date_Format_Patterns. This is mentioned in the documentation for the CDateFormatter class.
However, two problems remain.
If you're not following the exact MySQL format, you'll want to reformat the date on the server side after a post. You would want to do this anyway, just to be safe, since users can still type in the field and post their own values.
There are two places where this will need to be addressed, because this form can be posted in two different ways, as discussed before—on Create and Update, so the date translation will have to be added to actionCreate and actionUpdate. In either case, the code is the same. After you get into the if(isset($_POST)){} block, you can expect this field might be filled out.
Use the PHP date function along with the string-to-time function to fix whatever value you received:
if (isset($_POST['Post2']))
{
    $model->attributes=$_POST['Post2'];
    $model->publish_date = date(
        'Y-m-d',
        strtotime($model->publish_date)
    );
    if($model->save())
        $this->redirect(array('view','id'=>$model->id));
}
The second issue with dates that you will need to address is relevant on any views that show this field. This could be the update form, where you would want the field prepopulated with the display style date format, or the view and list screens. The easiest way to address this is to change it before you render the views. For example, the View action looks like this by default:
public function actionView($id)
{
    $this->render('view',array(
        'model'=>$this->loadModel($id),
    ));
}
We'll need to change the model before calling the render method, so we have to rearrange this a little bit while adding our date format fix. Something like this should do the trick:
public function actionView($id)
{
    $model = $this->loadModel($id);
    $model->publish_date = date('m/d/Y', strtotime($model->publish_date));
    $this->render('view',array(
        'model'=>$model,
    ));
}
This is essentially the same process we did for saving the posted value, just in reverse.
Note that you can put this logic for reformatting the date on a deeper level into the model code. Each Yii model has a pair of special methods, afterFind and beforeSave, which are fired by Yii automatically right after the model is populated with data from the database or just before saving the updated data to the database respectively. Utilizing these methods, you will not need to modify the actionView method at all, instead you'll need to add the following to the code of your post model:
/**
 * For displaying the model on pages,
 * we convert publishing date to 'MM/DD/YYYY' format.
 */
public function afterFind()
{
    $this->publish_date = date('m/d/Y', strtotime($this->publish_date));
}

/**
 * Publish date of Post is being stored in the MySQL in 'YYYY-MM-DD' format.
*/
public function beforeSave()
{
    $this->publish_date = date(
        'Y-m-d',
        strtotime($this->publish_date)
    );
}
Of course, this has a catch. After you set up these two handlers, you will always convert your dates, even if you don't want or need to. When the conversion is at the hands of a controller, it can decide whether or not to do it.
Now that we've covered the basics of how the CRUD forms work, it's time to take a look at building more specialized interfaces. Unless you're strictly making a database application, odds are the basic CRUD functionality isn't going to be enough. There are a couple of ways to go about this. Every page needs to be an action within a controller, but controllers do not need to be tied specifically into a specific model. Whether or not you work within an existing controller or not depends on whether the new view really applies to an entity.
For example, if you allow users to submit posts that enter a pending state and must be approved by an administrator before being published, you might want a page that lists these pending posts and that has buttons for viewing and approving them. Something like this makes sense to keep within the PostController.
There are a few things to cover before we dig too far into this process. If we're adding an approved field to our Post model, it will show up on the _form.php file by default. We will want to hide it from non-administrator users, as well as use a checkbox input element instead of the text field it will insert by default. Since we haven't yet talked about using proper user access roles, we will rely on the standard Yii user accounts for permissions on this field. Later in this section, we will return to this example with proper role-based access checking.
In MySQL, you can set up the approved field as approved tinyint(1) default 0. That way, when not showing this field to non-administrator users, the posts will default to 0 (unapproved). Also, when changing the input field to a checkbox, it will work with values of 0 and 1.
<?php
//quick and dirty hide for non-admin users
if (Yii::app()->user->name == 'admin') {
    echo CHtml::openTag('div', array('class' => 'row'));
        echo $form->labelEx($model,'approved');
        echo $form->checkBox($model,'approved');
        echo $form->error($model,'approved');
    echo CHtml::closeTag('div');
}
?>
By default, PostController contains an index page, which is a general, pageable list. To create a page that only deals with a particular type of post, we start by adding a new action to the PostController. Assuming our Post model also contains an approved property, we can use this to generate a filtered list of models to pass to the a pending view template.
In PostController, if we want this list to look like the index list but with a filter, the easiest thing to do is to copy the index action, rename it, and add some filtering. We can even use the same view script, but it's best to copy this over as well. So, protected/views/post/index.php should be copied to protected/views/post/pending.php. These views have breadcrumb and menu options that you may wish to have look different, so it makes the most sense to keep these files different.
public function actionPending()
{
    $dataProvider=new CActiveDataProvider('Post');
    $criteria = new CDbCriteria;
    $criteria->condition = 'approved=0';
    $dataProvider->criteria = $criteria;
    $this->render('pending',array(
        'dataProvider'=>$dataProvider,
    ));
}
The view template, in this case, is making use of a Zii widget called CListView, which makes use of CActiveDataProvider to get relevant models and to handle things like paging automatically. On the view template, it looks like this:
<?php $this->widget('zii.widgets.CListView', array(
  'dataProvider'=>$dataProvider,
  'itemView'=>'_view',
)); ?>
Each item is then rendered via the _view.php template, which can be altered or duplicated to fit the needs of each different content type. By default, Yii views are very plain and generally only list properties in rows or tables. Even the actual view.php template, which is used by actionView to show a single entity, merely displays each field in an HTML table.
For listing rows of records with action buttons, the admin interface has a much better display. Instead of CListView, it uses CGridView. It also provides the ability to search on fields (columns in the display table), as well as possessing a more sophisticated advanced search form.
Yii::app()->clientScript->registerScript('search', "
$('.search-button').click(function(){
$('.search-form').toggle();
return false;
});
$('.search-form form').submit(function(){
$('#post-grid').yiiGridView('update', {
data: $(this).serialize()
});
return false;
});
");
?>
<h1>Manage Posts</h1>
<p>
You may optionally enter a comparison operator (<b><</b>, <b><=</b>, <b>></b>, <b>>=</b>, <b><></b>
or <b>=</b>) at the beginning of each of your search values to specify how the comparison should be done.
</p>
<?php echo CHtml::link('Advanced Search','#',array('class'=>'search-button')); ?>
<div class="search-form" style="display:none">
<?php $this->renderPartial('_search',array(
'model'=>$model,
)); ?>
</div><!-- search-form -->
<?php $this->widget('zii.widgets.grid.CGridView', array(
'id'=>'post-grid',
'dataProvider'=>$model->search(),
'filter'=>$model,
'columns'=>array(
'id',
'cat_id',
'title',
'body',
'approved',
array(
'class'=>'CButtonColumn',
),
),
)); ?>Let's assume you're not concerned with the advanced search for the pending posts view. We can copy the admin.php script over to pending.php (instead of copying index.php to pending.php as mentioned previously). This action uses the $model->search() method to get the DataProvider for this widget. For now, we can ignore that piece. We'll return to it later.
One thing to notice here in the CGridView widget is the columns list. You can choose which fields you want to have display. In a lot of cases, you might not want to show all the fields, or you may want them to show up differently. If the actual Post ID is not important, we can remove that item. Since category ID, as a number, doesn't tell us much, we can easily make that show the name field for the given ID. Another thing we're going to want to change is the last column. CButtonColumn defaults to giving us three buttons: view, update, and delete. The form we're trying to build is intended to allow an administrator to approve pending posts, so we really need an action button for doing the approving. We might also have this as an option in other places too, such as the view and update screens, so it might make sense to leave those buttons there. In any case, we must customize both the CGridView column list as well as CButtonColumn itself.
<?php $this->widget('zii.widgets.grid.CGridView', array(
  'id'=>'post-pending-grid',
  'dataProvider'=>$model->search(),
  'columns'=>array(
    array(
      'name'=>'cat_id',
      'value'=>'$data->category->name',
    ),
    'title',
    array(
      'class'=>'CButtonColumn',
      'template'=>'{approve} {view} {update} {delete}',
      'buttons'=>array(
        'approve' => array(
          'url'=>'', //need to set this
          'imageUrl'=>Yii::app()->request->baseUrl
            .'/images/approve.png',
        ),
      ),
    ),
  ),
)); ?>
The highlighted lines are what's most important here. The buttons property tells the widget what buttons, to generate for this grid. In here, we have the approve button defined manually. You have three buttons, update, view, and delete, for free with any CGridView. The template property tells the widget in what order and what buttons to render. So, if you configure some custom buttons, as we did with approve, then you have to mention it in the template property. A full description of what parameters can be defined for each button can be found in the documentation for the CButtonColumn.buttons property at http://www.yiiframework.com/doc/api/1.1/CButtonColumn#buttons-detail.
Note that we still need to properly configure the url property for our approve button.
Let's do the AJAX update for when a user clicks on the approve button. It will send a request to the /post/approve endpoint, which we will create shortly, and update the grid afterwards. Here's how we do it:
'buttons'=>array(
    'approve' => array(
        'imageUrl'=>Yii::app()->request->baseUrl.'/images/approve.png',
        'url'=>'Yii::app()->createUrl("post/approve", array("id"=>$data->id))',
        'options' => array(
            'ajax' => array(
                'type' => 'post',
                'url'=>'js:$(this).attr("href")',
                'success' => 'js:function(data) { $("#post-pending-grid"). yiiGridView('update'); }'
            )),
    ),
),
After that, we write the simplest possible endpoint in our PostController:
public function actionApprove($id)
{
    $model= Post::model()->findByPk($id);
    if (!$model)
        throw new CHttpException(404);

    $model->approved = 1;
    $model->save();
}
This just changes the approved status of the Post to true value and saves it. Note the common practice of checking whether we got the correct Post ID and throwing an exception if not.
For listing pending posts, we do the following:
public function actionPending()
{
    $model=new Post('search');
    $model->unsetAttributes();  // clear any default values
    $model->approved = 0;
    if(isset($_GET['Post']))
        $model->attributes=$_GET['Post'];

    $this->render('pending',array(
        'model'=>$model,
    ));
}
This table will only show the post category by name and the title of the post. After you set the approved field to zero in this particular model instance, it'll be used as a filter for the grid view.
Another great feature of Yii, and the Yii community, is the library of user-contributed extensions that you will find on the Yii website (http://www.yiiframework.com/extensions/). There are currently over 1,100 extensions that make it easy to drop in specialized functionality. Extension categories include Authorization, Caching, Date and Time, File System, Mail, Security, User Interface, Validation, and a few others. In this section, we'll take a look at a couple of really good ones.
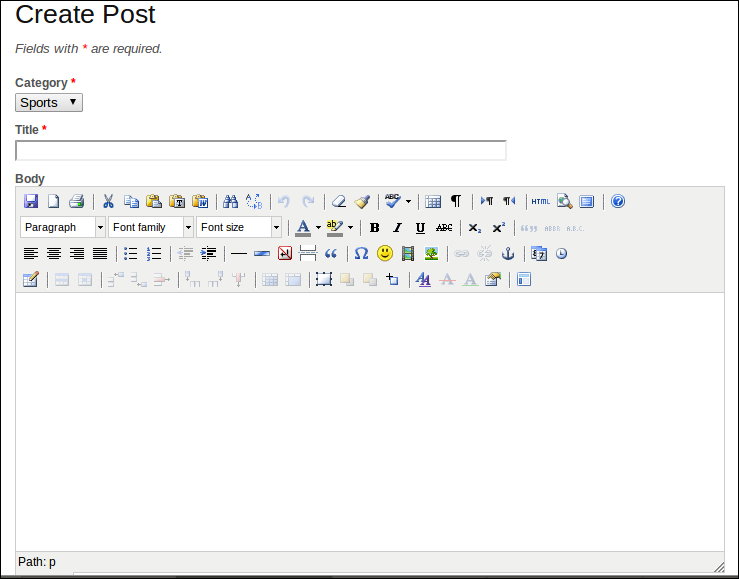
The most popular extension by far is tinymce. This, as you might have guessed, is a wrapper for the TinyMCE (http://www.tinymce.com/) WYSIWYG editor. It attaches to a text area input and provides a toggle between the HTML view and a Preview mode, where styles appear as they would when published. Users are given controls, such as font selection/color, text alignment, bold/italic/underline, and so on.
To use the TinyMCE extension, you first download and extract it into the protected/extensions directory. After that, simply replace the single line of _form.php that normally calls for textArea with the following, which will yield the full set of controls:
<?php $this->widget('application.extensions.tinymce.ETinyMce', array(
            'model'=>$model,
            'attribute'=>'content',
            'editorTemplate'=>'full',
            'htmlOptions'=>array('rows'=>6, 'cols'=>50, 'class'=>'tinymce')
)); ?>
Another very sought after feature on most websites today is drop-down menus. MbMenu provides an extension to the default Yii CMenu class, making it easy to plug in for existing projects. To get started, again, all you have to do is download and extract the extension into the protected/extensions folder. The main site menu is configured in protected/views/layout/main.php, so that is where we must go to make our changes.
By default, the menu looks like this:
<div id="mainmenu">
  <?php $this->widget('zii.widgets.CMenu',array(
    'items'=>array(
      array(
        'label'=>'Home',
        'url'=>array('/site/index')
      ),
      array(
        'label'=>'About',
        'url'=>array('/site/page', 'view'=>'about')
      ),
      array(
        'label'=>'Contact',
        'url'=>array('/site/contact')
      ),
      array(
        'label'=>'Login',
        'url'=>array('/site/login'),
        'visible'=>Yii::app()->user->isGuest
      ),
      array(
        'label'=>'Logout ('.Yii::app()->user->name.')',
        'url'=>array('/site/logout'),
        'visible'=>!Yii::app()->user->isGuest
      )
    ),
  )); ?>
</div><!-- mainmenu -->
To use MbMenu, we must change the widget to application.extensions.mbmenu.MbMenu. Then we may nest arrays of items within individual menu items following the same format CMenu used by default. Going with our example, we might want to first add a menu item for posts that links to the post index list. With the old CMenu way, we would just do this:
<div id="mainmenu">
  <?php $this->widget('zii.widgets.CMenu',array(
    'items'=>array(
      array(
        'label'=>'Home',
        'url'=>array('/site/index')
      ),
      array(
        'label'=>'Posts',
        'url'=>array('/post/index')
      ),
      array(
        'label'=>'About',
        'url'=>array('/site/page', 'view'=>'about')
      ),
      array(
        'label'=>'Contact',
        'url'=>array('/site/contact')
      ),
      array(
        'label'=>'Login',
        'url'=>array('/site/login'),
        'visible'=>Yii::app()->user->isGuest
      ),
      array(
        'label'=>'Logout ('.Yii::app()->user->name.')',
        'url'=>array('/site/logout'),
        'visible'=>!Yii::app()->user->isGuest
      )
    ),
  )); ?>
</div><!-- mainmenu -->
Now, let's say we want to add some of the CRUD actions and the pending list as submenu items. That would look like the following:
<div id="mainMbMenu">
<?php
  $this->widget('application.extensions.mbmenu.MbMenu', array(
    'items'=>array(
      array(
        'label'=>'Home',
        'url'=>array('/site/index')
      ),
      array(
       'label'=>'Posts',
       'url'=>array('/post/index'),
       'items'=>array(
          array(
            'label'=>'All Posts',
            'url'=>array('/post/index')
          ),
          array(
            'label'=>'Add Post',
            'url'=>array('/post/create'),
            'visible'=>!Yii::app()->user->isGuest
          ),
          array(
            'label'=>'Pending',
            'url'=>array('/post/pending'),
            'visible'=>Yii::app()->user->name=='admin'
          ),
        ),
      ),
      array(
        'label'=>'About',
        'url'=>array('/site/page', 'view'=>'about')
      ),
      array(
        'label'=>'Contact',
        'url'=>array('/site/contact')
      ),
      array(
        'label'=>'Login',
        'url'=>array('/site/login'),
        'visible'=>Yii::app()->user->isGuest
      ),
      array(
        'label'=>'Logout ('.Yii::app()->user->name.')',
        'url'=>array('/site/logout'),
        'visible'=>!Yii::app()->user->isGuest
      )
    ),
  )); ?>
</div><!-- mainmenu -->
Note that this widget has its own CSS, so the ID of the wrapper div element should be changed from mainmenu to mainMbMenu. Also, we don't want non-admin users to see the menu option for the pending list or non-authenticated users to see the link to create a post, so we have to specify the visible condition.
These two extensions are among the most downloaded extensions. Yii-User provides mechanisms for user registrations and all the issues that arise with that process, such as confirming e-mail, resetting passwords, and user profiles. Yii-User-Management provides many more of the same features, but additionally includes groups, inter-user messaging, and user roles.
Yii-Shop is a fully-featured, internationalized shopping cart extension. It handles different types of products with variations, tax calculations, shipping and payment methods, as well as invoicing and delivery slips.
This is a great jQuery-based calendar extension. Use it to create and schedule events that display on a full-sized calendar.
Who doesn't like those modal pop-up image viewers? This one is perfect for fancy looking image galleries. It's a wrapper around the third-party application Fancybox, located at http://fancyapps.com/fancybox/.
There are so many great extensions available for Yii, and for the most part, they are as easy to drop in and use as the two examples illustrated earlier. In the next section, we'll be talking about another great extension that makes it easy to deal with one of the most important issues in web-based applications, namely access permissions.
A common practice in software applications for decades has been to assign permissions for specific actions to generalized roles. Users can be granted one or more roles, through which they will be enabled to perform certain functions. Given the blog example, general registered users might be given a role like visitor. That role would be linked to a limited set of possible actions. For instance, visitors might only be allowed to create comments for posts, but not posts themselves. Another role might be given to a select number of users who are actually allowed to create posts. This might be called post creator. Roles often describe the intended behavior, and even if they are never publicly visible as part of the site, they serve to keep things simple on the administrative or programmatic side of things. A final, top-level role might be something like admin, which would probably handle things like enabling new users or approving posts. All-in-all, this process of granting permission for certain actions to user roles is known as role-based access control (RBAC), and it is very important in Yii.
One of the easiest ways to get going with role based access controls is this widely popular extension called SRBAC (http://www.yiiframework.com/doc/guide/1.1/en/basics.module). This extension provides a graphical interface for configuring roles, tasks, and operations. Operations are assigned to tasks, tasks are assigned to roles, and finally, roles are assigned to users. At the lowest level, operations are a one-to-one mapping to an action. For example, viewing a post is actionView in the post controller. PostView is the operation that would be created to map to this action. Similarly, operations would be created for all actions in the PostController. By default, SRBAC will also set up two tasks for each controller. For Post, these would be PostViewing and PostAdministrating. View and Index are read-only operations, so they generally get lumped into PostViewing, whereas Create, Update, Delete, and Admin fit more reasonably in PostAdministering. You can always reserve administering for a few more important tasks, such as Delete or just Admin, but you'll probably want to create another task like PostCreating to fit in-between strictly view-only and actual creation/editing of content.
To make use of SRBAC with a particular controller, there are a few changes that need to be made. First, we must configure this extension, which is a slightly different process from the earlier examples. This is an older extension that follows a less used pattern for install. Instead of finding a home in the protected/extensions folder, the documentation states to place it in protected/modules, which doesn't exist by default, but can be created (http://www.yiiframework.com/doc/guide/1.1/en/basics.module).
Next, a few simple changes must be made to the main configuration file in protected/config/main.php. In the import section, add a line for application.modules.srbac.controllers.SBaseController.
In the modules section, where you'll find the configuration for Gii, add this:
'srbac' => array(
  'userclass'=>'User',
  'userid'=>'id',
  'username'=>'username',
  'delimeter'=>'@',
  'debug'=>true,
  'pageSize'=>10,
  'superUser' =>'Authority',
  'css'=>'srbac.css',
  'layout'=>
  'application.views.layouts.main',
  'notAuthorizedView'=> 'srbac.views.authitem.unauthorized',
  'alwaysAllowed'=>array(
    'SiteLogin','SiteLogout','SiteIndex','SiteAdmin',
    'SiteError', 'SiteContact'),
  'userActions'=>array('Show','View','List'),
  'listBoxNumberOfLines' => 15,
  'imagesPath' => 'srbac.images',
  'imagesPack'=>'noia',
  'iconText'=>true,
  'header'=>'srbac.views.authitem.header',
  'footer'=>'srbac.views.authitem.footer',
  'showHeader'=>true,
  'showFooter'=>true,
  'alwaysAllowedPath'=>'srbac.components',
)
These are some standard settings as expressed in the SRBAC documentation. A few things to note here are that you must specify exactly what your user class and username fields are. You'll find that at the top of the list. Also, you can set actions that should always be allowed in the alwaysAllowed item. This would be useful if you want anonymous users to see your PostIndex page. The last major thing to note is the debug option. It is very important to set this to false as soon as you have properly configured your roles. Most importantly, you will need to assign the Authority role to a user, as this is the only role allowed to administer SRBAC. If you set this to false before assigning that role, you will be locked out of further configuration of SRBAC rules. You can reset this to true if that is the case.
In the components section of your main.php config, you must set the authManager item to SRBAC:
'authManager'=>array(
  'class'=>'application.modules.srbac.components.SDbAuthManager',
  'connectionID'=>'db',
  'itemTable'=>'authitem',
  'assignmentTable'=>'authassignment',
  'itemChildTable'=>'authitemchild',
),
SRBAC uses three database tables for rules; roles, tasks, and operations will go into the item table. The item child table deals with relationships between roles and tasks, and tasks and operations. The assignment table relates roles to users. These tables will be created during the install process, which will take place the first time you attempt to access SRBAC.
Once you have the SRBAC module in the modules folder and the config options set in main.php, you can visit your site index.php?r=srbac, and you should be taken to the install screen. This screen will show you a summary of the settings and will have an install button at the bottom. This action will create the tables necessary for using SRBAC in your application.
To set up rules for a particular controller, you must first make a few changes to the controller file. Instead of extending Controller, it must now extend SBaseController. By relying on a higher level controller, the checking for permission upon action request is abstracted away from you as a coder. It becomes something you don't need to think about, and it doesn't clutter up your code:
class PostController extends SBaseController
At the top of your controller, under the public $layout setting, you'll need to set up a couple of quick variable definitions to avoid issues in your views:
public $layout='//layouts/column2';
public $breadcrumbs;
public $menu;
Lastly, you can remove the filters and accessRules methods:
/**
 * @return array action filters
 */
public function filters()
{
    return array(
        'accessControl', // perform access control for CRUD operations
        'postOnly + delete', // we only allow deletion via POST request
    );
}

/**
 * Specifies the access control rules.
 * This method is used by the 'accessControl' filter.
 * @return array access control rules
 */
public function accessRules()
{
    return array(
        array('allow',  // allow all users to perform 'index' and 'view' actions
            'actions'=>array('index','view'),
            'users'=>array('*'),
        ),
        array('allow', // allow authenticated user to perform 'create' and 'update' actions
            'actions'=>array('create','update'),
            'users'=>array('@'),
        ),
        array('allow', // allow admin user to perform 'admin' and 'delete' actions
            'actions'=>array('admin','delete', 'pending'),
            'users'=>array('admin'),
        ),
        array('deny',  // deny all users
            'users'=>array('*'),
        ),
    );
}
Now you are ready to go back into SRBAC. If you go to the Managing AuthItems section, you should see a link for Autocreate Auth Items. This page will show you controllers that you are able to use to autogenerate tasks and operations. By clicking on the light bulb icon next to a listed controller, you should see on the right a list of all the operations that it can create as well as two default tasks that it wants to set up for you. You can selectively choose items or go with Select All. For tasks, you can go with the two standard tasks of viewing and administering, and either stick with these, add more, or create entirely unique tasks for your controller.
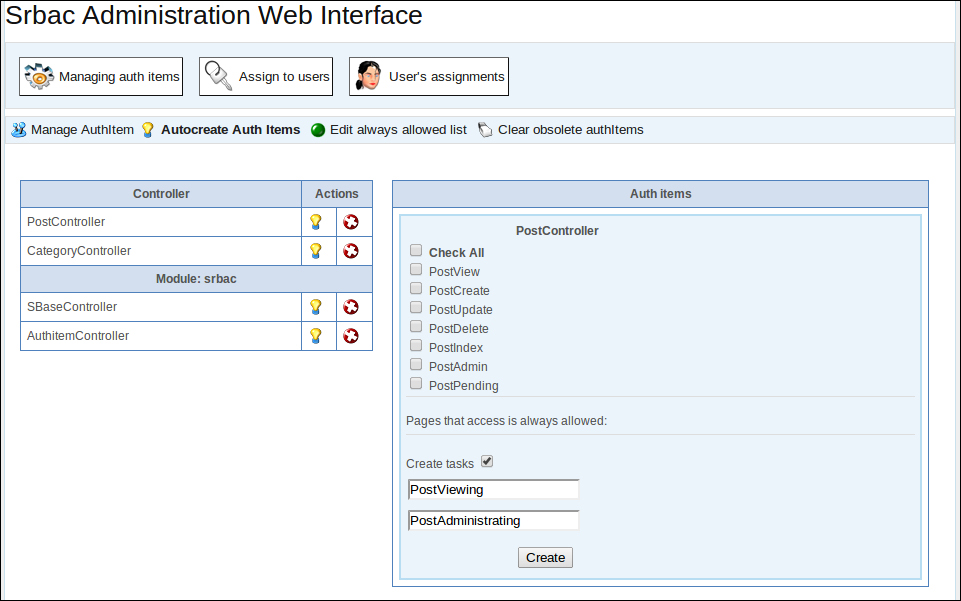
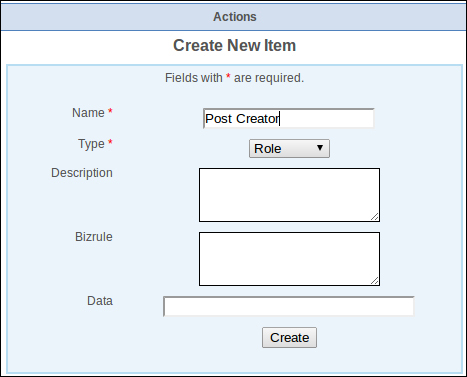
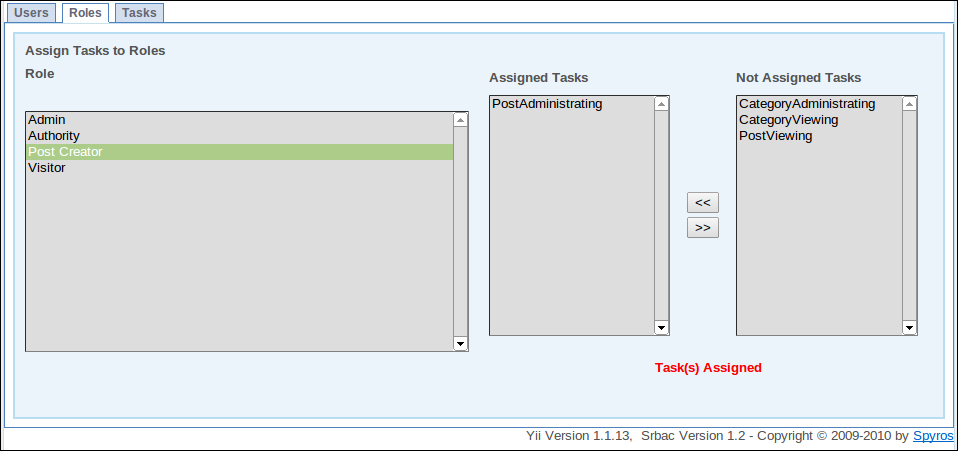
After autogenerating your tasks and operations, you'll want to set up a few roles. Go back to the primary Auth Items screen and find the Create button. Here is where you can create custom tasks and operations, but you will find this most useful for simply creating roles. Change the drop-down to role, give it a name, and hit Create below. Note that you have to hit Create on the left side before adding another role.
At this point, we can go to the Assign Roles to Users section. This is a simple, graphical way to add and remove assignments.
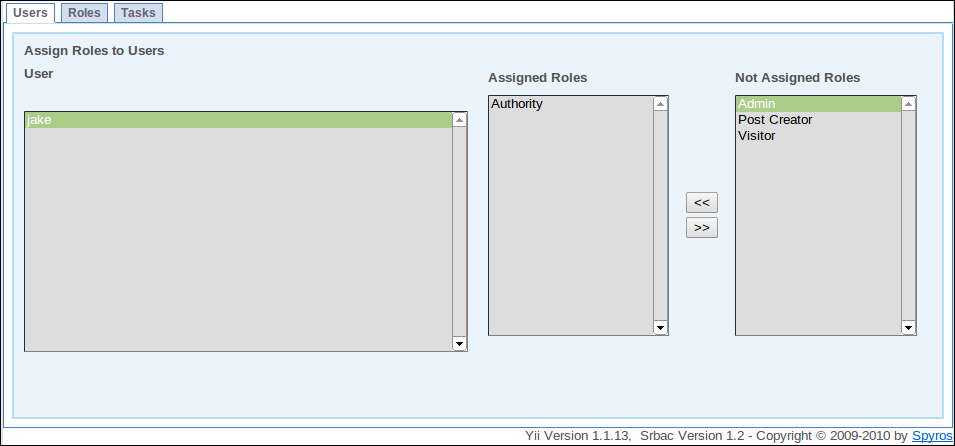
With a few clicks, you can assign operations to tasks, tasks to roles, and roles to users. Make sure you add the Authority role to at least one user, as mentioned earlier, before you turn of SRBAC debug-mode in the main.php config file.
SRBAC is useful in more situations than simply managing controller actions. When we set up the drop-down menu earlier, we restricted the pending menu option to be visible only to the admin user:
array(
  'label'=>'Pending',
  'url'=>array('/post/pending'),
  'visible'=>Yii::app()->user->name=='admin'
),
Now that we have roles, we can set up this restriction based on roles:
array(
  'label'=>'Pending',
  'url'=>array('/post/pending'),
  'visible'=>Yii::app()->user->checkAccess('Admin')
),
At any point in our code, we can check to see if the current user has a particular authorization assignment. This could be a role, task, or operation. This is important because it's not enough to simply show the user a denied access message when they visit part of the app they shouldn't be using. It's better that they never find a link to it in the first place.