
From the Setting up an environment for Cucumber BDD on Rails (Intermediate) recipe we know Cucumber contains two parts: Gherkin and Step definitions, and from the Writing your first Hello World Feature (Simple) recipe we got our first Cucumber feature to run successfully. We are now ready to walk into Cucumber world!
In this recipe, we will learn the foundation knowledge and skills for achieving our goal, which is developing features in the BDD style using Cucumber. Let's take a deep look into the Cucumber Gherkin and Step separately.
Gherkin is the language that Cucumber understands; it is a DSL. Gherkin has two major missions: it should have a maintainable documentation that is stakeholder-readable/understandable and it should be programmatically testable.
A feature written in Gherkin is as follows:
Feature: Credit card payment
  As a online shopper
  I want to pay through my Credit card
  So that I can buy stuff online instead of visiting the super market

  Scenario: transaction completed successfully
    Given ...
    When ...
    Then ...
  Scenario: Credit card is invalid
    Given ...
    When ...
    Then ...
  Scenario: Third party payment system refused the transaction
    Given ...
    When ...
    Then ...
A scenario consist of steps beginning with Given, When, Then, or And/But:
Given: This puts the system in a known state before the user (or external system) starts interacting with the system (in theWhensteps). Examples are as follows:Given I logged in as a system administrator Given the user has been authorized to do operation Given I have two items in my shop cart
When: AWhenstep represents the key action the user performs. The action usually has an observable effect somewhere else. Examples are as follows:When I press "Submit" on the Contact us area When I am on the "Shopping Cart" page When the progress bar is running When I wait for the Ajax request to finish
Then: TheThenstep observes and validates the outcome(s), it is an assertion sentence just like the assert statement in common unit testing frameworks. TheThensentence should be related to the business value/benefit in your feature description. Examples are as follows:Then the login popup form should be shown Then user should be redirected to item list page Then I should receive $800
And,But: This is used when we have multipleGiven/When/Thensteps. Examples are as follows:Given I have a dummy repository on github And this project is written in Ruby on Rails Then I should be able to clone this project And I should be able to add more developers to folk this project But I cannot make this project private
Once we write a feature with steps in Gherkin, we need to implement each step. Step definition files are, by convention, under the features/step_definitions directory, just like the hello_world_steps.rb file we created in the Writing your first Hello World feature (Simple) recipe.
Cucumber is widely used in automation testing web applications. In most cases, Cucumber is simulating the behavior of the end user who will be using the developed application, thus verifying whether it passes the acceptance tests. So under the step definition, we will usually do the following things:
Environment preparation: Examples include simulating user login, and preparing test data in the database
URL navigation: Examples include opening initial pages and redirecting the user to a predefined URL after a specific action
DOM manipulation: Examples include filling text in a form, selecting items from drop-down lists, clicking on a link, or pressing a button
Waiting: Examples include waiting for a specific operation to be finished, waiting for animations to be completed, and simply waiting for a few seconds
Assertion: Examples include verifying whether a page contains expected content and checking whether the user was redirected to the right page
To achieve the preceding things, we need to use a famous Ruby gem: Capybara. It exposes a DSL to simulate and uniform a real user's interaction with a web application. The DSL is designed to be natural. The following code snippets are some examples of the Capybara DSL syntax:
To find a DOM element:
find_field('blog_title').should be_visible
find_field('blog_content').value.should eq(@content)
find_link('back').click
find("section#main").text.should eq("Foo section")
find("div.main-pillar").find("section#main").text.should eq("Foo section")
all("a").each { |a| puts a[:href] }
all("input[type='text']").each { |textbox| p textbox[:value] }
To fill text in a textbox:
fill_in 'Login', :with => '[email protected]'
To select an item in the drop-down list:
select("California", :from => 'Choose State')To choose the Male ratio button:
choose 'Male'
To check the Food checkbox:
check 'Food'
To click on the Edit Profile link:
click_link 'Edit Profile'
To click on the Submit button:
Click_button 'Submit'
To attach a file:
attach_file('Image', '/path/to/image.png')To make assertions:
page.has_selector?('div.main-pillar section#main').should be_true
page.has_selector?(:xpath, '//div/article').should be_true
page.has_xpath?('//div/article').should be_true
page.has_css?('div.main-pillar section#main').should be_true
page.has_content?('Foo section').should be_true
Other than utilizing Capybara, we also need a number of other Ruby gems, which are widely used in the real BDD project:
rspec-rails: This is a BDD test framework for Rails. In our Cucumber step implementation, we rely on it to write human-readable test assertions.
Launchy: The Launchy application inside the Rails application is required when we debug our Cucumber steps.
database-cleaner: This introduced a set of strategies to ensure a clean state when running Cucumber tests.
Add Capybara into our Gemfile, as well as Launchy, which is required when we debug our Cucumber step.
group :test do
 gem 'rspec-rails'   # library of Rails assertions
 gem 'cucumber-rails', :require => false
 gem 'launchy'
 gem 'database_cleaner'
end
Then we need to run
bundle installin the terminal to install the added gems.Finally, make sure you have the latest version of Firefox installed, since Capybara's default web driver is Selenium with Firefox driver.
Ok, it's time to run a good sample case to demonstrate the magic of Capybara. Assume we would like to buy baseball gloves on Amazon. We write out a feature in
amazon_search.feature:Feature: Shopping in Amazon As an internet user I want to search stuff on Amazon So that I can choose and buy items I like @javascript Scenario: Search for baseball gloves Given I am on Amazon homepage When I enter "baseball glove" in the search box And I click "Go" button Then I should see a list of results related with Baseball Gloves
We run the feature in the terminal and watch it fail, and then create the step file
amazon_search_steps.rbwith the following code:Given /^I am on Amazon homepage$/ do visit "http://www.amazon.com" end When /^I enter "(.*?)" in the search box$/ do |keywords| fill_in "Search", :with => keywords end When /^I click "Go" button$/ do click_button "Go" end Then /^I should see a list of results related with Baseball Gloves/ do page.should have_content("#centerBelow") end
We run the feature again and we see how it works. We specified a @javascript tag for the scenario. It is a Capybara built-in tag, which runs a feature marked as @javascript, and Capybara switches the web driver from the default (RackTest) to Capybara.javascript_driver. A Firefox browser will open and automatically perform the actions we defined in the step file.
Note
To make this clearer, by default, Capybara uses the rack_test driver to drive browsers, which is fast but doesn't support JavaScript. Selenium is the default driver for JavaScript-required scenarios. You can change the value of the Capybara.javascript_driver setting to use another JavaScript-capable driver.
The previous Amazon search example requires JavaScript, so we specify a @javascript tag prior to Scenario.
The following screenshots demonstrate how our Cucumber feature runs, opens up Amazon's home page, and inputs the keyword baseball glove:

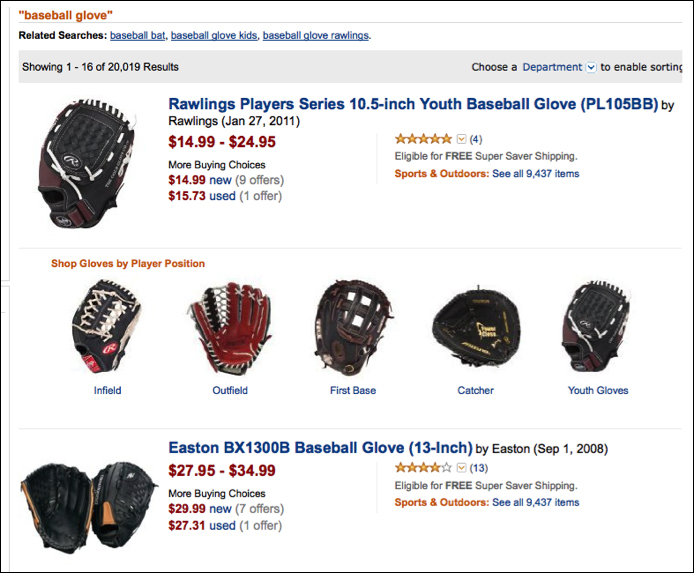
And then after clicking on the Go button, we will see the search result as follows:
Note
The preceding screenshots were not captured manually; Capybara provides a convenient API called save_screenshot, which can be invoked inside any Cucumber step, and then we can use Launchy to open it ASAP or open the screenshot later manually.
When /^I enter "(.*?)" in the search box$/ do |keywords|
page.save_screenshot('input_keyword.png')
  Launchy.open 'input_keyword.png'
end
Under the hood, Capybara invokes a web driver to communicate with a real browser. It supports the following web drivers:
RackTest: This is the default driver which is fast but cannot execute JavaScript
Selenium: This is fully functional and ready to use, just a little bit slower
Capybara-webkit: It uses QtWebKit to start a rendering engine and is the fastest. It is used for true headless testing and has full JavaScript support
Poltergeist: It runs Capybara tests on a headless WebKit browser, unlike Capybara-webkit, and uses PhantomJS as its rendering engine
Note
We can switch Capybara's web driver by executing the following code:
Capybara.javascript_driver= :webkit #or :rack_test,:selenium, etc.
Capybara encapsulates these web driver libraries and exposes a uniformed façade for the higher level, so developers benefit from it by learning uniformed syntax while dealing with various kinds of situations/purposes by switching between different web drivers.
In this Amazon search example, we learnt how to drive an automated web test case using Cucumber and Capybara. In the next recipe we will develop a real project based on this technology combination!