

This recipe will introduce a number of awesome third-party libraries used in line with Cucumber; each of them dominates a specific field, and all of them are widely used.
We will be re-using the example project that we created in the Building a real web application with Cucumber (Intermediate) recipe, and do some refactoring based on it, so that it is clear to see the differences.
Before we get started, please
cdto the blog directory and open the Gemfile.Make sure the following Ruby gems exist and are installed:
gem 'cucumber'
group :development do
  gem 'guard-spork'
  gem 'guard-cucumber'
end

group :test do
 gem 'rspec-rails'
 gem 'cucumber-rails', require => false
 gem 'capybara'
 gem 'launchy'
 gem 'database_cleaner'
 gem 'factory_girl_rails', "~> 4.0"
 gem 'webmock'
 gem 'pickle'
 gem 'spork-rails'
end
In the following sections, a number of useful Ruby gems will be introduced and covered in detail.
Factory_Girl is a fabulous tool that helps you create and build Ruby objects/data for tests. It provides a simple and straightforward syntax to create objects, and it also supports a number of build mechanisms (saved instances, unsaved instances, attribute hashes, and stubbed objects), and it can gracefully build associate objects.
Remember in the Building a real web application with Cucumber (Intermediate) recipe we wrote a step to prepare a Post object? Using Factory_Girl, we can do it in a better way:
Create a
factories.rbunder thespecdirectory with the following content:FactoryGirl.define do factory :post do title 'Test title' content 'Test content' post_time Time.now end end
And in the step definition we can write:
Given /^there is a post titled with "(.*?)" and content with "(.*?)"$/ do |title, content|
  FactoryGirl.create(:post, title: title, content: content)
end
Factory_Girl is good at building associated objects. In the Building a real web application with Cucumber (Intermediate) recipe, we wrote two steps to prepare one blog post containing comment(s). If we were using
Factory_Girl, it would be easier.We can update our
factories.rbas follows:FactoryGirl.define do factory :post do title 'Test title' content 'Test content' post_time Time.now factory :post_with_comments do ignore do comments_count 5 end after(:create) do |post, evaluator| FactoryGirl.create_list(:comment, evaluator.comments_count, post: post) end end end factory :comment do name "Wayne" email "[email protected]" content "Test comment content" end endWe can revise our Gherkin as follows:
Given there is a post with 1 comment
We can revise our step definition as follows:
Given /^there is a post with (\d) comment$/ do |comments_count|
  @post = FactoryGirl .create(:post_with_comments, comments_count: comments_count.to_i)
end
The functionalities of Factory_Girl are far more than we demonstrated previously. You can take a look at a brief Getting Started tutorial for Factory_Girl on the GitHub page (https://github.com/thoughtbot/factory_girl/blob/master/GETTING_STARTED.md).Whenever we need prepare data for testing, Factory_Girl is our friend!
Alternatives to Factory_Girl are Machinist, Fabrication, and so on.
Pickle collaborates with the object created/built from Factory_Girl (or Machinist, Fabrication, or ActiveRecord objects) and generates many useful steps to help us write Cucumber easily and efficiently as follows:
Firstly we bootstrap Pickle to our project:
$ rails generate pickle --pathThis will generate step definition files and
paths.rb. The following screenshot shows the generation of pickle steps:
Remember in the Building a real web application with Cucumber (Intermediate) recipe when we prepared a post object, we wrote a Gherkin step and implemented it ourselves:
Given there is a post titled with "Dummy post" and content with "Dummy content"
Now if we use Pickle, the step definition is already there! We can write our Gherkin step in the following style:
Given a post exists with title: "Dummy post", content: "Dummy content"
And we visit a URL inside the step definition, which is hard to maintain as the project gets larger. A recommended way to do this is to centralize all URLs/paths in
features/support/paths.rb, with Pickle's support, so we can rewrite the Gherkin step as follows:When I am on the post's page
We update
edit_blog_steps.rbandpaths.rbrespectively:edit_blog_steps.rb: When /^I am on the post's page$/ do visit(path_to "the edit page for post") end paths.rb: when /^the edit page for #{capture_model}$/ polymorphic_path(model!($1), :action => "edit")
As you can see, by using Pickle we can improve our productivity to a new level, and its predefined steps can satisfy the significant scenarios we need when writing Cucumber tests. This saves a huge amount of time for us!
When we write functional tests, it is common we don't really want a real network transaction, we do want to isolate the network requests so that we can focus more on testing the business logic of the module we are testing; in the meantime, some web APIs have invocation limits; we don't want to burn the limits out by our tests.
WebMock is the tool to help! It stubs at a low HTTP client lib level, and it supports many popular Ruby HTTP libraries such as Net::HTTP, Patron, and Typhoeus.
For using WebMock with Cucumber, we need require in the features/support/env.rb:
require 'webmock/cucumber'
For example, we expect our code to navigate a website,
www.abc.com, and we expect it to return the content we want. We can stub the request as follows:stub_request(:get, "www.abc.com").to_return(:body => "My expected content")
For another example, we expect our code to submit an HTTP POST request with the expected body to a third-party website. As long as the POST request is submitted with the correct content, the rest of the stuff belongs to a third party. Thus we can stub this request:
stub_request(:post, "www.abc.com").with(:body => "My expected content", :header => "Content-Type: application/json")
Another example is that we expect our code to communicate with the GitHubOAuth API and acquire the user's authorization. We need to behave differently according to the user's choice. Using WebMock, we can simulate the OAuth process as follows:
Assume we've written the OAuth feature as follows:
Feature: OAuth with Github
In order to provide easy registration and login
As a web application
I want submit OAuth request to Github and acquire user's authorization

 Scenario: User accept to authorize
   Given the user landing on homepage
   When the user clicks "Github" icon within "Registration" area
   Then the user should see GithubOAuth page
   When the user enter user email and password correctly
   And the user clicks "Authorize App"
   Then the user should be on registration success pageAnd I can get user's name on Github
   And I can get the user's repositories on Github
We can simulate the OAuth process by writing a code similar to the following code snippet:
stub_request(:POST, "https://github.com/login/oauth/access_token").with("client_id={client_id}&client_secret={secret}&code={code}").to_return("access_token={token}&token_type=bearer")stub_request(:GET, "https://api.github.com/users/wayneye").with(:headers => 'Authorization: token {fake_token}').and_return('"name": "Wayne Ye", "public_repos": 9, "company": "ThoughtWorks"')What the preceding code does is simulate GitHub to return a valid
access_token, so that we can use this fake token to invoke GitHub's API, and the data from the API is also mocked!
Using WebMock, we can stub any real network connection to ensure our code behaves as expected without relying on an active connection. If we do want to test a real network transaction, we can temporarily enable a real network connection by WebMock.allow_net_connect!
Alternatives to WebMock are Fake Web, Stale Fish, and so on.
Spork is a very cool and handy gem, which has two major advantages:
It hosts a Distributed Ruby (DRb) server and pre-loads the Rails environment into the server instance. After that, all further running tests can communicate with the DRb server. Thus there is no need to reload the Rails environment every time! Much faster than the common way!
It forks (using
Kernel.fork) a copy of the server each time we run our tests, thus ensuring a clean state between each other.We can run
spork cucumber –bootstrapin the terminal to enable Spork for our project.
The first step in running spork cucumber –bootstrap in the terminal is as follows:
$ spork cucumber --bootstrap
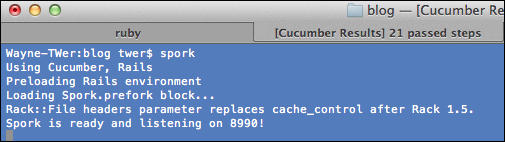
Spork will update the features/support/env.rb file with guidance for us to modify. Usually one thing we need to do is move the existing code inside env.rb to the Spork.prefork block. After that we can run spork in the terminal to start the DRb server. The following screenshot shows the starting of Spork:
With Spork running, we can now run our Cucumber features by passing a --drb option:
$ bundle exec cucumber --drb features/*.features
Cucumber will try to communicate with the local DRb server. It can be imagined as running against a copy of the pre-loaded server and won't load the Rails environment any more, so it would run much faster!
Guard is another very cool gem. It monitors the file you are editing, and as soon as you save the file, the related events will be triggered based on the configuration in Guardfile, and then Cucumber tests will respond and run! For example, if it sees that Gemfile has been changed, it will trigger the bundle install command immediately; if you modify a Cucumber feature, it will automatically run (rerun) this feature. Using Guard in line with Spork will give you an awesome BDD experience!
We can run the following command in a terminal to initialize the guard file with Spork and Cucumber supported:
$ guard init spork&& guard init cucumber
Guardfile basically defines two event handlers to handle the change event of the files passed to the watch method as follows:
When we open up the Guardfile, we should see the content similar to the one that follows. One important point is that we need to ensure we pass
--drbfor running Cucumber.# A sample Guardfile # More info at https://github.com/guard/guard#readme guard 'spork', :cucumber_env => { 'RAILS_ENV' => 'test' }, :rspec_env => { 'RAILS_ENV' => 'test' }, :rspec => false,:cucumber => true, :test_unit => false do watch('config/application.rb') watch('config/environment.rb') watch('config/environments/test.rb') watch(%r{^config/initializers/.+\.rb$}) watch('Gemfile') watch('Gemfile.lock') watch('spec/spec_helper.rb') { :rspec } watch('test/test_helper.rb') { :test_unit } watch(%r{features/support/}) { :cucumber } end guard 'cucumber', :cli => '-c --drb' do watch(%r{^features/.+\.feature$}) watch(%r{^features/support/.+$}) { 'features' } watch(%r{^features/step_definitions/(.+)_steps\.rb$}) { |m| Dir[File.join("**/#{m[1]}.feature")][0] || 'features' } endNow we can start Guard in the terminal as follows:

Any further changes on the files that are monitored by Guard will trigger a related response by Guard. The following screenshot is of Guard monitoring:
