

We are ready to pull Bootstrap's files into our Project Template 1 folder and file structure. We'll move down through the big Bootstrap repository, selecting out only the parts we need. To speed up this process, I highly recommend having your Bootstrap 3 files open in one file browser window and your project template files open in another to facilitate comparing, dragging, and dropping.
From the main Bootstrap folder, copy the fonts folder, and paste it into the main directory of your Project Template 1 folder. This contains the important Glyphicon fonts that come with Bootstrap. (If you've not used font icons before, you're in for a treat.)
For good measures, I'm going to suggest that you add a cross-domain-friendly .htaccess file to this folder. Why? As more hosting services provide Content Delivery Network (CDN) for your site's static assets, you may discover, as I have, that some browsers refuse to recognize your web fonts without this access file. (Note that the H5BP .htaccess file contains lines to take care of this. The step we are taking now is aimed at ensuring that we do not run into problems even if the H5BP .htaccess file is not in the root directory of the site.)
Create a new file in your code editor, and add the following lines:
<FilesMatch "\.(ttf|otf|eot|woff)$">
  <IfModule mod_headers.c>
    Header set Access-Control-Allow-Origin "*"
  </IfModule>
</FilesMatch>
Tip
Downloading the example code
You can download the example code files for all Packt books you have purchased from your account at http://www.packtpub.com. If you purchased this book elsewhere, you can visit http://www.packtpub.com/support and register to have the files e-mailed directly to you.
Save the newly created file directly inside the fonts folder naming it .htaccess. (Note that if you're working locally, your OS may make the file invisible. If you have trouble getting your OS to make hidden files visible, you can often view it again by using your FTP client, setting its preferences to view hidden files, and using it to navigate to this folder.)
Once in place, the .htaccess file travels with your fonts folder, ensuring that your web fonts work in all browsers across whichever hosting and CDN services your websites may use.
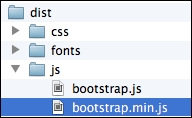
Now let's try to bring in Bootstrap's JavaScript. Thanks to the HTML5 Boilerplate, we already have a JavaScript folder (named js) in place. Inside this, you'll find four files, two of them inside a subfolder named vendor, as shown in the following screenshot:

Bootstrap's plugins make use of jQuery, and the Boilerplate has it ready for us. Alongside jQuery, you'll see the Modernizr script. If you're unfamiliar with Modernizr, it includes an HTML5 shiv, which enables HTML5 sectioning elements in Internet Explorer 8. We're supporting IE8 in these projects, and so we need this here. In addition, Modernizr enables us to test for specific browser capabilities easily, such as CSS 3D transforms (to read more, see http://modernizr.com/docs/). We'll use Modernizr's feature-detection powers in the last chapter of the book.
Now, we need to add Bootstrap's plugins to the mix. First, let's bring them over as a group of individual plugins. Inside the main js folder of your Project Template 1 folder, create a subfolder named bootstrap. Now copy into this the files you'll find in Bootstrap's js folder. The following are the Bootstrap's plugins, each as an individual file:

By copying and pasting these plugins into your new js/bootstrap folder, when you're ready to optimize your site for performance, you can select just the plugins you need, thereby eliminating the others and reducing file size.
Meanwhile, it may be helpful to have all of Bootstrap's plugins available during the development phase. That way, if you need to add an accordion, a tooltip, or a carousel, you can do it at your whim. Let's do this for ourselves now.
The H5BP method of doing this is to paste the code for all plugins into the provided plugins.js template file. This is a best practice when we're finished and ready to optimize the site because fewer HTTP requests means faster site loading times. (Loading one file of, say, 80 KB is more efficient than loading four files of 20 KB each.)
While developing, it's fairly convenient to use this same structure. It simply requires that we copy and paste the code for our required plugins into the plugins.js file. Let's find Bootstrap's big file of plugins and do this here.
Note
You may prefer to work otherwise during the development stage, adding links to individual plugins to your markup during development, and then rolling the plugins into one minified file at the end. If you prefer that method, you can ignore this set of instructions and replace them with your own steps.
From Bootstrap's main folder, navigate to the dist folder to find the distribution files. Here, in the js folder, are bootstrap.js and bootstrap.min.js, containing all of Bootstrap's plugins rolled into one fat file. We will not be editing the plugins in these exercises, so let's use the minified version.
Once you've found it, perform the following steps:
Open
bootstrap.min.jsin your editor.Copy the code, including the comment at the top. (Select all, then copy.)
Now, open
plugins.jsfrom your new project files.Paste Bootstrap's plugin code inside the file, below the
// Place any jQuery/helper plugins in here.comment. So, you'll now see something like the following:// Place any jQuery/helper plugins in here. /** * bootstrap.js v3.0.0 by @fat and @mdo * Copyright 2013 Twitter Inc. * http://www.apache.org/licenses/LICENSE-2.0 */ if(!jQuery)throw new Error("Bootstrap requires jQuery");+function(a){"use strict"; ...And of course the rest of the lengthy block of code will follow.
You now have Bootstrap's plugins loaded and ready!
Note
By keeping the comments from the top of Bootstrap's plugins, as well as from any other plugins we may include down the line, we are giving credit where credit is due and including essential licensing information. We're also making it easier for ourselves to search and sort through our plugins later. For instance, while optimizing the following projects for production, you'll want to substitute minified versions of only the specific Bootstrap plugins you'll be using in the project. Keeping these comments in place will help greatly at that point.