

By default, Magento provides us with some generic order statuses that we can use to distinguish each of the real-life stages our orders are in. As of Magento 1.5 onwards, we have the ability to create our own order statuses.
First of all we are going to take a look at the default order statuses within Magento. To do this we will navigate to System | Order Statuses. Within this section we will see a list similar to the following screenshot:

Some of these such as Processing, Pending Payment, On Hold, Complete, and Cancelled will be familiar to us.
Depending on our Magento setup and which payment gateway we are using, our orders may start off as either Pending or Processing (payment gateways that take credit card details and transfer the funds instantly via an IPN normally set orders to Processing).
In the previous chapter we learned that we could add a comment to an order to let the customer know that their shipment has been delayed. However from an administrative point of view, an order comment does not help us distinguish our delayed orders from our healthy orders when we are looking at a list of them within Sales | Orders. Only by clicking on each order and reading the comments can we find out which are delayed.
By creating a new order status called delayed we could immediately identify the problematic orders within our list.
To create a new order status called delayed we must first navigate to System | Order Statuses and click on Create New Status.
Within Status Code enter
delayed, in Status Label enterDelayedthen click onSave Status.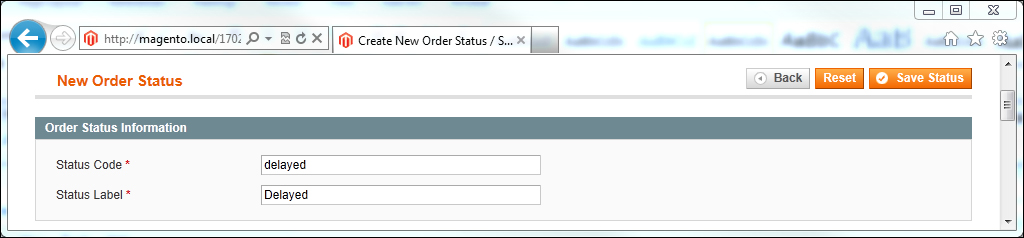
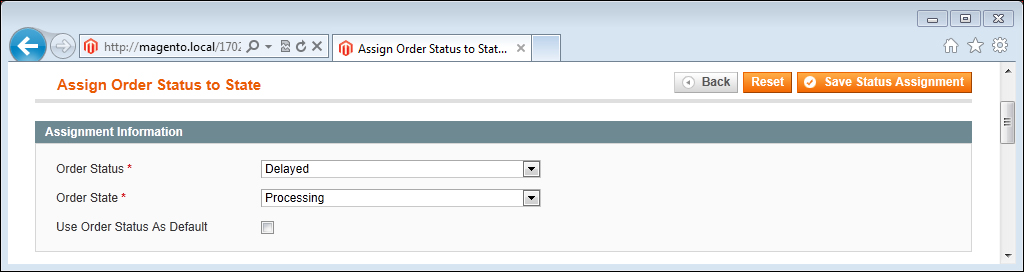
Next we need to assign our new status to a state, so let's navigate back to System | Order Statuses and click on Assign Status to State.
For Order Status select Delayed and then for Order State select Processing. We can leave Use Order Status as Default unchecked and then click on Save Status Assignment:
To use our new status we must navigate into a new order that has its status currently set to Processing. Within the order, navigate to the Comments History box and change the Status drop-down to our new custom status Delayed.
All that's left to do is to select whether we wish to Notify the Customer by Email (choosing this will send an e-mail to the customer with the current status and comment) and also whether we wish to have our new comment and order status Visible on Frontend (meaning that our order status and comment are visible within the customers dashboard).
Once happy with our comment and notification settings we can click on Submit Comment, this will change our order status from processing to Delayed wherever our order status is displayed within the administration panel.

Not all businesses can use the default Magento statuses to handle their orders, so it is important to know that we can break down each complex stage into separate statuses, keeping the customer informed of any problems that we as a business may encounter with their order.
To be able to effectively set up a new order status it is important to understand the difference between an Order State section and an Order Status section.
An Order State section is effectively the current core state that an order resides within—depending on what we have done with it. Within Magento these are broken down into eight different states:
New: A new order comes into the system without any manual or automatic input
Pending payment: An order has been created, but payment has not yet been captured (for example, check/money order)
Processing: An order has started to be processed—normally, when either payment has been taken, the order has been invoiced or the order has been shipped
Complete: Order has been invoiced and shipped
Closed: Order has been closed after a successful credit memo
Cancelled: Order has been canceled
On hold: Order has been put on hold
Payment review: Allows the order to be manually reviewed before payment taken—only if payment gateway allows this functionality
These states are primarily used by Magento and cover almost all the processing stages for our orders. Each of these states can hold as many statuses as we wish.
An order status is different to an order state in that a status is customer and administrator facing (we can see the label of the status). Statuses can be changed and created, whereas the core states must remain the same for Magento to process our orders correctly.
By default, Magento has set its own order status of processing to the order state processing and (because we did not select the Use Order Status as Default option when we created our new order status) this is currently the default status that will be applied when the order moves into the processing state. However because we now have our own custom order status also applied to the processing state, once an order moves into this state, we can now select either processing or delayed for its status.
Each order state within Magento performs different actions on the way we interact with our orders—for example when an order is kept on hold, the customer cannot click on the Reorder button from within their dashboard, therefore when we are creating our custom order statuses, we must consider first the order state they are to be applied to.
Magento provides us with the ability to edit our Order Status labels for each store view on our Magento installation—this is helpful as we would not want to go to the trouble of creating a new customer facing order status if they could not read it in their chosen store language.
The following illustration shows a rough journey through the order states of Magento. The items with a star indicate an order state, the large dark line illustrates the ideal customer journey, whereas the other lines indicate the possible routes that an order can take, whether that be through canceling, putting the order on hold, or even refunding the order:

If our order has been delayed realistically, the order should be within the on hold state. Previously, we had assigned our delayed status to our processing stage, but what happens if we choose to put that particular order on hold? Well, our custom status will be replaced with the default on hold status.
This is a good example of knowing which custom statuses should go with which stage.
To reassign the status to our on hold status we need to perform the following steps:
Navigate to System | Order Statuses and click on the Unassign link next to our Delayed status.
Click on Assign Status to State, set Order Status to Delayed, and Order State to On Hold.
Now when we hold our order (by clicking on the hold button on the order view page), we will be able to change our order On Hold status to Delayed by applying it within the comments history box as before.