

In order to install Drupal 8 within our local MAMP PRO server, we will need to perform a series of steps:
We will need to grab a copy of the latest Drupal 8 release and extract the files to a location on our computer that will be the document root of our website.
We will have to create a new host entry with the server name that we will want to use for our URL and point our host entry to the proper document root containing our Drupal 8 instance.
We will have to create a MySQL database that we can point Drupal to during the installation process.
We will walk through each of these steps in detail to ensure that we all have a copy of Drupal 8 installed properly that we will build upon as we work through each lesson.
Drupal.org is the authority on everything about Drupal. We will often find ourselves navigating to Drupal.org to learn more about the community, look for documentation, post questions within the support forum, or review contributed modules or themes that can help us extend Drupal's functionality. Drupal.org is also the place where we can locate and download the latest release of Drupal 8.
We can begin by navigating to https://www.drupal.org/node/2627402 and locate the latest release of Drupal 8. Click on the compressed version of Drupal 8 that we prefer, which will begin downloading the files to our computer. Once we have a copy of Drupal 8 on our computer, we will want to extract the contents to a location where we can easily work with Drupal and its folders and files.
A document root is the main folder that our host entry will point to. In the case of Drupal, this will be the extracted root folder of Drupal itself. Generally, it is a best practice to maintain some sort of folder structure that is easy to manage and that can contain multiple websites.
For the sake of demonstration, we will create a Sites folder and then copy the compressed Drupal files to our new folder and extract the contents, as shown in the following image:

A host entry represents our website, which, in this case, is our Drupal 8 instance. Hosts always contain a server name that equates to the URL we will use to navigate to Drupal within our browser.
Begin by opening MAMP PRO and clicking on the Hosts tab. To add a new host entry, we can click on the plus icon at the bottom of the Server Name column, as shown in the following image:

By default, this will add a new host entry that will require us to configure with three very important pieces of information:
We will have to change the Server name from the default to
drupal8.Then, we will want to verify that the required version of PHP is being used; in our case, the default of 5.6.10 will work just fine.
Finally, we will need to click on the folder icon within the Document root section and choose our Drupal 8 folder that we placed within our
sitesfolder earlier from the Please select a Document Root folder dialog.
The General settings for our new host entry should look as shown in the following image:

We can now apply our changes by clicking on the Save button and then clicking on the Yes button when prompted to have MAMP PRO restart the servers.
Drupal 8 requires a database available to install any tables that make up the content management system. These tables will hold configuration data, users and permissions, content, and any extendable functionality that makes Drupal 8 so powerful.
Lucky for us, MAMP PRO installs a MySQL database server that we can take advantage of to create a new database that Drupal 8 can point to. This same database server we will also be working with to back up and restore our database content as we progress through each lesson.
MAMP PRO also installs a free software tool written in PHP for the sole purpose of managing MySQL databases. phpMyAdmin allows us to perform a multitude of tasks from browsing tables, views, fields, and indexes to exporting and importing database backups and much more.
If we switch back over to MAMP PRO, we can locate the MySQL tab and click on the phpMyAdmin link located in the Administer MySQL with region, as shown in the following image:

We should now be presented with phpMyAdmin within our browser. Currently, we are interested in creating a new database. We will revisit phpMyAdmin a little later to learn how to back up and restore our database. The following are the steps to create a database:

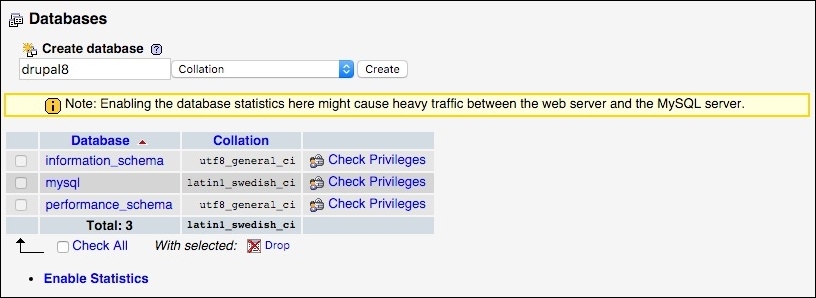
We have now created our first MySQL database, which we will use when configuring Drupal 8 in the next step.
Now that we have all of our basic requirements completed, we can open up our favorite web browser and navigate to http://drupal8/core/install.php to begin the installation process.
Since this may be the first time installing Drupal 8, one thing we will notice is that the install screen looks a little different. The install screen has been given a makeover, but the steps are similar to that of Drupal 7, starting with choosing a language.
The installation process will prompt us to choose a language that we want Drupal 8 to be installed in. This language will control how the Admin area appears, and in many cases, the default of English is acceptable. We will need to click on the Save and continue button to proceed to the next step, as shown in the following image:

Our next step is to choose an installation profile. We can think of this as Drupal's way of preconfiguring items for us that will make our job easier when developing. By default, we can leave the Standard profile selected, but if we choose to configure Drupal ourselves, we can always choose Minimal. Click on the Save and continue button to proceed to the next step, as shown in the following image:

The next screen allows us to review any requirements that Drupal needs or recommends for optimal performance. From here, we can see web server information, PHP version, memory limits, and more:

The requirements review can also alert us to any configuration settings that will allow Drupal to perform better. In our example, we forgot to enable OPcode caching, which allows PHP to compile down to bytecode. Without going into the details of caching, we can easily enable this feature in MAMP PRO.
Begin by opening up the MAMP PRO console and clicking on the PHP tab. Next, we will want to select OPcache from the Cache module to speed up PHP execution dropdown, as shown in the following image:

Click on the Save button and then allow MAMP PRO to restart servers if prompted. Now, we can refresh our Drupal install in the browser, and we will be taken to the next step in the installation process.
Database configuration can sometimes be a tricky part of installing Drupal for the first time. This is generally due to selecting the incorrect database type, wrong database name, or password, or by not specifying the correct host or port number.

The settings we will want to use are as follows:
Database type: Leave the default of MySQL selected.
Database name: This is the name of the database that was created upon import. In our case, it should be
drupal8.Database username:
root.Database password:
root.
With these settings, we can click on the Save and continue button to proceed.
If this is successful, we can see the Installing Drupal screen and watch as Drupal installs the various modules and configurations. This process may take a few minutes. If this process fails in any way, please go back and review the previous steps to make sure that they match what we have used.
Before we can wrap up our Drupal 8 installation, we need to configure our site by inputting various settings for site information, site maintenance account, regional settings, and update notifications. Let's proceed now by entering our Site Information.

The site information consists of the following:
Site name: To be consistent, let's call our site
drupal8. We may give our new site any name that we like. As usual, we can change the site name later from the Drupal admin.Site e-mail address: Enter an e-mail address that we will want to use for automated e-mails such as registration information. It is the best practice to use an e-mail that ends in our site's domain to prevent e-mails from being flagged as spam.
Next, we will want to set up the site maintenance account. This is the primary account used to manage Drupal to perform such tasks as updating the core instance, module updates, and any development that needs user 1 permissions.
The site maintenance account information consists of the following:
Username: Because we are developing a demo site, it makes sense to generally use
adminfor the username. Feel free to choose whatever is easy to remember, but don't forget it.Password: Security sticklers will ask to create something strong and unique, and Drupal displays a visual interface to let us know how strong our password is. For the sake of demonstration, we will use
adminas our password so that your username and password match and are easy to remember.E-mail address: Generally, using the same e-mail that is used for the site e-mail address makes for consistency but is not required as we can choose any e-mail that we don't mind receiving security and module update notices.
Regional settings consist of default country and default time zone. These are often neglected and left with their defaults. The defaults are not recommended, as they are important in the development and design of Drupal 8 websites, specifically, when it comes to dates and how they are used to capture data and display dates back to the end user.
For our specific installation, choose the country and time zone for our region.
At last, we have come to our final set of configurations. Update notifications should always be left-checked unless we have no reason to receive security updates to Drupal core or module updates. By default, they should be checked. Click on Save and continue to finalize the configuration and installation of Drupal 8.
Drupal installation is now complete, and we should see the home page of our new website. Say "hello" to Drupal 8.