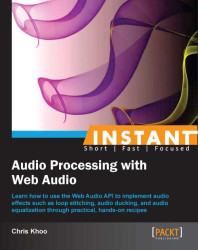

One of the big advantages of using Web Audio is its built-in supporting for constructing sophisticated audio effects in real time. In this recipe, we'll use Web Audio's BiquadFilterNode functionality to build a 5-band equalizer. The implementation includes a real-time equalizer frequency response chart display so that we can visualize the equalizer's impact on the sound output.
This time, we're building our recipe from an audio mixer template so that we can focus specifically on the equalizer implementation (you'll find the template source code in the code bundle at tools/
AudioMixerTemplate). I recommend familiarizing yourself with its implementation—the implementation uses the Web Audio techniques and features we've covered so far.
The complete source code for this recipe is available in the code bundle at recipes/Recipe6_1.
Start with a clean copy of the audio mixer template. The template bundle is located at
tools/AudioMixerTemplatein the code bundle.Open
index.htmlin a text editor.We'll add our equalizer controls to the HTML section:
<div id="appwindow">
<h2>Audio Mixer</h2>
<form>
    <div class="audiopanel" style="text-align: center;">
        <h3>Equalizer</h3>
        <canvas id="eqcanvas" width="400" height="250">
        </canvas><br>
        <div style="display: inline-block; margin: 0 20px;">
            <span id="eq_label_0"></span><br>
            <div style="display: inline-block;">
                <span id="eq_gain_0" style="display: inline-block; height: 100px; margin: 10px;"></span><br>
                <span>Gain</span>
            </div>
        </div>
        <div style="display: inline-block; margin: 0 20px;">
            <span id="eq_label_1"></span><br>
            <div style="display: inline-block;">
                <span id="eq_gain_1" style="display: inline-block; height: 100px; margin: 10px;"></span><br>
                <span>Gain</span>
            </div>
            <div style="display: inline-block;">
                <span id="eq_q_1" style="display: inline-block; height: 100px; margin: 10px;"></span><br>
                <span>Q</span>
            </div>
        </div>
        <div style="display: inline-block; margin: 0 20px;">
            <span id="eq_label_2"></span><br>
            <div style="display: inline-block;">
                <span id="eq_gain_2" style="display: inline-block; height: 100px; margin: 10px;"></span><br>
                <span>Gain</span>
            </div>
            <div style="display: inline-block;">
                <span id="eq_q_2" style="display: inline-block; height: 100px; margin: 10px;"></span><br>
                <span>Q</span>
            </div>
        </div>
        <div style="display: inline-block; margin: 0 20px;">
            <span id="eq_label_3"></span><br>
            <div style="display: inline-block;">
                <span id="eq_gain_3" style="display: inline-block; height: 100px; margin: 10px;"></span><br>
                <span>Gain</span>
            </div>
            <div style="display: inline-block;">
                <span id="eq_q_3" style="display: inline-block; height: 100px; margin: 10px;"></span><br>
                <span>Q</span>
            </div>
        </div>
        <div style="display: inline-block; margin: 0 20px;">
            <span id="eq_label_4"></span><br>
            <div style="display: inline-block;">
                <span id="eq_gain_4" style="display: inline-block; height: 100px; margin: 10px;"></span><br>
                <span>Gain</span>
            </div>
        </div>
    </div>

    ...

</form>
</div>
We'll add the equalizer functionality to
AudioLayer. In its class constructor, we integrate the equalizer node instances into the audio layer node graph:function AudioLayer( audioContext ) { this.audioContext = audioContext; // Create the volume GainNode this.volNode = audioContext.createGain(); // Expose the gain control this.gain = this.volNode.gain; // Calculate the frequency metrics var EQ_FREQ_MARGIN = 1000; // margin for equalizer range var NODES_NUM = 5; // number of equalizer nodes var tempFilter = audioContext.createBiquadFilter(); var freqMin = tempFilter.frequency.minValue + EQ_FREQ_MARGIN; var freqMax = tempFilter.frequency.maxValue - EQ_FREQ_MARGIN; var freqStep = (freqMax - freqMin) / (NODES_NUM - 1); // Create the equalizer nodes to cover the // frequency spectrum evenly var headNode = audioContext.destination; this.eqNodes = []; this.eqParms = []; for( var nodeIndex = 0; nodeIndex < NODES_NUM; nodeIndex++ ) { // Set up the filter var eqNode = audioContext.createBiquadFilter(); eqNode.frequency.value = Math.round(freqMin + (nodeIndex * freqStep)); if( nodeIndex == 0 ) { // Use a low shelf filter for the lowest filter eqNode.type = "lowshelf"; } else if( nodeIndex == NODES_NUM - 1 ) { // Use a high shelf filter for the lowest filter eqNode.type = "highshelf"; } else { eqNode.type = "peaking"; } // Connect to the previous node eqNode.connect( headNode ); // Keep track of the node this.eqNodes.push( eqNode ); // Add the tweakable audio parameters to the // equalizer parameter array this.eqParms.push({ frequency: eqNode.frequency, Q: eqNode.Q, gain: eqNode.gain } ); // Keep track of the head node headNode = eqNode; } // Connect the volume control to the last head node this.volNode.connect( headNode ); }We'll add the function
AudioLayer.getEqResponse()to return the equalizer's frequency response graph:AudioLayer.prototype.getEqResponse = function( freqs ) { var magCombined = new Float32Array( freqs.length ); // Get the frequency response from all the eq nodes var eqNodes = this.eqNodes; var magCurr = new Float32Array( freqs.length ); var phaseCurr = new Float32Array( freqs.length ); for(var eqIndex=0; eqIndex<eqNodes.length; eqIndex++ ) { eqNodes[ eqIndex ].getFrequencyResponse( freqs, magCurr, phaseCurr ); // Combine the node magnitudes for( var freqIndex = 0; freqIndex < freqs.length; freqIndex++ ) { var magDb = Math.log(magCurr[ freqIndex ]) * 20; magCombined[ freqIndex ] += magDb; } } return magCombined; };In
WebAudioApp, we add the member functionupdateEqGraphic()for rendering the equalizer's response graph:WebAudioApp.prototype.updateEqGraphic = function() { var FREQ_MIN = 10; // Hz var FREQ_MAX = Math.round( this.audioContext.sampleRate * 0.5 ); var MAG_MIN = -80; var MAG_MAX = 80; // Build the frequency response sampler list if( this.eqFreqs == null ) { var FREQS_NUM = 100; var FREQ_STEP = (FREQ_MAX - FREQ_MIN) / (FREQS_NUM - 1); this.eqFreqs = new Float32Array( FREQS_NUM ); for( var freqIndex = 0; freqIndex < FREQS_NUM; freqIndex++ ) { this.eqFreqs[freqIndex] = Math.round( FREQ_MIN + (freqIndex * FREQ_STEP) ); } } // If we have an update scheduled, don't do anything if( this.eqUpdateHandle != null ) return; // Schedule the graphic update this.eqUpdateHandle = later( 0, function(){ this.eqUpdateHandle = null; var canvasCtx = $("#eqcanvas")[0] .getContext( "2d" ); var canvasWidth = canvasCtx.canvas.width; var canvasHeight = canvasCtx.canvas.height; // Calculate the draw steps var stepX = canvasWidth / (FREQ_MAX - FREQ_MIN); var stepY = canvasHeight / (MAG_MAX - MAG_MIN ); // Clear the canvas canvasCtx.fillStyle = "#f0f0f0"; canvasCtx.fillRect( 0, 0, canvasWidth, canvasHeight ); // Draw the frequency response var eqFreqs = this.eqFreqs; var eqMag = this.musicLayer.getEqResponse(eqFreqs); var firstPt = true; canvasCtx.beginPath(); for(var index = 0; index < eqFreqs.length; index++ ) { var x = Math.round( (eqFreqs[index] - FREQ_MIN) * stepX ); var y = canvasHeight - Math.round( (eqMag[index] - MAG_MIN) * stepY ); if( firstPt ) { firstPt = false; canvasCtx.moveTo( x, y ); } else { canvasCtx.lineTo( x, y ); } } canvasCtx.strokeStyle = "#ff0000"; // red line canvasCtx.stroke(); // Draw the neutral response line var neutralY = canvasHeight - Math.round( (0 - MAG_MIN) * stepY ); canvasCtx.beginPath(); canvasCtx.moveTo( 0, neutralY ); canvasCtx.lineTo( canvasWidth, neutralY ); canvasCtx.strokeStyle = "#3030ff"; // blue line canvasCtx.stroke(); }, this ); };Finally, we link the equalizer's HTML control widgets to its corresponding equalizer node and set up the equalizer response graph rendering in
WebAudioApp.start():WebAudioApp.prototype.start = function() { .. // Initialize the volume slider this.initSlider( "#musicvol", this.musicLayer.gain, 0.01, "music volume" ); // Initialize the equalizer sliders var eqParms = this.musicLayer.eqParms; for( var nodeIndex = 0; nodeIndex < eqParms.length; nodeIndex++ ) { var parms = eqParms[ nodeIndex ]; var freqValue = String( parms.frequency.value ); this.initSlider( "#eq_gain_" + nodeIndex, parms.gain, 0.01, "Gain " + freqValue + " Hz", { orientation: "vertical" } ); this.initSlider( "#eq_q_" + nodeIndex, parms.Q, 0.01, "Q " + freqValue + " Hz", { orientation: "vertical", min: 0.25, max: 2.5 } ); // Set up the label $("#eq_label_" + nodeIndex).text( freqValue + " Hz" ); } // Set up equalizer graphics update on slider change var me = this; $( "[id^=eq_]" ).on( "slide", function() { me.updateEqGraphic(); } ); // Refresh the equalizer graphics this.updateEqGraphic(); };
Launch the application test URL in a web browser (http://localhost/myaudiomixer) to see the end result. Have fun playing with the mixer!
Web Audio offers a variety of built-in audio processing nodes which can be combined to build sophisticated audio effects. One of these audio processor node types is BiquadFilterNode.
BiquadFilterNode is actually a collection of common low order filters. These low order filters form the building blocks for tonal control and more advanced filters. The following is its class definition:
The
typeattribute indicates the filter type represented by the instance as shown in the following code. Filter types support low-pass, high-pass, low-shelf, high-shelf, and notch filters. We'll discuss this in detail later:interface BiquadFilterNode : AudioNode { var type:String;The
frequency,detune,Q, andgainaudio parameters affect how the filter processes its input signal. The units forfrequency,detune, andgainare Hz, cents (1/100th of a semitone), and dB (decibels—a logarithmic scale for measuring gain), respectively. The units forQvary depending on the type of filter. In fact, the audio parameters are interpreted differently depending on the type of filter:var frequency:AudioParam; // in Hz var detune:AudioParam; // in Cents var Q:AudioParam; // Quality factor var gain:AudioParam // in dBThe
getFrequencyResponse()method returns the frequency response for a list of frequencies as shown in the following code. Applications specify the list of frequencies (in Hz) to sample through thefrequencyparameter. The function then returns the magnitude and phase values associated with the frequencies through the array parametersmagResponseandphaseResponse. Therefore, it is important that thefrequency,magResponse, andphaseResponsearrays are of the same size:function getFrequencyResponse( frequency:Float32Array, // in magResponse:Float32Array, // out phaseResponse:Float32Array ); // out };The magnitude values are returned as a gain multiplier while the phase values are returned in radians.
Tip
Make sure that the
getFrequencyResponse()parameters are theFloat32Arrayobjects instead ofArrayobjects! When the function parameters are not theFloat32Arrayobjects, the function seems to operate normally, except that the method will exit without fillingmagResponseandphaseResponsewith the desired information.
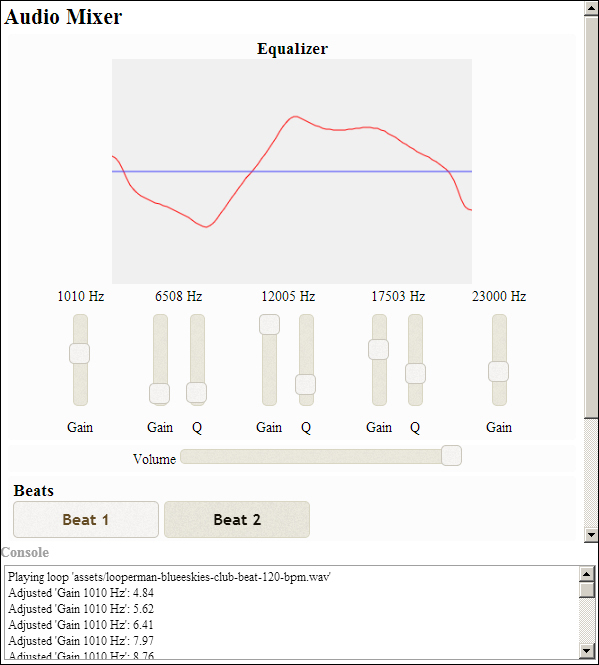
The following table summarizes the BiquadFilterNode filters and how their audio parameters are interpreted:
|
Description |
|
Interpretation | ||
|---|---|---|---|---|
|
|
|
| ||
|
Low-pass filter |
|
The cutoff frequency |
Unused |
The frequency drop-off steepness at the cutoff frequency |
|
High-pass filter |
|
The cutoff frequency |
Unused |
The frequency drop-off steepness at the cutoff frequency |
|
Band-pass filter |
|
Center of the frequency band |
Unused |
The width of the frequency band |
|
Notch filter |
|
Center of the frequency band |
Unused |
The width of the frequency band |
|
Low-shelf filter |
|
The upper limit of the frequencies boosted/attenuated |
The boost or attenuation level |
Unused |
|
High-shelf filter |
|
The lower limit of the frequencies boosted/attenuated |
The boost or attenuation level |
Unused |
|
Peaking filter |
|
Center of the frequency band which is boosted/attenuated |
The boost or attenuation level |
The width of the frequency band |
|
All-pass filter |
|
Center frequency where the phase transition occurs |
Unused |
The transition steepness |
The following is the graphical representation of the filter types:
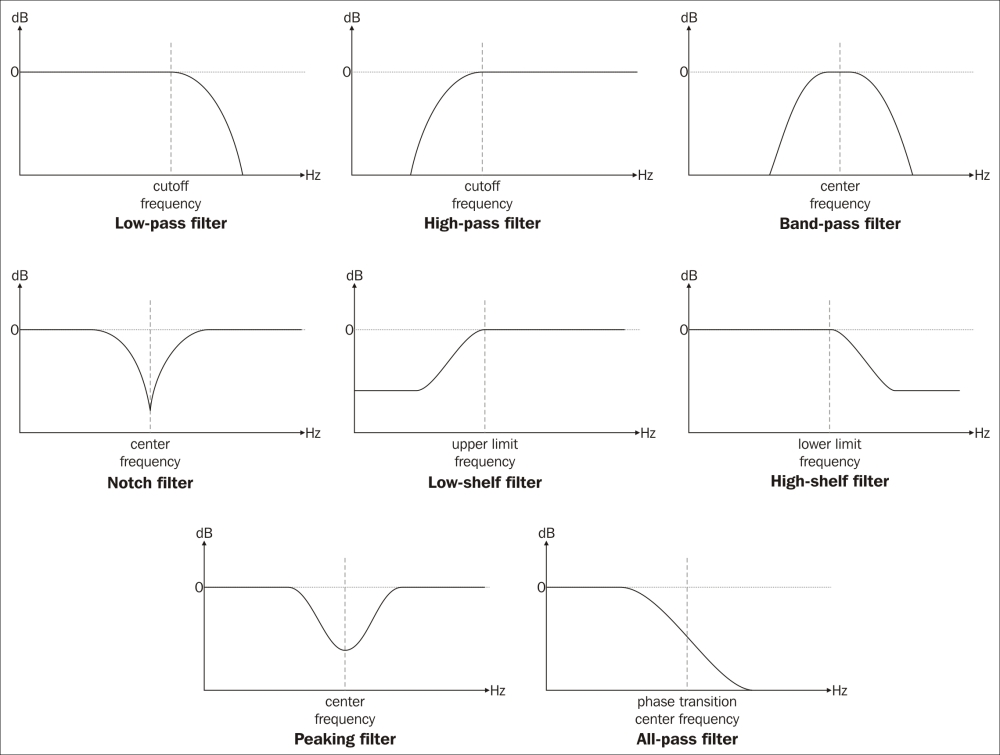
In our recipe, we build a 5-band equalizer by:
Inserting five
BiquadFilterNodeinstances into the node graph—one for each equalizer band. These instances must be inserted in a series so that the output signal is a product of all theBiquadFilterNodeinstances.Exposing each
BiquadFilterNodeinstance'sgainandQaudio parameters so that users can tune the equalizer behavior.
The following is the resulting node graph:
Let's take a look at the equalizer set up code in the AudioLayer class constructor:
First, we'll need to determine the default frequencies for all the equalizer bands. In order to determine this, we'll need to know the supported frequency range. We create a temporary
BiquadFilterNodeinstance and sample itsfrequencyaudio parameter to get the frequency range. This range is reduced byEQ_FREQ_MARGINat both ends yielding the cutoff frequencies for the lowest and highest equalizer bands,freqMinandfreqMax. It's important that the equalizer frequency range has margins on both ends to ensure that the band filters at the ends have enough frequency range to operate properly. Finally, we calculate the default frequency step size between bands and store it infreqStep:function AudioLayer( audioContext ) { ... // Calculate the frequency metrics var EQ_FREQ_MARGIN = 1000; // margin for equalizer range var NODES_NUM = 5; // number of equalizer nodes var tempFilter = audioContext.createBiquadFilter(); var freqMin = tempFilter.frequency.minValue + EQ_FREQ_MARGIN; var freqMax = tempFilter.frequency.maxValue - EQ_FREQ_MARGIN; var freqStep = (freqMax - freqMin) / (NODES_NUM - 1);We instantiate
BiquadFilterNodefor each equalizer band and set itsfrequencyaudio parameter to its default band frequency:// Create the equalizer nodes to cover the // frequency spectrum evenly var headNode = audioContext.destination; this.eqNodes = []; this.eqParms = []; for( var nodeIndex = 0; nodeIndex < NODES_NUM; nodeIndex++ ) { // Set up the filter var eqNode = audioContext.createBiquadFilter(); eqNode.frequency.value = Math.round( freqMin + (nodeIndex * freqStep) );We use a combination of peaking filters, low-shelf filters, and high-shelf filters to model the equalizer's frequency response as shown in the following code. We use a low-shelf filter and a high-shelf filter for the lowest frequency and the highest frequency equalization bands, respectively. We use peaking filters for all the other bands:
        if( nodeIndex == 0 ) {
            // Use a low shelf filter for the lowest filter
            eqNode.type = "lowshelf";
        } else if( nodeIndex == NODES_NUM - 1 ) {
            // Use a high shelf filter for the lowest filter
            eqNode.type = "highshelf";
        } else {
            eqNode.type = "peaking";
        }
Tip
Low-shelf/high-shelf versus peaking filters
It's good practice to use low-shelf/high-shelf filters over peaking filters when dealing with filtering at the frequency extremes. In theory, peaking filters should behave like low-shelf/high-shelf filters when used at the frequency extremes. In practice, the peaking filter frequency response deteriorates rapidly as it approaches the extremes. On the other hand, the low-shelf/high-shelf frequency response remains consistent.
We connect the
BiquadFilterNodeinstances in a series to the audio context'sAudioDestinationNodeinstance. Then, we cache each instance'sfrequency,Q, andgainaudio parameters inAudioLayer.eqParmsso that the applications can access the equalizer controllers directly:// Connect to the previous node eqNode.connect( headNode ); // Keep track of the node this.eqNodes.push( eqNode ); // Add the tweakable audio parameters to the // equalizer parameter array this.eqParms.push({ frequency: eqNode.frequency, Q: eqNode.Q, gain: eqNode.gain } ); // Keep track of the head node headNode = eqNode;Finally, we connect the layer's volume control,
AudioLayer.volNode, to theBiquadFilterNodechain. The volume control is treated as the audio layer's "terminal"AudioNodeinstance—all sourceAudioNodeinstances must be connected to the volume control node in order to be considered as a part of theAudioLayerinstance's node graph:} // Connect the volume control to the last head node this.volNode.connect( headNode ); }
AudioLayer.getEqResponse() implements the logic for calculating the equalizer's frequency response:
Using
biquadFilterNode.getFreqResponse(), we retrieve each equalizer band's frequency response for the target frequency list,freqs. The method fillsmagCurrwith the response magnitude information:AudioLayer.prototype.getEqResponse = function( freqs ) { var magCombined = new Float32Array( freqs.length ); // Get the frequency response from all the eq nodes var eqNodes = this.eqNodes; var magCurr = new Float32Array( freqs.length ); var phaseCurr = new Float32Array( freqs.length ); for( var eqIndex = 0; eqIndex < eqNodes.length; eqIndex++ ) { eqNodes[ eqIndex ].getFrequencyResponse( freqs, magCurr, phaseCurr );We convert each magnitude value from its original gain multiplier value to its dB equivalent:
        // Combine the node magnitudes
        for( var freqIndex = 0;
             freqIndex < freqs.length;
             freqIndex++ ) {
            var magDb = Math.log(magCurr[ freqIndex ]) * 20;
The formula for converting a gain multiplier to dB is as follows:

Then, we sum the magnitude on a per frequency basis. The accumulated magnitude is cached in
magCombined:magCombined[ freqIndex ] += magDb;
We return
magCombinedonce all thebiquadFilterNodefrequency responses have been summed:} } return magCombined; };
Finally, WebAudioApp.updateEqGraphic() renders the equalizer frequency response to an HTML canvas:
FREQ_MINandFREQ_MAXspecify the graph's rendered frequency range as shown in the following code.FREQ_MAXis set to the highest supported frequency so that we get a complete frequency response graph. The highest sample frequency that is supported by anAudioContextinstance is its Nyquist frequency:WebAudioApp.prototype.updateEqGraphic = function() { var FREQ_MIN = 10; // Hz var FREQ_MAX = Math.round( this.audioContext.sampleRate * 0.5 );The graph renders the frequency response in dB units between the range of
MAG_MINandMAG_MAX:var MAG_MIN = -80; var MAG_MAX = 80;The first time we try to render the response graph, we generate the sample frequency list and store it in
WebAudioApp.eqFreqsas aFloat32Arrayobject:// Build the frequency response sampler list if( this.eqFreqs == null ) { var FREQS_NUM = 100; var FREQ_STEP = (FREQ_MAX - FREQ_MIN) / (FREQS_NUM - 1); this.eqFreqs = new Float32Array( FREQS_NUM ); for( var freqIndex = 0; freqIndex < FREQS_NUM; freqIndex++ ) this.eqFreqs[freqIndex] = Math.round( FREQ_MIN + (freqIndex * FREQ_STEP) ); }Because the frequency response retrieval and rendering is a fairly expensive operation, we limit the operation to occur once per update. We enforce this limit by queuing the render operation for the next update and monitoring
WebAudioApp.eqUpdateHandleto determine when the operation has executed:// If we have an update scheduled, don't do anything if( this.eqUpdateHandle != null ) return; // Schedule the graphic update this.eqUpdateHandle = later( 0, function(){ this.eqUpdateHandle = null;We start the frequency response graph rendering by clearing the canvas:
        var canvasCtx = $("#eqcanvas")[0].getContext( "2d" );
        var canvasWidth  = canvasCtx.canvas.width;
        var canvasHeight = canvasCtx.canvas.height;

        // Calculate the draw steps
        var stepX = canvasWidth / (FREQ_MAX - FREQ_MIN);
        var stepY = canvasHeight / (MAG_MAX - MAG_MIN );

        // Clear the canvas
        canvasCtx.fillStyle = "#f0f0f0";
        canvasCtx.fillRect( 0, 0, canvasWidth, canvasHeight );
We retrieve the equalizer's frequency response by calling
AudioLayer.getEqResponse()with the sample frequency list cached inWebAudioApp.eqFreqs:// Draw the frequency response var eqFreqs = this.eqFreqs; var eqMag = this.musicLayer.getEqResponse( eqFreqs );We render the response graph as a red line strip:
        var firstPt = true;
        canvasCtx.beginPath();
        for(var index = 0; index < eqFreqs.length; index++) {
            var x = Math.round(
                       (eqFreqs[index] - FREQ_MIN) * stepX );
            var y = canvasHeight - Math.round(
                       (eqMag[index] - MAG_MIN) * stepY );
            if( firstPt ) {
                firstPt = false;
                canvasCtx.moveTo( x, y );
            } else {
                canvasCtx.lineTo( x, y );
            }
        }

        canvasCtx.strokeStyle = "#ff0000";  // red line
        canvasCtx.stroke();
Finally, we overlay a blue line indicating the
0dB position.// Draw the neutral response line var neutralY = canvasHeight - Math.round( (0 - MAG_MIN) * stepY ); canvasCtx.beginPath(); canvasCtx.moveTo( 0, neutralY ); canvasCtx.lineTo( canvasWidth, neutralY ); canvasCtx.strokeStyle = "#3030ff"; // blue line canvasCtx.stroke(); }, this ); };
Finally we talk about the two most popularly used audio processors in Web Audio.
The biquadFilterNode and GainNode instances are just two of the many built-in audio processing nodes available in Web Audio (volume manipulation is considered a form of audio processing).
The following table highlights some of the more popular audio processor classes:
|
Class |
Description |
|---|---|
|
|
Spatializes an incoming audio signal in 3D space. |
|
|
Compresses the volume range of an incoming audio signal. It accomplishes this by lowering the volume of loud segments and raising the volume of soft segments. |
|
|
Delays the incoming audio signal by a specified time delay. |
|
|
Mixes an incoming audio signal with an impulse response waveform. This audio processor is a fundamental building block for reverberation effects. |
The following node graph illustrates a reverberation effect constructed using Web Audio's built-in audio processing nodes:
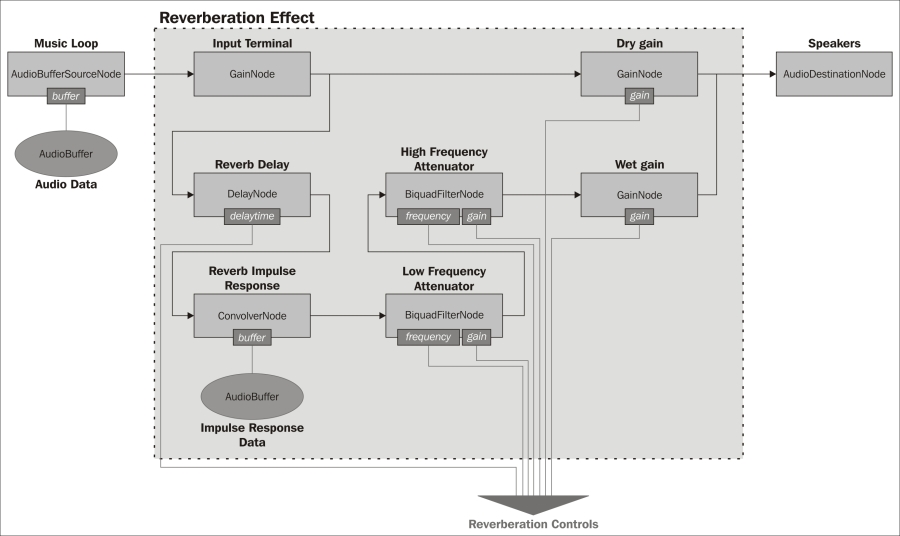
The example exposes the most common reverberation control parameters, which are:
Reverberation delay
Impulse response
Reverberation high cut-off frequency
Reverberation low cut-off frequency
Dry/wet mix
Unfortunately, a technical implementation of the reverberation audio processor is beyond the scope of this book. Hopefully, the example will serve as an inspiration and jump point to greater and more exciting real-time audio processors on the Web.
This concludes our exploration of the Web Audio API.