
All ADF applications consist of the following parts:
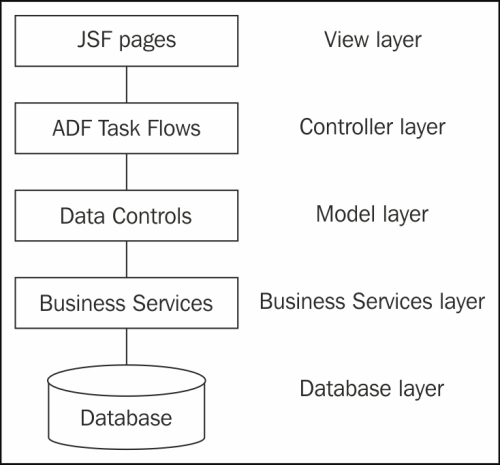
Controller layer: The Controller layer consists of ADF Task Flows.
Model layer: The Model layer consists of the Data Controls that connect the View/Controller layers to the business service.
Business Service layer: The Business Service layer provides services to query and manipulate data. There are many ways to build business services—in this book, we will use ADF Business Components, but you can also use, for example, JPA Entities and EJB 3.0 Session beans, POJOs, web services, and so on.
Database layer: The Database layer is where your data is stored persistently.
This section will briefly take you through the necessary steps to create an ADF Essentials application with the simplest possible representation of all of these layers. If you follow the steps on your own environment, you will get a first-hand feel for ADF development with JDeveloper. The next chapters will explain the various parts in more detail.
To create the application, click on the New Application link in the Application Navigator or choose File | New | Applications. Choose Fusion Web Application (ADF).
Give your application a name, provide a directory, and enter an application package prefix. This prefix is used in Java package naming in the application, so it should adhere to your normal Java naming standards. If your organization has the Internet domain company.com, your application package prefix will normally be something like com.company.<application>, for example, com.company.adfdemo1.
You can leave the defaults for the Model and ViewController projects in the following steps of the wizard.
When you are done, your screen will look like the following screenshot, with your application name at the top of the Application Navigator to the right, two projects under it, and a quick start checklist for the application in the middle:
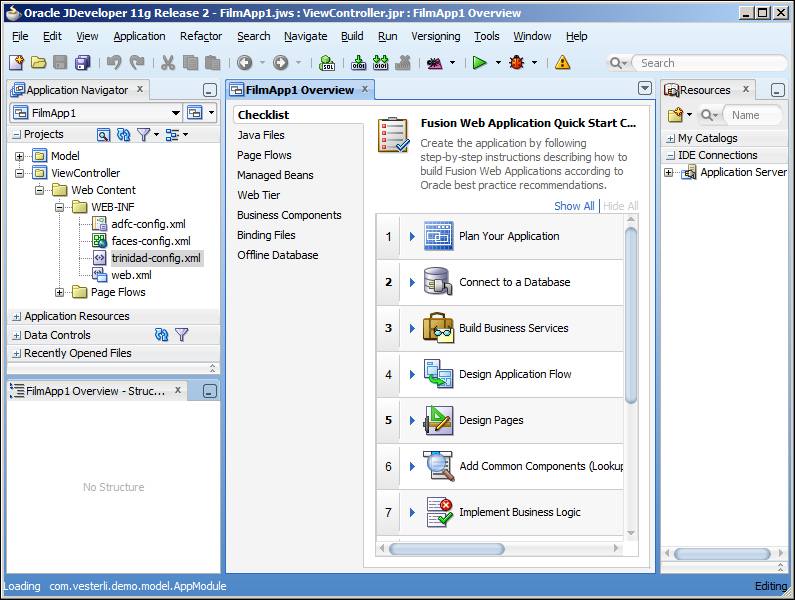
You can explore the checklist to get a feel for the steps in ADF application development—it includes both detailed task lists and links to relevant places in the documentation.
We will be working on the film table in the MySQL Sakila demo database. To create a connection, choose File | New | Connections | Database Connection. Give your Connection Name, choose Connection Type as MySQL, fill in Username as root, and give the Password. Remember that the default port is 3306 and we use the default sakila database. Your screen should look like this:
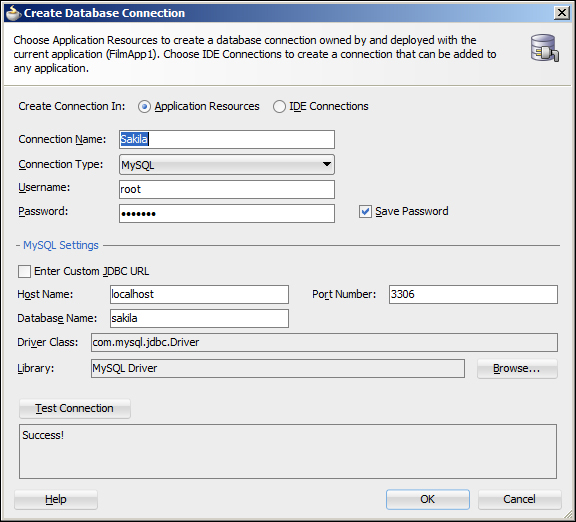
In the Library field, click on Browse and select the MySQL Driver you created when you installed JDeveloper (it's under the User node in the Select Library dialog).
Click on Test Connection—if you get a Success! message, your driver is installed correctly and you have provided the right connection information.
To start building business services for your application, select the Model project in the Application Navigator and choose File | New | Business Tier | ADF Business Components | Business Components from Tables as shown in the following screenshot:

In the Initialize Business Components Project wizard, choose your Sakila connection, choose SQL92 as the SQL Platform, and choose Java as Data Type Map.
Note
The SQL Platform setting controls the SQL statements that ADF generates. If you know you'll be using a specific database, you can select it to allow ADF to build optimized SQL for that platform. SQL92 is a standard that is supported by all modern databases, including MySQL.
The Data Type Map setting controls the Java objects used by ADF. Unless you are using an Oracle database, select Java.
In step 1 of the wizard, click on Query, choose the
filmtable on the left, and use the > button to move it to the Selected box in order to create an entity object.In step 2, move the
Filmentity object to the Selected box on the right in order to create an entity-based view object.In step 3, don't change anything (that is, do not create any query-based view objects).
In step 4, leave the defaults (that is, create an Application Module).
In step 5, you can leave the defaults (that is, do not create a business component diagram). If you are curious, feel free to check the checkbox to see the documentation JDeveloper can automatically generate for you.
In step 6, just click on Finish.
JDeveloper creates a number of objects for you—you can see them in the Application Navigator.
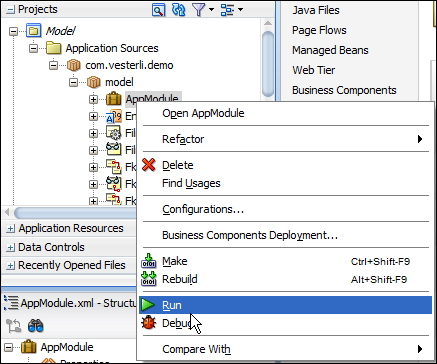
You can test your business components by right-clicking on the AppModule node (with the suitcase icon) and choosing Run as shown in the following screenshot:
This starts the Business Components Tester application shown in the following screenshot, which allows you to interact with your business service through a simple UI:

The model layer is automatically created for you when you create the business components. You can see the available data elements and operations in the Data Controls palette in the Application Navigator as shown in the following screenshot:

In the controller layer, we define the screens that make up the application and the possible navigation flows between them. For now, we'll just use the Unbounded Task Flow that every ADF application has.
Open the ViewController project and then Web Content | Page Flows to see the adfc-config element that represents the Unbounded Task Flow. Double-click on this element to open a visual representation of the flow. It's empty at the moment because we haven't added any pages yet.
Drag a View activity in from the Component Palette on the left as shown in the following screenshot and give it a name (for example, FilmPage):
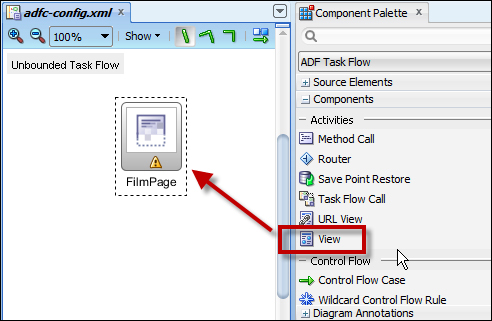
You'll notice that the view component has a yellow exclamation mark, indicating a warning. This means that we have added a view component to the task flow, but we have not actually defined the page yet. So, let's do that.
In the View layer, we define the actual JSF pages that make up the application. Simply double-click on the page you just created in the unbounded task flow to open the Create JSF Page wizard. Set Document Type to Facelets and leave the page layout at Blank Page. We'll get back to using layouts and page templates in a later chapter.
Click on OK to actually create the page and open it in JDeveloper. You'll see an empty page in the Design view.
Find the Data Controls panel to the left and expand it. Expand the AppModuleDataControl node and drag the FilmView1 object onto the page as shown in the following screenshot:
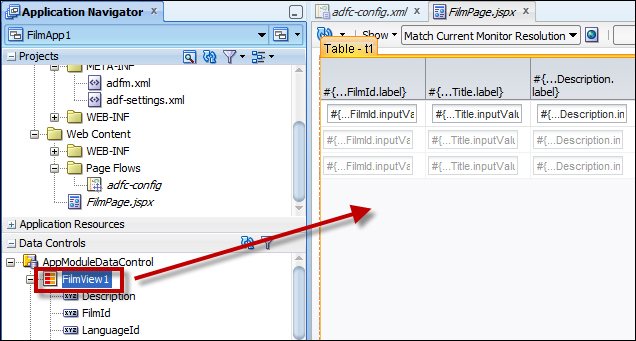
When you release it, JDeveloper will automatically prompt you for a choice of component. Choose Table | ADF Read-Only Table. In the Edit Columns dialog, check the Enable Sorting and Enable Filtering checkboxes and click on OK.
Your page will show a representation of an ADF table full of mysterious #{…xxx} labels and fields. They represent bindings to the data control and will be replaced with actual labels and data at runtime—we'll get back to this in a later chapter.
By default, your application gets a long and complicated URL. You can change this by right-clicking on the ViewController project and choosing Project Properties. Select the Java EE Application node and set the Java EE Web Context Root to something simpler. It will typically default to something like FilmApp1-ViewController-context-root—you can change this to something like FilmApp1.
Click on Save All to save your work.
There are some settings that you need to change in order to make your application run with ADF Essentials on GlassFish.
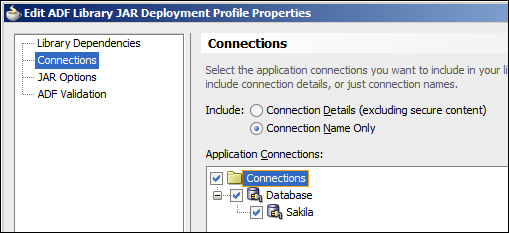
You just want your application to include the name of your database connection, not the actual connection details. In order to ensure this, you need to right-click on your Model project and choose Project Properties. In the properties dialog, choose Deployment and then Edit to edit the deployment profile. Choose Connections and then Connection Name Only as shown in the following screenshot:
Then, click on OK a couple of times to close the dialog box.
In the current version of JDeveloper, the default application module configuration does not work with GlassFish, so you need to change the bc4j.xcfg file.
Right-click on the Application Module in the Model project and choose Configurations. This opens the bc4j.xcfg file in the Overview mode. Find the Source tab at the bottom of this panel to see the actual contents of this file.
Find the two <Custom JDBCDataSource=…/> lines. If they start with java:comp/env, change them to look like this:
<Custom JDBCDataSource="jdbc/SakilaDS">
Finally, you need to tell JDeveloper that you want to run your ADF Essentials application on the GlassFish platform. You do this in two places:
In the project properties for the
ViewControllerproject (choose Deployment and edit the deployment profile as shown in the preceding screenshot, choose Platform, and then GlassFish 3.1) as shown in the following screenshot:
In the application properties (choose Application | Application Properties on the menu, then Deployment, and edit the deployment profile as in the preceding screenshot. Choose Platform and then GlassFish 3.1).
Now your first ADF Essentials application is ready to deploy and run!
Choose Application, Deploy. You should see a default deployment profile (something like FilmApp1_Project1_FilmApp1). Choose this default profile and choose Deploy to Application Server. Choose your GlassFish connection and click on Finish to deploy your application.
The log panel at the bottom of the JDeveloper window will show deployment messages on the Deployment tab.
[03:34:42 PM] ----  Deployment started.  ----
[03:34:42 PM] Target platform is  (Glassfish 3.1).
[03:34:42 PM] Retrieving existing application information
[03:34:42 PM] Running dependency analysis...
[03:34:42 PM] Building...
[03:34:49 PM] Deploying 2 profiles...
[03:34:51 PM] Wrote Web Application Module to C:\JDeveloper\mywork\FilmApp1\ViewController\deploy\FilmApp1_ViewController_webapp.war
[03:34:55 PM] Wrote Enterprise Application Module to C:\JDeveloper\mywork\FilmApp1\deploy\FilmApp1_Project1_FilmApp1.ear
[03:34:55 PM] Deploying Application...
[03:38:28 PM] Application Deployed Successfully.
[03:38:28 PM] Elapsed time for deployment:  3 minutes, 46 seconds
[03:38:28 PM] ----  Deployment finished.  ----
Have patience—it takes a while (up to several minutes) for JDeveloper to bundle up the necessary ADF Essentials libraries with your application and deploy it onto the GlassFish server.
Once the deployment is finished, you can run your application in a web browser. Your URL will be of the form http://<server>:<port>/<web context root>/faces/<page name>. Remember that you set the web context root in the properties of the ViewController project. In the preceding section on the controller layer, we set it to FilmApp1. An example of a URL would be http://localhost:8080/FilmApp1/faces/FilmPage.jspx. Your page should look like this:
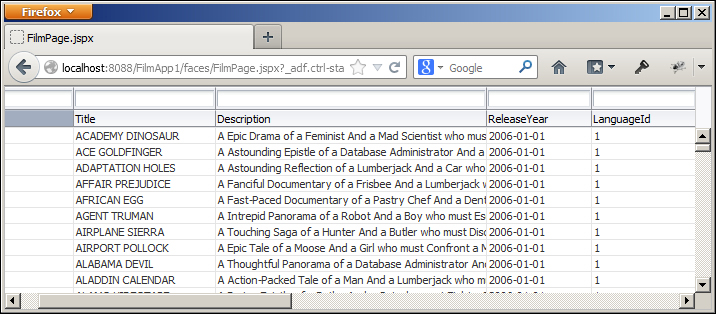
Notice some of the cool features of the ADF table component we used:
You can resize the columns by dragging the column borders
You can reorder columns with drag-and-drop
New records are loaded as you scroll down (try dragging the slider on the vertical scrollbar)
You can sort columns by clicking on the header
You can filter data by entering filtering criteria in the filtering field over each column