
First, we need to download WordPress. Open your web browser and navigate to http://wordpress.org/download/. At that page you can choose to download WordPress as a ZIP file or as a .tar.gz file. If you're on Windows you'll probably want to download the ZIP file, while Linux and OS X users can download whichever they prefer.
Once you've got the .zip or .tar.gz file downloaded, open it up and you should see a folder named wordpress in there. Extract that wordpress folder to somewhere on your local computer, such as your desktop. Next, open up an FTP connection to your webhost and upload everything from the wordpress directory that we have put on your desktop earlier.
After the upload is finished, go ahead and install WordPress as you would for a single site. After that install is done, we'll edit wp-config.php to enable multisite.
We'll go through the basic settings in wp-config.php, including code snippets.
After renaming wp-config-sample.php to wp-config.php, open it up for editing. You can open it directly from your webhost if you're using a FTP client such as FileZilla. Just right-click on wp-config.php and select View/Edit within FileZilla. I chose to use FileZilla as an example because it's available for multiple operating systems, including Windows, OS X, and Linux.
Once you've opened wp-config.php in your text editor, you'll be presented with some code that looks like what you'll see in the next code.
// ** MySQL settings - You can get this info from your web host ** //
/** The name of the database for WordPress */
define('DB_NAME', 'database_name_here');

/** MySQL database username */
define('DB_USER', 'username_here');

/** MySQL database password */
define('DB_PASSWORD', 'password_here');

/** MySQL hostname */
define('DB_HOST', 'localhost');

/** Database Charset to use in creating database tables. */
define('DB_CHARSET', 'utf8');

/** The Database Collate type. Don't change this if in doubt. */
define('DB_COLLATE', '');

/* Multisite */
define('WP_ALLOW_MULTISITE', true);

/**#@+
 * Authentication Unique Keys and Salts.
 *
 * Change these to different unique phrases!
 * You can generate these using the {@link https://api.wordpress.org/secret-key/1.1/salt/ WordPress.org secret-key service}
 * You can change these at any point in time to invalidate all existing cookies. This will force all users to have to log in again.
 *
 * @since 2.6.0
 */
define('AUTH_KEY',         'put your unique phrase here');
define('SECURE_AUTH_KEY',  'put your unique phrase here');
define('LOGGED_IN_KEY',    'put your unique phrase here');
define('NONCE_KEY',        'put your unique phrase here');
define('AUTH_SALT',        'put your unique phrase here');
define('SECURE_AUTH_SALT', 'put your unique phrase here');
define('LOGGED_IN_SALT',   'put your unique phrase here');
define('NONCE_SALT',       'put your unique phrase here');
You may notice that there's an additional piece of code in there, compared to what's being shown in your wp-config.php file. There's a comment in there that says Multisite and directly under it is where we define the named constant, WP_ALLOW_MULTISITE, to true. In the following code, you'll find exactly what you need to add to wp-config.php to enable the multisite feature:
/* Multisite */
define('WP_ALLOW_MULTISITE', true);
I like to set that constant below the database config settings, around lines 36 and 37 in the default wp-config.php file.
The database configuration constants at the top of wp-config.php are pretty self-explanatory. They're named things such as DB_NAME, DB_USER, and DB_PASSWORD. Bet you can guess what those values should be set to. There are some not quite so obvious database settings too, such as DB_CHARSET and DB_COLLATE. It's usually a good idea to keep those at the default value; DB_CHARSET is set to utf8 by default, which is Unicode. The DB_COLLATE constant should contain a value for the language you're going to use within WordPress. If you're using English, you can just leave the value for DB_COLLATE blank.
In the following code, I also included a bunch of named constants for authentication unique keys and salts, towards the bottom. You need to change the existing values there. You can easily generate new, random values by visiting https://api.wordpress.org/secret-key/1.1/salt/. Just copy the eight lines of code generated on that page and then paste it into wp-config.php, replacing the other keys. So you should go from the following code to something resembling what you see in the version generated by api.wordpress.com:
define('AUTH_KEY',         'put your unique phrase here');
define('SECURE_AUTH_KEY',  'put your unique phrase here');
define('LOGGED_IN_KEY',    'put your unique phrase here');
define('NONCE_KEY',        'put your unique phrase here');
define('AUTH_SALT',        'put your unique phrase here');
define('SECURE_AUTH_SALT', 'put your unique phrase here');
define('LOGGED_IN_SALT',   'put your unique phrase here');
define('NONCE_SALT',       'put your unique phrase here');
And following is the code that's an example of the keys generated on the api.wordpress.com page:
define('AUTH_KEY',         '*`b7,!cuc2Ub+IabKJ-h|*5SdfO8uBm-L1&=<Q5>6oiS3?qCTVA|^d%W(o[<Y-<C');
define('SECURE_AUTH_KEY',  '<v?OP<V*:Nz#AazY0l?*7^{d-i6-EyA*,|Flp>|BR&*u=&Gad{2r6L^8g+#r~Z&^');
define('LOGGED_IN_KEY',    'I!u|T-h(4kc[ L%#QJs7`NyM.]]-W`/,rmhRteNQ`^LC+0>0&zG|6Lqe5Zf%kx$B');
define('NONCE_KEY',        ',[RGlO?&-GDw|>DC&rH5gMQ040(d3Xo{dCAY~F28M=:=]l>/_,|d#l9X_aRTHfnp');
define('AUTH_SALT',        '8G+g,K.Sd^PDyD,q@,mcXs&CxqR5veL*z9P%<O|+O2^YU}Ob^je|Ty;{JL1AQOz/');
define('SECURE_AUTH_SALT', 'mndP#V.PZNH+N2HN9,I5`KC_;|j7TyT[`_1UFX 3j|x18*cZSO5`u2j5miB^~d^:');
define('LOGGED_IN_SALT',   '[>uO+hz%+0t9X1tf<P*Sx1q44leN_WI4$l>yD-fiu7a>{Gq+ubtqjpym4[S0YPTp');
define('NONCE_SALT',       'O -Gk@XjD{4PAi-*Q+OhVD^+6@C]Uebrwc}qLW,2tR*1g4+NMF(sbrp>ppoFD [j');
After making those changes to wp-config.php, save the file and upload it back to your server. If you opened wp-config.php directly with FileZilla, you'll be prompted with a window inside FileZilla that's titled File has changed. This window asks if you want to upload the changed file back to the server. Click on Yes and your modified wp-config.php file will be automatically uploaded to its original location on your server. Any additional changes you make to wp-config.php can be uploaded simply by saving wp-config.php again and telling FileZilla to upload your changed file.
Now that our wp-config.php file knows that we're going to set up multisite, it's time to run the network setup. To install a network, start out by putting your mouse cursor over the Tools menu on the left-hand side of the WordPress Dashboard window and clicking on the Network Setup submenu item.
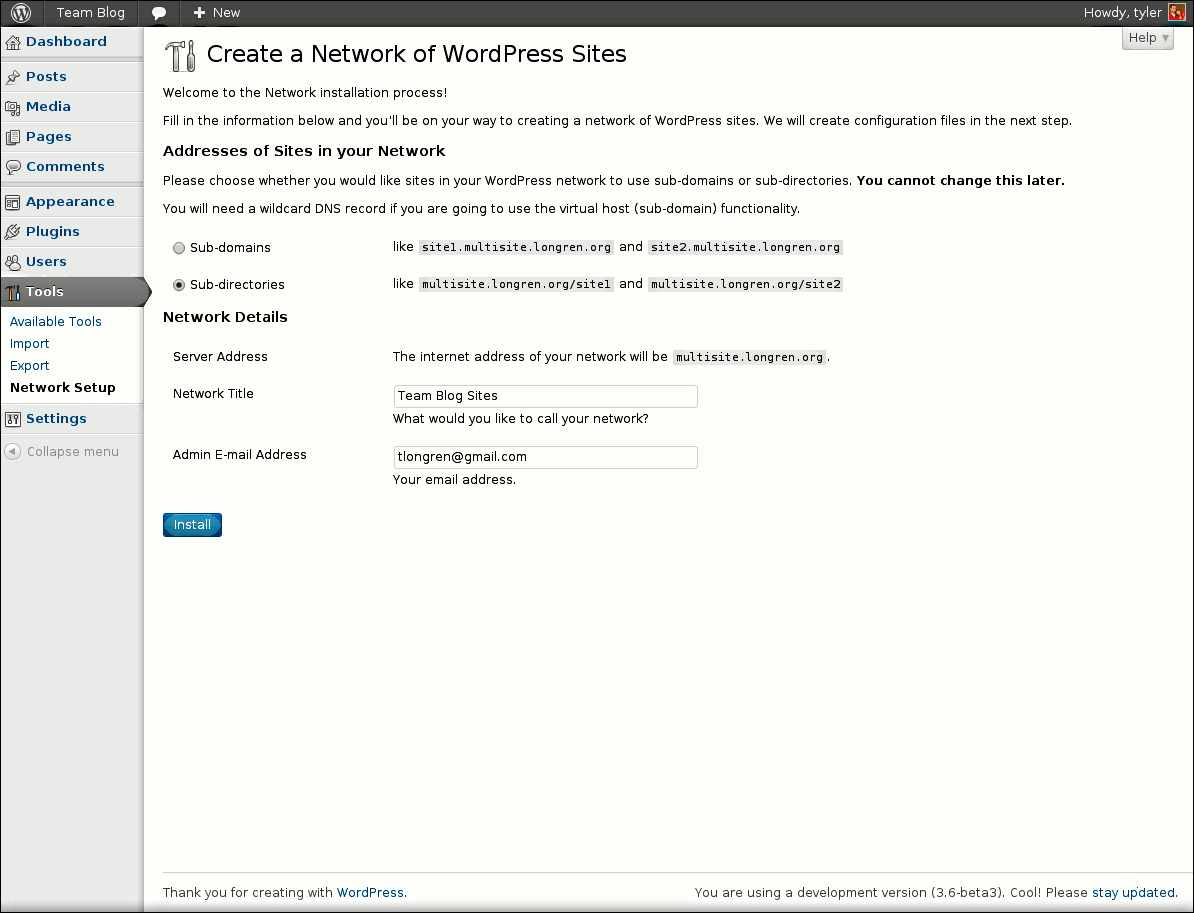
The page you're taken to after clicking on the Network Setup submenu item is titled Create a Network of WordPress Sites. Sounds awesome, right? This is ultimately what we're here for, after all.
From here, you can specify if you want to use a subdomain for individual sites or if you'd rather use a directory. I've chosen to use a directory as I think that's the most common setup. So, the URLs in my example will be http://multisite.longren.org/tyler/ for my blog, http://multisite.longren.org/kayla/ for my wife, Kayla's, and http://multisite.longren.org/sydney/ for my daughter, Sydney's.
The setup I'm using on the Create a Network of WordPress Sites page can be seen in the following screenshot:
Specify your Network Title and Admin E-mail Address values and click on the Install button at the bottom of the form. After clicking on Install you'll see a page with Enabling the Network in bold at the top, with some more named constants being defined also. Copy and paste the code from the section 1 into your wp-config.php file and re-upload it to your server. Next, edit your .htaccess file. It should be in the same folder as wp-config.php. If the .htaccess file doesn't exist, you can save a blank text file as .htaccess and upload it to your server. Copy the Apache rewrite rules from the section 2 into your .htaccess file and upload it to your server, again, in the same directory as the wp-config.php file.
The following screenshot shows the page after clicking on Install; it's the page that provides the sections 1 and 2, that I previously referenced:

After you've uploaded your modified wp-config.php and .htaccess files, the setup of your multisite network is complete. You'll need to log in again, so just click on the Log In link at the very end of the Enabling the Network page. You'll be taken to the login page as shown previously. You may need to clear the cache in your browser and possibly delete cookies for the domain your WordPress site is using.
After you're logged back in, you should see a My Sites link in the WordPress toolbar at the top-left corner of the screen. Put your mouse cursor over it and then click on the Network Admin item. Doing so will take you to the network Dashboard window, which is similar in appearance to the regular WordPress Dashboard window but significantly different in content. This is where you can see the sites hosted by your new network. From here, you can add new sites, new users, or enable and disable themes and plugins. Cool, huh? The following is the screenshot of the network Dashboard window:

Tip
Downloading the example code
You can download the example code files for all Packt books you have purchased from your account at http://www.packtpub.com. If you purchased this book elsewhere, you can visit http://www.packtpub.com/support and register to have the files e-mailed directly to you.