
In this recipe, we will implement a peer-to-peer private messaging service using WebRTC data channels. This method allows us to send messages directly from peer to peer, using secure and safe data channels provided by the WebRTC stack.
The schema represented in the following diagram depicts the generic feature flow:
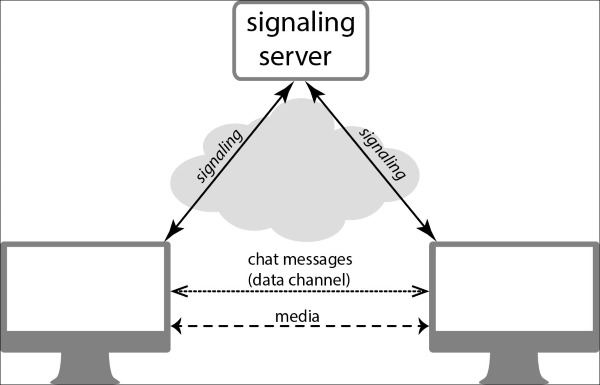
We will develop a simple application, so you don't need any specific preparations for this recipe. A signaling server is necessary for this application, and it can be taken from the Building a signaling server in Erlang or Building a signaling server in Java recipe.
For simplicity, we will make two parts of the application: an index web page and a JavaScript library.
First, create an HTML
index.htmlpage. In the following code, you can find its content. Note that the less important and obvious parts might be skipped here.<!DOCTYPE html> <html> <head>
Include our JavaScript library that is in a separate file:
<script type="text/javascript" src="myrtclib.js"></script>
Include Google's WebRTC JavaScript adapter:
<script src="https://rawgit.com/GoogleChrome/webrtc/master/samples/web/js/adapter.js"></script>
</head>
<body>
Create a
divtag where we will put information regarding the connection:<div id="status"></div><br>
Create a
divtag where the received messages from a remote peer will be placed:<div id="chat"></div>
Create a form with an input element and a button to send messages to the remote peer:
<form name="chat_form" onsubmit="onChatSubmit(document.chat_form.msg.value); return false;">
    <input type="text" class="search-query" placeholder="chat here" name="msg" id="chat_input">
    <input type="submit" class="btn" id="chat_submit_btn"/>
</form>
<script>
Create a connection to the signaling server and initialize the WebRTC stack. The following function is declared in the JavaScript library, which we will consider further in the recipe:
myrtclibinit("ws://localhost:30001");
Note that the domain name and port might be different in your case; they should be the same as declared in the source codes of the signaling sever. By default, the signaling server is listening on local host and on port 30001.
The following function sends a message to the remote peer using the sendDataMessage function—we will write it as part of the JavaScript library:
function onChatSubmit(txt) {
    var msg = JSON.stringify({"type" : "chatmessage", "txt" : txt});
    sendDataMessage(msg);
};
We will also declare a callback function for a catching event when a new virtual room is created:
function onRoomReceived(room) {
    var st = document.getElementById("status");
Create a link to share with the remote peer, put the link in the div status.
    st.innerHTML = "Now, if somebody wants to join you, should use this link: <a href=\""+window.location.href+"?room="+room+"\">"+window.location.href+"?room="+room+"</a>";
};
To show the messages received from the remote peer, we will declare an appropriate callback function. This function gets the message and puts it in the appropriate place on the HTML page:
function onPrivateMessageReceived(txt) {
    var t = document.getElementById('chat').innerHTML;
    t += "<br>" + txt;
    document.getElementById('chat').innerHTML = t;
}
</script>
</body>
</html>
Save the HTML file. This will be the main page of the applications.
Now, create an empty myrtclib.js file and put the following content into it. Note that many parts of the following code might be used in the next chapters, so they should be well-known to you already. Such obvious parts of the code might be skipped in further.
    var RTCPeerConnection = null;
    var room = null;
    var initiator;
    var pc = null;
    var signalingURL;
The following variable will be used for handling the data channel object:
    var data_channel = null;
    var channelReady;
    var channel;
    var pc_config = {"iceServers":
       [{url:'stun:23.21.150.121'},
        {url:'stun:stun.l.google.com:19302'}]};

    function myrtclibinit(sURL) {
        signalingURL = sURL;
        openChannel();
    };

    function openChannel() {
        channelReady = false;
        channel = new WebSocket(signalingURL);
        channel.onopen = onChannelOpened;
        channel.onmessage = onChannelMessage;
        channel.onclose = onChannelClosed;
    };

    function onChannelOpened() {
        channelReady = true;
        createPeerConnection();

        if(location.search.substring(1,5) == "room") {
            room = location.search.substring(6);
            sendMessage({"type" : "ENTERROOM", "value" : room * 1});
            initiator = true;
            doCall();
        } else {
            sendMessage({"type" : "GETROOM", "value" : ""});
            initiator = false;
        }
    };

    function onChannelMessage(message) {
        processSignalingMessage(message.data);
    };

    function onChannelClosed() {
        channelReady = false;
    };

    function sendMessage(message) {
        var msgString = JSON.stringify(message);
        channel.send(msgString);
    };

    function processSignalingMessage(message) {
        var msg = JSON.parse(message);

        if (msg.type === 'offer') {
            pc.setRemoteDescription(new RTCSessionDescription(msg));
            doAnswer();
        } else if (msg.type === 'answer') {
            pc.setRemoteDescription(new RTCSessionDescription(msg));
        } else if (msg.type === 'candidate') {
            var candidate = new RTCIceCandidate({sdpMLineIndex:msg.label, candidate:msg.candidate});
            pc.addIceCandidate(candidate);
        } else if (msg.type === 'GETROOM') {
            room = msg.value;
            onRoomReceived(room);
        } else if (msg.type === 'WRONGROOM') {
            window.location.href = "/";
        }
    };

    function createPeerConnection() {
        try {
            pc = new RTCPeerConnection(pc_config, null);
            pc.onicecandidate = onIceCandidate;
Until now, the code is very similar to what we used in a typical WebRTC example application. Although, now we will add something new. We will set up a handler for the ondatachannel event of the PeerConnection object. This callback function will be called when the peer asks us to create a data channel and establish a data connection:
            pc.ondatachannel = onDataChannel;
        } catch (e) {
            console.log(e);
            pc = null;
            return;
        }
    };
The handler function is pretty simple. We will store the reference in the data channel and initialize it:
    function onDataChannel(evt) {
        console.log('Received data channel creating request');
        data_channel = evt.channel;
        initDataChannel();
    }
By initializing the data channel, I mean setting up a channel's event handlers:
    function initDataChannel() {
        data_channel.onopen = onChannelStateChange;
        data_channel.onclose = onChannelStateChange;
        data_channel.onmessage = onReceiveMessageCallback;
    }
In the following function, we need to create a new data channel—not when the remote peer is asking us, but when we're the initiator of the peer connection and want to create a new data channel. After we have created a new data channel, we should ask the remote peer to do the same:
    function createDataChannel(role) {
        try {
When we create a new data channel, we can set up a name of the channel. In the following piece of code, we will use the number of the virtual room to name the channel:
            data_channel = pc.createDataChannel("datachannel_"+room+role, null);
        } catch (e) {
            console.log('error creating data channel ' + e);
            return;
        }
        initDataChannel();
    }

    function onIceCandidate(event) {
        if (event.candidate)
            sendMessage({type: 'candidate', label: event.candidate.sdpMLineIndex, id: event.candidate.sdpMid, candidate: event.candidate.candidate});
    };

    function failureCallback(e) {
        console.log("failure callback "+ e.message);
    }

    function doCall() {
When we are playing the role of the connection initiator (caller), we create a new data channel. Then, during the connection establishment, the remote peer will be asked to do the same and the data channel connection will be established:
        createDataChannel("caller");
        pc.createOffer(setLocalAndSendMessage, failureCallback, null);
    };

    function doAnswer() {
        pc.createAnswer(setLocalAndSendMessage, failureCallback, null);
    };

    function setLocalAndSendMessage(sessionDescription) {
        pc.setLocalDescription(sessionDescription);
        sendMessage(sessionDescription);
    };
To send text messages via the data channel, we need to implement the appropriate function. As you can see in the following code, sending data to the data channel is pretty easy:
    function sendDataMessage(data) {
        data_channel.send(data);
    };
The following handler is necessary to print the state of the data channel when it is changed:
    function onChannelStateChange() {
        console.log('Data channel state is: ' + data_channel.readyState);
    }
When the remote peer sends us a message via the data channel, we will parse it and call the appropriate function to show the message on the web page:
    function onReceiveMessageCallback(event) {
        console.log(event);
        try {
            var msg = JSON.parse(event.data);
            if (msg.type === 'chatmessage') onPrivateMessageReceived(msg.txt);
        }
        catch (e) {}
    };
Save the JavaScript file.
Now, start the signaling server and open the HTML file in a web browser—you should see an input field and a button on the page. At the top of the page, you should see a URL to be shared with the remote peer.
On another browser's window, open the sharing link. In the web browser's console, you should see the Data channel state is open message. Now, enter something in the input box and click on the Submit query button. You should see the message printed on another browser's window.
When the application starts, it establishes a connection with the signaling server and gets a virtual room number. Then, another peer starts the application and enters the virtual room. The second peer is the caller. When the peer connection is established, the caller creates a new data channel and another peer receives this event notification. So, both peers get a data channel reference and can use it for data exchanging.
In our example, when the customer enters a message and clicks on the Submit query button, we will wrap the message into a JSON object and send it via the data channel. The remote peer gets the JSON object, parses it to the message, and displays it on the page.
Using data channels, peers can exchange any kind of data. It can be plain text, for example, or binary data. Moreover, the same data channel can be used to exchange different sorts of data between peers. In this recipe, we used JSON to format messages, and every packet has a type field. To send text messages, we used the chatmessage type, but you can use your own custom type system to distinguish messages. You can also use something other than JSON. So, data channels are a good tool to exchange data between peers, using a secure and safe direct connection.