To create a map with Leaflet, you need to do the following four things:
Reference the JavaScript and Cascading Style Sheet (CSS) files
Create a
<div>element to hold the mapCreate a
mapobjectAdd a tile layer (base layer)
Before we get into the details of building the map, let's set up an HTML file that we can use throughout the book. Open a text editor and enter the following HTML:
<!DOCTYPE html><html>
<head><title>Leaflet Essentials</title>
</head>
<body>
</body>
</html>
Save the file as LeafletEssentials.html. We will add to this file throughout the rest of the book.
Tip
Downloading the example code
You can download the example code files for all Packt books you have purchased from your account at http://www.packtpub.com. If you purchased this book elsewhere, you can visit http://www.packtpub.com/support and register to have the files e-mailed directly to you.
There are two ways to load Leaflet into your code: you can either reference a hosted file or download a copy to your local machine and reference that copy. The next two sections will cover how you can set up your environment for a hosted copy or for a local copy.
We will not be making any changes to the original CSS or JS files, so we will link to the hosted version.
In a text editor, open LeafletEssentials.html. In the <head> element, and after the </title> element, add the following code:
<link rel="stylesheet" href="http://cdn.leafletjs.com/leaflet-0.7.3/leaflet.css"0.7.3 />
After the <body> tag, add the following code:
<script src="http://cdn.leafletjs.com/leaflet-0.7.3/Leaflet"></script>
The links are standard HTML for <link> and <script>. Open either link in your browser and you will see the contents of the files.
Using a local copy is the same as a hosted copy, except the path to the files is different. Download Leaflet.js from http://leafletjs.com/download.html and extract it to your desktop. If you downloaded Leaflet-0.7.3.zip, you should have a folder with the same name. In the folder, you will find a subfolder named images and the following three files:
Add the following code in the <head> tag of LeafletEssentials.html:
<link rel="stylesheet"href="\PATH TO DESKTOP\leaflet-0.7.3\leaflet.css" />
Add the following code in the <body> tag of LeafletEssentials.html:
<script src="\leaflet-0.7.3\Leaflet"></script>0.7.3Leaflet
You now have local references to the Leaflet library and CSS. We are using the Leaflet file because it is smaller and will load faster. As long as you do not need to add any code to the file, you can delete the Leaflet-src.js file.
You need a place to put the map. You can accomplished this by creating a <div> tag with an ID that will be referenced by a map object. The <div> tag that is holding the map needs a defined height. The easiest way to give the tag a height is to use CSS in the <div> tag that you created. Add the following code to the <body> tag of LeafletEssentials.html after the <script> reference to the Leaflet file:
<div id="map" style="width: 600px; height: 400px"></div>
Now that you have the references and a place to put the map, it is time to start coding the map using JavaScript. The first step is to create a map object. The map class takes a <div> tag (which you created in the previous step) and options: L.map(div id, options). To create a map object named map, add the following code after the <script> element in LeafletEssentials.html:
var map = L.map('map',{center: [35.10418, -106.62987],
zoom: 10
});
Alternatively, you can shorten the code using the setView() method, which takes the center and zoom options as parameters:
var map = L.map('map').setView([35.10418, -106.62987],10);In the preceding code, you created a new instance of the map class and named it map. You may be used to creating new instances of a class using the keyword new; this is shown in the following code:
var map = new L.Map();
Leaflet implements factories that remove the need for the new keyword. In this example, L.map() has been given the <div> map and two options: center and zoom. These two options position the map on the screen with the latitude and longitude in the center of the <div> element and zoomed in or out at the desired level. The center option takes the [latitude, longitude] parameters, and zoom takes an integer; the larger the number, the tighter the zoom.
The last step to create your first map in Leaflet is to add a tile layer. A tile layer can be thought of as your basemap. It is the imagery that you will add points, lines, and polygons on top of later in the book. Tile layers are a service provided by a tile server. A tile server usually breaks up the layer into 256 x 256 pixel images. You retrieve the images needed based on your location and zoom through a URL that requests /z/x/y.png. Only these tiles are loaded. As you pan and zoom, new tiles are added to your map.
The tile layer, at a minimum, requires the URL to a tile server. In this book, we will use OpenStreetMap for our tile layer.
Note
You need to abide by the terms of service to use OpenStreetMap tiles. The TOS is available at http://wiki.openstreetmap.org/wiki/Tile_usage_policy.
The URL to the OpenStreetMap tile server is shown in the following code:
L.tileLayer('http://{s}.tile.osm.org/{z}/{x}/{y}.png').addTo(map);In the code, we provide the URL template to OpenStreetMaps. We also call the addTo() method so that the layer is drawn. We need to pass L.map() as a parameter to the addTo() function. We named our L.map() instance map in the previous section (var map = L.map()).
Note
Leaflet allows method chaining: the calling of multiple methods on an object at the same time. This is what we did when we put .addTo(map) at the end of the line, creating the instance of L.tileLayer(). The longer way of adding the layer to the map without chaining is to assign the instance to a variable and then call addTo() from the variable, as shown in the following code:
var x = L.tileLayer('http://{s}.tile.osm.org/{z}/{x}/{y}.png');
x.addTo(map);
You now have a complete map that allows you to pan and zoom around the world. Your LeafletEssentials.html file should look like the following code:
<html>
<head><title>Leaflet Essentials</title>
<link rel="stylesheet" href="http://cdn.leafletjs.com/leaflet-0.7.3/leaflet.css" />
</head>
<body>
<script src="http://cdn.leafletjs.com/leaflet-0.7.3/Leaflet"></script>
<div id="map" style="width: 600px; height: 400px"></div>
<script>
var map = L.map('map',
{
center: [35.10418, -106.62987],
zoom: 10
});
L.tileLayer('http://{s}.tile.osm.org/{z}/{x}/{y}.png').addTo(map);
</script>
</body>
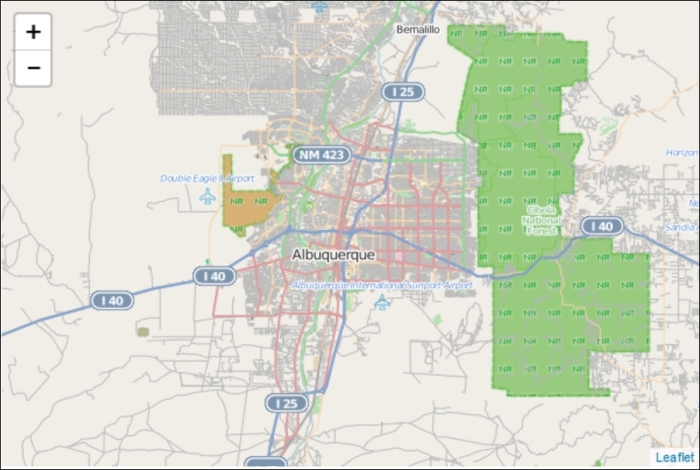
</html>Even with liberal spacing, you were able to build a fully functional map of the world with pan and zoom capabilities in six lines of JavaScript. The following screenshot shows the finished map: