

In this section, we will implement our test case completely in Ruby. Writing a test in a new language can be intimidating, but don't despair because we will walk through and talk about every command we use. This book will not make you a great Ruby developer, but it will get you comfortable enough to write tests on your own!
Note
At this point, it is assumed that you already have Ruby and the selenium-webdriver gem installed on your computer. Please refer to Appendix, Getting Started with Selenium, for step-by-step installation instructions.
Our fully ported test into Ruby looks like this:
require 'rubygems'
require 'selenium-webdriver'

selenium = Selenium::WebDriver.for(:firefox)
selenium.get("http://awful-valentine.com/")
selenium.find_element(:id, "searchinput").clear
selenium.find_element(:id, "searchinput").send_keys("cheese")
selenium.find_element(:id, "searchsubmit").click
selenium.quit
As you can see, there are only a couple of new lines that we didn't see before. The first two lines are require 'rubygems' and require 'selenium-webdriver', which tell the Ruby interpreter that we want to use some gems; specifically, we want to the selenium-webdriver gem:
selenium = Selenium::WebDriver.for(:firefox)
In the preceding line, we request a new instance of the Firefox browser, and store it in the selenium variable. From this point on, we will reference back the selenium variable anytime we wish to give new directions to Firefox browsers. The code is as follows:
selenium.find_element(:id, "searchinput").clear
The preceding line clears any previous text from the search field. This is just a good practice anytime you wish to fill out any text field, because you never know what was left over there after some other test.
Tip
When writing a Selenium test, it is always a good practice to send a clear command into every text field you wish to fill out. Due to the unpredictable nature of JavaScript from browser to browser, the default text might not be cleared before the new desired text is entered by Selenium. By explicitly clearing each field, we avoid test instabilities.
Finally, selenium.quit is the final command of our test, which closes the Firefox browser and stops any WebDriver processes we started at the beginning of our test.
Save our test to a file as search_test.rb, and then run the following command in the terminal:
ruby search_test.rb
Tip
The preceding command assumes that search_test.rb is located in the current directory that your terminal is located in. You may need to look up some basic command-line navigation to find the location of your search_test.rb file.
After you run this command, you will see a Firefox window open; navigate to your website and search for cheese. Congratulations! Our test has been ported from Selenium IDE to Ruby, and we learned some new, fun skills such as simple Ruby commands and command-line navigation in the process!
Now that we have ported our test into Ruby, you probably noticed that even though our test does some stuff, it actually does not really test anything. Yes, it searches for cheese on the website, but it does not actually validate that anything was found or not found. As far as we are concerned, this test is a complete failure, because it not only doesn't test anything useful, but also because it has no failure condition—it will always pass.
We could write some checks in our current script to check that the search page returns the results we care about. However, this is a pretty good time to introduce Test::Unit. The Test::Unit framework is a simple testing framework that comes with Ruby. Testing frameworks allows us to better organize our individual tests and verify that everything on the page looks as expected with built-in methods called assertions.
Note
An assertion is what a test framework uses to confirm that something is a certain way. Assertions need two things to work—an expected outcome and an actual outcome. The expected outcome is defined in the test and the actual outcome is the result from the application when we run the test.
Let's convert our search test to use the Test::Unit framework. We will do this in three steps:
Convert the test file into a
CheeseFinderTestclass that inherits functionality from theTest::Unitframework.Save the new test as
cheese_finder_test.rb.Add an assertion to make the test meaningful.
After completing the first step, our test file will look like this:

As you can see, only a couple of lines in our test case actually changed:
For starters, we pulled in a new
require 'test/unit'gem on line 3Next, we declared a new class on line 5 to be
CheeseFinderTestsFinally, we created a new method called
test_find_some_cheesethat has all of our test codeLet's save this to
cheese_finder_test.rband run the following command in the terminal:ruby cheese_finder_test.rb
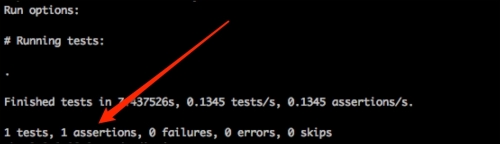
The following screenshot shows the output of the test run. The period (.) character in the middle of output, pointed out by the arrow, represents a single passing test. If a given test fails, you will see an F character in that position:

This is pretty cool, isn't it? We got all of this information about our test by only adding 3 new lines of actual code! As our suite keeps growing, these statistics will continue to change, and the test count should keep going up while failure count should stay down.
However, as we can still see, there are 0 assertions in our test. Let's add some assertions so that we are actually testing something!
Test::Unit comes with many different assertions, and the most commonly used ones are assert and assert_equal to test whether something is true or two items equal each other, respectively. In this test case, we will be using the
assert method to check whether the search for cheese gives the No Results Found message.
Note
A list of all supported assertions can be found at http://ruby-doc.org/stdlib-2.1.0/libdoc/test/unit/rdoc/Test/Unit/Assertions.html.
Let's walk through the individual steps required to add assertions to our tests:
To make this assertion work, we will use the
find_elementmethod we used previously to find theentryclass on the page; theentryDIV will contain all of the search results on the page. The code for this is as follows:selenium.find_element(:class, "entry")Once we find the
entryelement, we can use thetextmethod to get the full string seen on the page:selenium.find_element(:class, "entry").textFinally, we will use the
include?method on the returned text string. This Ruby method returnstrueif the characters we are looking for are present in the string. The code looks something like this:selenium.find_element(:class, "entry").text.include?("No Results Found")After all of this is set up for the assertion, we can now pass in the result of the word search into an assertion. As long as we keep getting No Results Found, our tests will keep passing. Let's take a look at the final version of our test:

Let's rerun our test; we should now see (as shown in the following screenshot) that the assertion count went up from 0 to 1:
Our test is now officially testing the website! But we are not done yet; let's see what will happen when we force it to fail. Let's modify line 13 to expect a different result:
Tip
Never consider a test complete unless you have seen it fail due to incorrect expectations. Often in a rush to get a test complete, we forget to test that it fails when it should, which gives us false green builds. These types of tests are not just useless, but harmful as they give us a false sense of security about the build.
Our modified code looks like the following:

By modifying the expected result to say 5 Results Found, our test will fail in the following manner:

Our test has passed once and failed once, we can officially call it complete!
Note
In the current state of our test, on assertion failure the test suite exits but does not close the Firefox window. This allows us to examine the last page our test finished on. In Chapter 3, Refactoring Tests, we will discuss the teardown method, which will clean up the test environment every time the test finishes.
Nothing is more exciting than to see your tests running, and running fast—really fast! Computers are great at taking bad instructions and running them really fast. The problem, of course, comes from the fact that when something goes wrong it is too fast for you to see it. You will run into a test failure, which no one can explain, almost on a daily basis. Tests, which fail intermittently, can be the source of frustration in your life. But don't despair; there are ways to track them down and fix them.
We will go into detail on how to track down and get rid of intermittent test failures in Chapter 5, Stabilizing the Tests. But in this section, we will take a look at a simple tool built into Ruby, called debug. Since Ruby is an interpreted language, you are able to stop test execution on any of your test environments without any fancy debugging tools. Let's play around with it, I promise it will be fun! Perform the following steps:


We have halted our test execution and entered into the Interactive Ruby Shell (irb), which is a command-line tool for controlling Ruby. This is a great tool for debugging tests, because all of the memory objects are available at your fingertips. You can "quite literally" control your tests from here if you type in the proper commands. Let's take it for a spin.
In the terminal irb session, type in selenium.get("http://seleniumhq.org") and hit the return (Enter) key on the keyboard.
Note
With Ruby 2.X, you will need to press the n + return buttons before you are able to take advantage of the selenium variable. Ruby 2.X tends to halt the execution in the Kernel class, which is one step before line 10 of our test file. By sending the next line command in irb, we step back into the test file and have access to the selenium variable.
Now watch the browser navigate to Selenium's website! You can run clicks, asserts, or anything else your tests can do and more. You are able to walk through your tests one line at the time, step into any method, or completely alter the course of the test. Here are some basic commands on how to control your test:
|
Description |
Command |
|---|---|
|
| |
|
| |
|
Continue |
|
|
|
The debugging tool mentioned here is by far the simplest tool available. It is built into every version of Ruby, but will not give us any fancy features. In compiled languages such as Java or C#, we can rely on the IDE to provide a user interface rich debugger. For a feature-rich debugger in Ruby, check out the Pry gem found at http://pryrepl.org/.