

Now that we have the proper tools installed, we're ready to create our first Flask app. To begin, create a directory somewhere convenient that will hold all of your Python projects. At the command prompt or terminal, navigate to your projects directory; mine is /home/charles/projects, or ~/projects for short on Unix-based systems.
$ mkdir ~/projects
$ cd ~/projects
Now we will create a virtualenv. The commands below will create a new directory named hello_flask inside your projects folder that contains a complete, isolated Python environment.
$ virtualenv hello_flask

New python executable in hello_flask/bin/python2.
Also creating executable in hello_flask/bin/python
Installing setuptools............done.
Installing pip...............done.
$ cd hello_flask
If you list the contents of the hello_flask directory, you will see that it has created several sub-directories, including a bin folder (Scripts on Windows) that contains copies of both Python and pip. The next step is to activate your new virtualenv. The instructions differ depending on whether you are using Windows or Mac OS/Linux. To activate your virtualenv refer to the following screenshot:
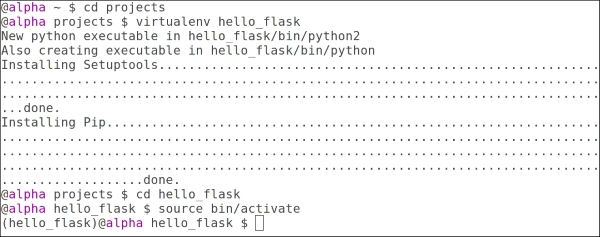
Creating the hello_flask virtualenv
When you activate a virtualenv, your PATH environment variable is temporarily modified to ensure that any packages you install or use are restricted to your virtualenv.
Now that we've verified that our virtualenv is set up correctly, we can install Flask.
When you are inside a virtualenv, you should never install packages with administrator privileges. If you receive a permission error when attempting to install Flask, double-check that you have activated your virtualenv correctly (you should see (hello_flask) in your command prompt).
(hello_flask) $ pip install Flask
You will see some text scroll by as pip downloads the Flask package and the related dependencies before installing it into your virtualenv. Flask depends on a couple of additional third-party libraries, which pip will automatically download and install for you. Let's verify that everything is installed properly:
(hello_flask) $ python
>>> import flask
>>> flask.__version__
'0.10.1'
>>> flask
<module 'flask' from '/home/charles/projects/hello_flask/lib/python2.7/site-packages/flask/__init__.pyc'>
Congratulations! You've installed Flask and now we are ready to start coding.
Create a new file in the hello_flask virtualenv named app.py. Using your favorite text editor or IDE, enter the following code:
from flask import Flask

app = Flask(__name__)

@app.route('/')
def index():
    return 'Hello, Flask!'

if __name__ == '__main__':
    app.run(debug=True)
Save the file and then execute app.py by running it from the command line. You will need to ensure that you have activated the hello_flask virtualenv:
$ cd ~/projects/hello_flask
(hello_flask) $ python app.py
* Running on http://127.0.0.1:5000/
Open your favorite web-browser and navigate to the URL displayed (http://127.0.0.1:5000). You should see the message Hello, Flask! displayed on a blank white page. By default, the Flask development server runs locally on 127.0.0.1, bound to port 5000.

Your first Flask app.
We just created a very basic Flask app. To understand what's happening let's take this code apart line-by-line.
from flask import Flask
Our app begins by importing the Flask class. This class represents a single WSGI application and is the central object in any Flask project.
WSGI is the Python standard web server interface, defined in PEP 333. You can think of WSGI as a set of behaviors and methods that, when implemented, allow your web app to just work with a large number of webservers. Flask handles all the implementation details for you, so you can focus on writing you web app.
app = Flask(__name__)
In this line, we create an application instance in the variable app and pass it the name of our module. The variable app can of course be anything, however app is a common convention for most Flask applications. The application instance is the central registry for things such as views, URL routes, template configuration, and much more. We provide the name of the current module so that the application is able to find resources by looking inside the current folder. This will be important later when we want to render templates or serve static files.
@app.route('/')def index():return 'Hello, Flask!'
In the preceding lines, we are instructing our Flask app to route all requests for / (the root URL) to this view function (index). A view is simply a function or a method that returns a response of some kind. Whenever you open a browser and navigate to the root URL of our app, Flask will call this view function and send the return value to the browser.
There are a few things to note about these lines of code:
@app.routeis a Python decorator from theappvariable defined above. This decorator (app.route) wraps the following function, in this case,index, in order to route requests for a particular URL to a particular view. Index is chosen as the name for the function here, as it's the common name for the first page that a web server uses. Other examples could be homepage or main. Decorators are a rich and interesting subject for Python developers, so if you are not familiar with them, I recommend using your favorite search engine to find a good tutorial.The
indexfunction takes no arguments. This might seem odd if you are coming from other web-frameworks and were expecting a request object or something similar. We will see in the following examples how to access values from the request.The
indexfunction returns a plain string object. In later examples, we will see how to render templates to return HTML.The following lines execute our app using the built-in development server in debug mode. The 'if' statement is a common Python convention that ensures that the app will only be run when we run our script via python
app.py, and will not run if we try to import this app from another Python file.if __name__ == '__main__': app.run(debug=True)
Right now our Flask app isn't much fun, so let's look at the different ways in which we can add more interesting behavior to our web app. One common way is to add responsive behavior so that our app will look at values in the URL and handle them. Let's add a new route to our Hello Flask app called hello. This new route will display a greeting to the person whose name appears in the URL:
from flask import Flask
app = Flask(__name__)
@app.route('/')
def index():
    return 'Hello, Flask!'
@app.route('/hello/<name>')
def hello(name):
return 'Hello, %s' % name
if __name__ == '__main__':
app.run(debug=True)Again, let's run our app and open it up in a web browser. We can now navigate to a URL such as http://127.0.0.1/hello/Charlie and see our custom message:

Our Flask app displaying a custom message
In the preceding example, the route we added specifies a single parameter: name. This parameter also appears in the function declaration as the sole argument. Flask is automatically matching the URL /hello/Charlie to the hello view; this is known as mapping. It then passes the string Charlie into our view function as an argument.
What happens if we navigate to http://127.0.0.1:5000/hello/ without specifying a name? As you can see, the Flask development server will return a 404 response, indicating that the URL did not match any known routes.
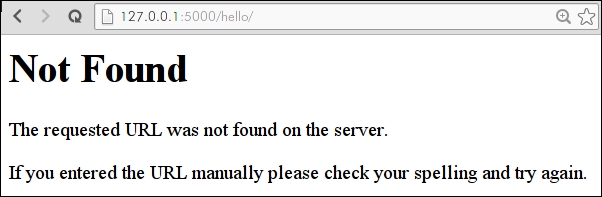
Flask 404 page
In addition to the URL, values can be passed to your app in the query string. The query string is made up of arbitrary keys and values that are tacked onto the URL, using a question-mark:
|
URL |
Argument Values |
|---|---|
|
|
name: Charlie |
|
|
name: Charlie favorite_color: green |
In order to access these values inside your view functions, Flask provides a request object that encapsulates all sorts of information about the current HTTP request. In the following example, we will modify our hello view to also respond to names passed in via the query string. If no name is specified either on the query-string or in the URL, we will return a 404.
from flask import Flask, abort, request

app = Flask(__name__)

@app.route('/')
def index():
    return 'Hello, Flask!'

@app.route('/hello/<name>')
@app.route('/hello/')
def hello(name=None):
    if name is None:
        # If no name is specified in the URL, attempt to retrieve it
        # from the query string.
        name = request.args.get('name')
        if name:
            return 'Hello, %s' % name
    else:
        # No name was specified in the URL or the query string.
        abort(404)

if __name__ == '__main__':
    app.run(debug=True)
As you can see, we have added another route decorator to our hello view: Flask allows you to map multiple URL routes to the same view. Because our new route does not contain a name parameter, we need to modify the argument signature of our view function to make name an optional parameter, which we accomplish by providing a default value of None.
The function body of our view has also been modified to check for the presence of a name in the URL. If no name is specified, we will abort with a 404 page not found status code.

Greet someone using the query string
It is inevitable that, sooner or later, we will introduce a bug into our code. Since bugs are inevitable, the best thing we can hope for as developers is good tools that help us diagnose and fix bugs quickly. Luckily, Flask comes bundled with an extremely powerful web-based debugger. The Flask debugger makes it possible to introspect the state of your application the moment an error occurs, removing the need to sprinkle in print statements or breakpoints.
This can be enabled by telling the Flask app to run in debug mode at run time. We can do this in a few ways but we have actually already done this through the following code:
if __name__ == '__main__':
    app.run(debug=True)
In order to try it out, let's introduce a bug to the hello_flask app by creating a typo. Here I have simply deleted the trailing e from the variable name:
@app.route('/hello/<name>')
@app.route('/hello/')
def hello(name=None):
    if nam is None:
        # No name was specified in the URL or the query string.
        abort(404)
When we fire up the development server and attempt to access our view, we are now presented with the debugging page:
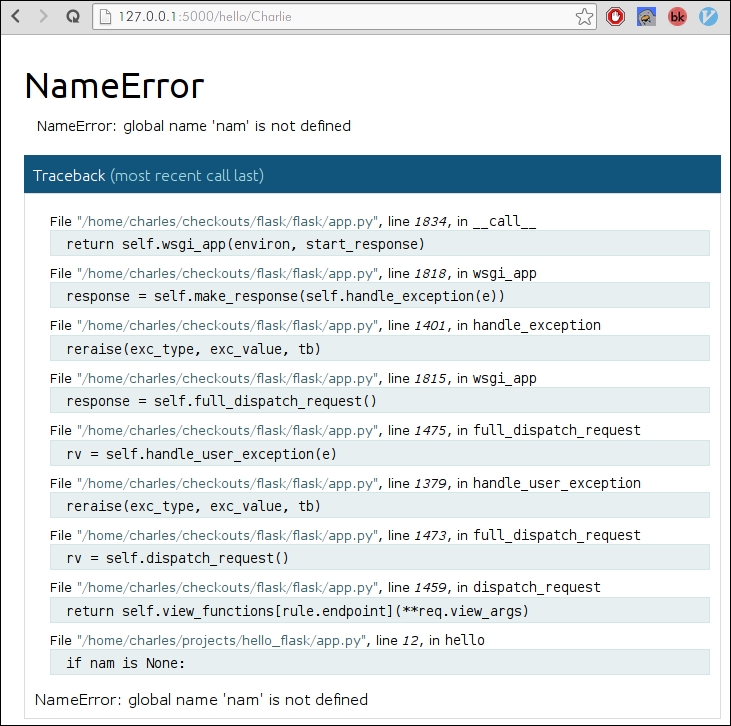
The Flask interactive debugger running in a web browser
This list of code is called a Traceback and it is made up of the call stack, the nested list of function calls that preceded the actual error. The traceback usually provides a very good clue as to what may have happened. At the very bottom we see the line of code we intentionally mistyped along with the actual Python error, which is a NameError exception telling us that nam is not defined.

Traceback detail showing our typo and a description of the error
The real magic happens when you place your mouse on the highlighted line with the mouse. On the right-hand side you will see two small icons representing a terminal and a source code file. Clicking the Source Code icon will expand the source code surrounding the line that contained the error. This is very useful for establishing some context when interpreting an error.
The terminal icon is the most interesting. When you click the Terminal icon, a small console appears with the standard Python prompt. This prompt allows you to inspect, in real-time, the values of the local variables at the time of the exception. Try typing in name and hitting Enter—it should display the value, if any, that was specified in the URL. We can also introspect the current request arguments as follows:

Introspecting variables using the debugging console
As you work through the chapters and experiment on your own, being able to quickly diagnose and correct any bugs will be an extremely valuable skill. We will return to the interactive debugger in Chapter 8, Testing Flask Apps but, for now, be aware that it exists and can be used to introspect your code when and where it breaks.