
Over the rest of this book, we will be building, enhancing, and deploying a programmer-friendly blogging site. This project will introduce you to the most common web development tasks, such as working with relational databases, processing and validating form data, and (everyone's favorite), testing. In each chapter, you will learn a new skill through practical, hands-on coding projects. In the following table, I've listed a brief description of the core skills paired with the corresponding features of the blog:
It's always a good idea when starting a large project to have a functional specification in mind. For the blogging site, our spec will simply be the list of features that we want our blog to have. These features are based on my experience in building my personal blog:
Entries should be entered using web-based interfaces. For formatting, the author can use Markdown, a lightweight, visually appealing markup language.
Images can be uploaded to the site and easily embedded in blog entries.
Entries can be organized using any number of tags.
The site should support multiple authors.
Entries can be displayed in order of publication, but also listed by month, by tag, or by author. Long lists of entries will be paginated.
Entries can be saved as drafts and viewed by their author but nobody else until they are published.
Visitors to the site can post comments on entries, which will be checked for spam and then left to the author's discretion as to whether they should remain visible.
Atom feeds will be made available for all posts, including separate feeds for each author and tag.
Entries can be accessed using a RESTful API. Authors will be given an API token that will allow them to modify entries using the API.
While this list is not exhaustive, it covers the core functionality of our blogging site and you will hopefully find it both fun and challenging to build. At the end of the book, I will present some ideas for additional features that you might add, but first you need to become comfortable working with Flask. I'm sure you're eager to get started, so let's set up our blogging project.
Let's start by creating a new project within our working directory; on my laptop this is /home/charles/projects, or on a Unix system ~/projects, for short. This is exactly what we did when we created the hello_flask app:
$ cd ~/projects
$ mkdir blog
$ cd blog
We will then need to set up our virtualenv environment. This differs from what we did earlier as this is a more structured way of using virtualenv:
$ virtualenv blog
The next step will be to install Flask into our virtualenv. To do this, we will activate the virtualenv and use pip to install Flask:
$ source blog/bin/activate
(blog) $ pip install Flask
Up until now, all of this should be somewhat familiar to you. However, instead of creating a single file for our app, which we are definitely allowed to do and that makes sense for very small apps, we can also create a new folder named app that will allow us to make our app modular and more logical. Inside that folder, we will create five empty files named __init__.py, app.py, config.py, main.py, and views.py as follows:
mkdir app
touch app/{__init__,app,config,main,views}.py
This last command uses a little trick of your shell to create multiple files with the names within the brackets. If you use version control, you will want to treat the app directory as the root of your repository. The app directory will contain the source code, templates, and static assets for the blog app. If you haven't used version control, now would be a great time to give it a try. Pro Git is a great resource and is available for free at http://git-scm.com/book.
What are these files that we just created? As you will see, each file serves an important purpose. Hopefully their names provide a clue as to their purpose, but here is a brief overview of each module's responsibility:
|
|
Tells Python to use the app/ directory as a python package |
|
|
The Flask app |
|
|
Configuration variables for our Flask app |
|
|
Entry-point for executing our application |
|
|
URL routes and views for the app |
Let's fill in these files with the minimum amount of code needed to create a runnable Flask app. This will get our project in good shape for the second chapter, in which we'll start working on the code to store and retrieve blog entries from the database.
We will start with the config.py module. This module will contain a Configuration class that instructs Flask that we want to run our app in the DEBUG mode. Add the following two lines of code to the config.py module as follows:
class Configuration(object):
    DEBUG = True
Next we will create our Flask app and instruct it to use the configuration values specified in the config module. Add the following code to the app.py module:
from flask import Flask

from config import Configuration  # import our configuration data.

app = Flask(__name__)
app.config.from_object(Configuration)  # use values from our Configuration object.
The views module will contain a single view mapped to the root URL of the site. Add the following code to views.py:
from app import app

@app.route('/')
def homepage():
    return 'Home page'
As you probably noticed, we are still missing our call to app.run(). We will put that code in main.py, which we will use as the entry-point into our app. Add the following code to the main.py module:
from app import app  # import our Flask app
import views

if __name__ == '__main__':
    app.run()
We do not call app.run(debug=True) because we have already instructed Flask to run our app in the debug mode in the Configuration object.
You can run the app from the command-line by executing the main module as follows:
$ python main.py
 * Running on http://127.0.0.1:5000/
* Restarting with reloader
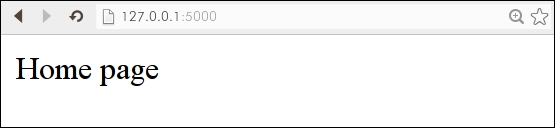
From humble beginnings...
Other than the Configuration class, most of this code should look familiar to you. We have basically taken the code from the hello_flask example and separated it into several modules. It may seem silly to write only two or three lines of code per file, but as our project grows you will see how this early commitment to organization pays off.
You may have noticed that there is an internal prioritization to these files, based on the order in which they are imported—this is to mitigate the possibility of a circular import. A circular import occurs when two modules mutually import each other and, hence, cannot be imported at all. When using the Flask framework, it is very easy to create circular imports because so many different things depend on the central app object. To avoid problems, some people just put everything into a single module. This works fine for smaller apps, but is not maintainable beyond a certain size or complexity. That is why we have broken our app into several modules and created a single entry-point that controls the ordering of imports.
Execution starts when you run python main.py from the command line. The first line of code that the Python interpreter runs into imports the app object from the app module. Now we're inside app.py, which imports Flask and our Configuration object. The rest of the app.py module is read and interpreted, and we're back into main.py again. The second line of main.py imports the views module. Now we're in views.py, which depends on app.py for @app.route and is, in fact, already available from main.py. The URL route and view are registered as the views module is interpreted, and we're back into main.py again. Since we are running main.py directly, the 'if' check will evaluate to True and our app will run.
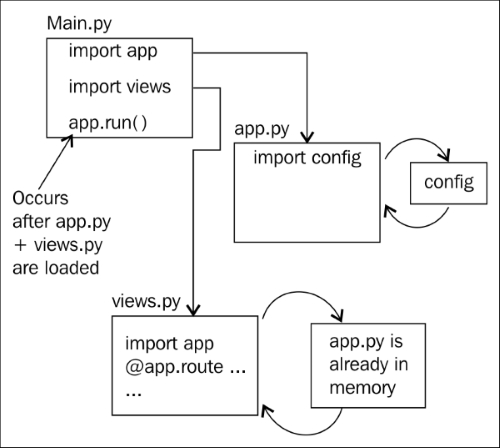
Import flow when executing main.py