

All web frameworks that are useful allow you to process forms. We have a route that we have not tested yet, which is app.post('/login', routes.loginProcess);. We have only been using and testing GET routes, so let's build a form and then do something with it.
We will create the form on the /login GET request. Before we modify our template, we will need some local styles that extend Bootstrap. Firstly, create a file that is called style.css in static/css, and add the following styles to it:
.facebook {background: #3b5998; color: #ffffff;}
.google {background: #dd4b39; color: #ffffff;}
.top-margin {margin-top: 20px;}
These are the styles that we will use to extend base Bootstrap. The styles are mainly for making sure that we color our social buttons correctly.
Please don't forget to add this to our layout:
<link rel="stylesheet" href="css/style.css">
We can now create our login form, which you can do by opening up login.ejs in login.ejs and adding the following code:
<div class="row">
<div class="col-sm-8 col-sm-offset-2">
<div class="row">
<div class="col-sm-12">
<form method="post">
<div class="form-group">
<label for="username">Username</label>
<input type="text" class="form-control" id="username" placeholder="username" name="username">
</div>
<div class="form-group">
<label for="password">Password</label>
<input type="password" class="form-control" id="password" placeholder="password" name="password">
</div>
<button class="btn btn-primary btn-block">Login</button>
</div>
</form>
</div>
<div class="row top-margin">
<div class="col-sm-6">
<button class="btn btn-block facebook"><i class="fa fa-facebook"></i> Facebook</button>
</div>
<div class="col-sm-6">
<button class="btn btn-block google"><i class="fa fa-google-plus"></i> Google</button>
</div>
</div>
</div>
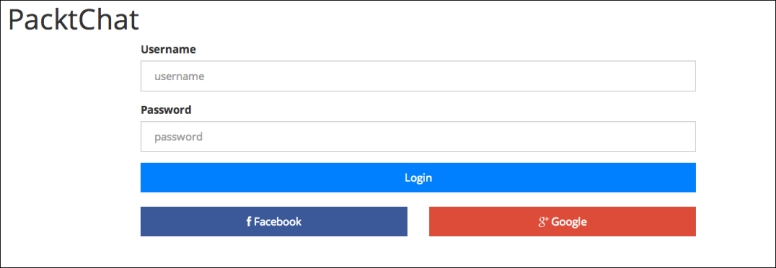
</div>We will not spend a lot of time on all the classes for the elements because the Bootstrap documents are a quick-and-easy read if you are looking for a quick reference of each class. We should now have a nice-looking form, as shown in the following screenshot, although it cannot currently do much:
Note
This should demonstrate why using Bootstrap can get your app running quickly. I am only using around a dozen different classes, and already, the form does not look like the basic browser style.
The form will make a POST request to /login, with the route responding with a redirect back to root. Express is not doing anything with our POST info, so let's change it.
We will first need to add a new piece of middleware (you should be seeing a trend now). Without parsing the body, our POST request will not see the data that we are sending. Add this variable declaration and middleware to the stack:
//variable declarations
var bodyParser = require('body-parser');
//middleware stack right after session
app.use(bodyParser.json());
app.use(bodyParser.urlencoded({extended: false}));
The middleware will process POST data that has a content type of application/json and application/x-www-form-urlencoded. We do not have the middleware for multipart as it can lead to a denial-of-service (DOS) attack. The multipart middleware creates a new tmp file for each new request, which can eventually kill your server. Since we are not processing files, we do not need to include it. The reason we do not use it is because it is merely a reference to all three of the parsers, as you can see in the following code line:
app.use(bodyParser());
Let's make sure that this is working how we expect it to. Open up the index.js file from routes and modify the loginProcess function to the following:
function loginProcess(req, res){
  console.log(req.body);
  res.send(req.body.username + ' ' + req.body.password);
};
Now, each post should show us what was entered into the form, instead of redirecting and writing it to the console. We can use the form we created, or we can use curl. Curl should be available if you are using Mac OS X or Linux, although it can be installed on Windows. Run the command below and check your node console:
$ curl -X POST -H "Content-Type: application/json" -d '{"username":"josh","password":"password"}' http://localhost:3000/login
It should log { username: 'josh', password: 'password' } in the console. Let's test a URL encoded form now, so run the following curl command:
$ curl -X POST -H "Content-Type: application/x-www-form-urlencoded" -d 'username=josh&password=password' http://localhost:3000/login
It should log { username: 'josh', password: 'password' } in exactly the same way as the json request.
We have just built a form that will post back to itself and then parse out the form values.
We are missing one huge security piece—the Cross-Site Request Forgery (CSRF) protection. Anyone can create a form and then tell it to process against our site. As far as Express is concerned, it is just another request, which is where CSRF comes in. It is essentially a token that is put into the form and a store on the server in the session. When the form is submitted, the server checks the token. If they do not match, the server knows the form is not from us and rejects it. It is time to implement it!
First, we add a..., you've got it, a middleware! Add the following code after your session and body parsing middleware:
//variable declarations
Var csrf = require('csurf');
//middleware stack
app.use(bodyParser.json());
app.use(bodyParser.urlencoded());
app.use(csrf());
By doing this, it will add the CSRF token to our session.
With CSRF loaded, let's try to submit our form using the POST method. As you can see in the following screenshot, we get the error Something broke. What did you do?

The CSRF middleware threw a 403 status code forbidden error. Our CSRF protection is working exactly as planned as we did not add the token to the form. This is exactly what will happen if someone with nefarious purposes tried to submit a form against our site with the token.
To fix this, let's add another piece of middleware (note that our app is 90 percent middleware and only 10 percent views). We will create a utility function file by creating a utilities.js file under the middleware directory. Inside this file, add the following:
module.exports.csrf = function csrf(req, res, next){
  res.locals.token = req.csrfToken();
  next();
};
Res.locals is a special object that is available to all templates that have access to this response. It will make all of its attributes available for the template to use. This is great for middleware as the only other way that we covered to get variables to the template was by passing them in through render(). Create a new variable at the top of app.js:
Var util = require('./middleware/utilities');Add it as middleware directly under our CSRF middleware:
app.use(csrf());
app.use(util.csrf);
It seems a little redundant to add two straight CSRF middlewares, but they serve different functions. The first is the built-in middleware that will add the token to the session. The other is our utility that will take it from the session and make it available to the template. Maintainable middleware should have one simple single focus.
We can now edit our form to send this token, so right under the form declaration, add the following input tag:
<input type="hidden" name="_csrf" value="<%= token %>">
Note
If you get errors while following along, I can almost guarantee that it is a middleware out-of-order issue. If you try to set the CSRF token in the session before the session is added to the request, you will get an error. When errors arise, step through your middleware and make sure that they are being executed in the correct order.
Our forms should now process and our middle stack should look similar to the following code:
app.use(partials());
app.use(log.logger);
app.use(express.static(__dirname + '/static'));
app.use(cookieParser('secret'));
app.use(session({
  secret: 'secret',
  saveUninitialized: true,
  resave: true,
  store: new RedisStore(
    {url: 'redis://localhost'})
  })
);app.use(bodyParser.json());
app.use(bodyParser.urlencoded());
app.use(csrf());
app.use(util.csrf);
app.get('/', routes.index);
app.get('/login', routes.login);
app.post('/login', routes.loginProcess);
app.get('/chat', routes.chat);
app.use(errorHandlers.error);
app.use(errorHandlers.notFound);
We have now learned all the basic building blocks of using Express. We will now take them and see how to build a functioning site.