
The Ghost hosting interface is deliberately simple, ensuring there are no confusing options to slow down your installation. Setup is as easy as hitting the New Blog button, filling in your preferred blog title, and clicking on the Create New Blog button. That's it!
As soon as you have installed Ghost online, there is one thing that you must do immediately and without delay: register your blog's owner user account.
With Ghost(Pro), you have an overall account you log into at http://ghost.org; however, you'll also need a user account for each Ghost blog you create in order to log into their individual admin areas.
Some hosts will take care of this user account setup as part of the installation process, but most will not.
The minute you have finished your installation, you should go to: http://<yourdomain.ghost.io>/ghost/signup/, which will look something like the following screenshot:

Once there, fill in your name, e-mail address, and password and then click on SIGN UP to create your user account.
You must complete this step immediately because until you do that, the form will be open for anyone to come along and create a user account.
Now that your account is created, go ahead and log in.
After you've logged into your account, you're ready to configure some basic settings. The available settings are very simple, so there's not a lot you'll need to do at this stage.
Ghost currently has two settings areas: General and User. Both the settings can be accessed via the Settings tab in the top admin menu. The panels are both fairly self-explanatory, so this will be a brief overview to point out the various features.
Let's first have a look at the general settings:
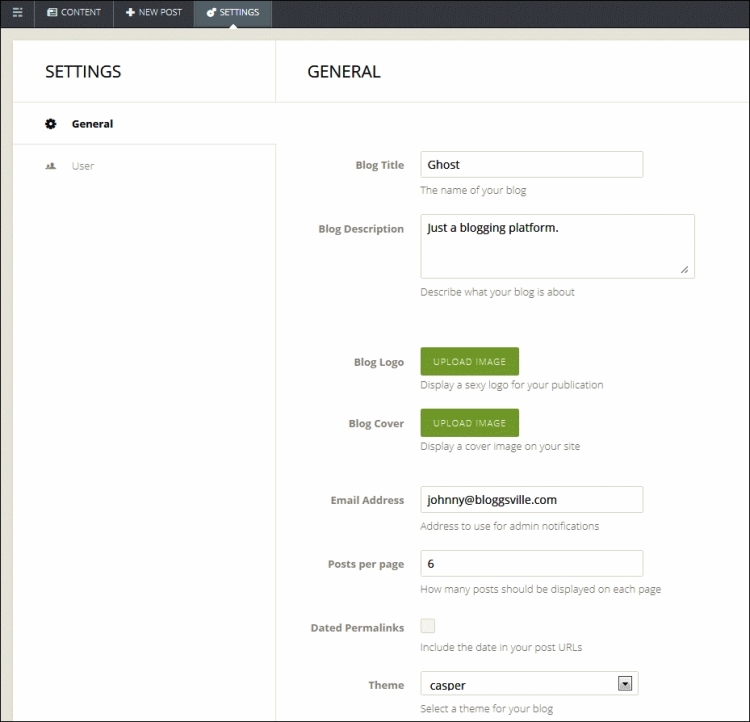
The general settings are as follows:
Blog Title: This will be used by most themes in the header as well as sometimes in the footer. Ghost will also output your Blog Title in your site's
<title>tags.Blog Description: This will also tend to appear in the header of most themes. Ghost will output your Blog Description in the description metatag of your site.
Blog Logo: The blog logo is typically positioned in the header or the top of the sidebar in most themes. To add a custom logo, click on the green Upload Image button next to the Blog Logo label.
Blog Cover: Not all themes use the blog cover image, but those that do, tend to use it as a background for large headers or as the background for the entire site. To add a custom block cover image, click on the green Upload Image button next to the Blog Cover label.
Email Address: This is the e-mail address to which you'll receive admin-related notifications.
Posts per page: This can be set to determine how many posts a user can see before needing to click through to the next page. This affects post listings on the home page and on tag pages.
Dated permalinks: If checked, this option will add the date of publishing to post permalinks in the
<yourdomain>.com/YYYY/MM/DD/post-title/format.Theme: This option will allow you to choose from any themes that were in your blog's
content/themesdirectory when it was last started up. Note that new themes uploaded to this directory won't be seen until Ghost is restarted.
After making any changes to these settings, click on the blue Save button in the top-right corner of the screen.
This section has two main purposes. One is to give you the ability to change your password; you'll see the fields that allow you to do so at the bottom of the page. The other is to enter information that your theme can display in the author profile area on single posts of your blog.
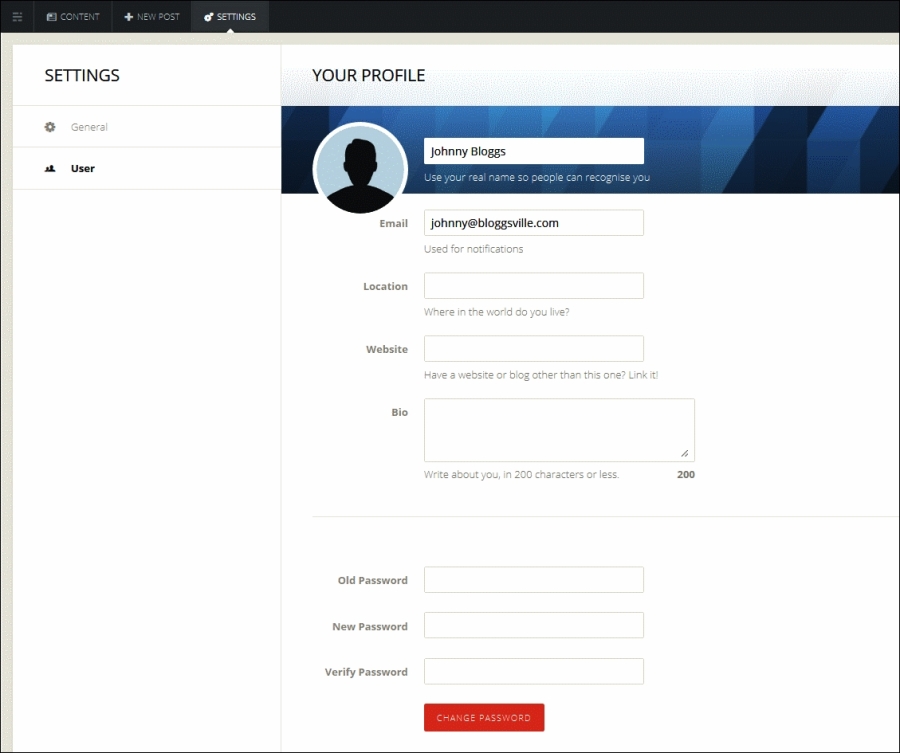
The author profile settings are as follows.
Author Image: In the little circle at the top-left of the user settings, you'll see the author image. To add your own, click on this circle and an uploading window will appear.
Author Cover: This is an image similar to the Blog Cover image that can be used by the theme on single posts. It would seem likely that this image may be designed to appear on author profile pages once their functionality is included in Ghost. Click on the Change Cover button in the bottom-right corner of the cover image preview to change it.
Author Name: Fill in the name here that you'd like to have displayed publicly as the author of your posts.
Email: This is a required field; however, it can use a different e-mail address than your main admin e-mail. Be aware that this address may be displayed in your author profile on some themes.
Location: Again, the location you enter here will appear in your author profile area should you want people to know where you live. If not, leave this blank.
Website: Add the URL of any other website of yours you'd like people to know about. Most themes will include a hyperlinked display of this URL in the author section of your single posts.
Bio: Include up to 200 characters about yourself to have included in your single post author section.