
Now that we have the compiler installed, let's start writing some code. This wouldn't be a good technical book without the inclusion of "Hello World" to get you started with writing code in a new language. The code for this particular example is pretty simple, but we can use it to demonstrate some of the early benefits of switching to TypeScript.
The TypeScript compiler is nothing more than JavaScript code; it is possible to compile your TypeScript anywhere that a JavaScript host exists. Earlier, we saw that an executable was provided that allows us to compile our code from the command line. We will walk through this first example using this executable and discover how simple it is to get going with TypeScript. To get started, let's create a new file on the filesystem and call it HelloWorld.ts. The following code creates a new HTML paragraph element and sets the text to the value of a pair strings concatenated together:
var p = document.createElement('p');
var hello: string = "Hello";
var world: string = 2;
p.textContent = hello + " " + world;

document.body.appendChild(p);
For the most part, this looks like plain old JavaScript. However, if you pay close attention to the declaration of the hello and world variables, you will see something new. After the variable names, you will see that they are now given the type of string. This type annotation tells the compiler to always treat the variables hello and world as strings; however, in this case, the compiler can infer these types from their initial values. Every other reference to these variables will be able to assume that all of the properties and methods of an object of the type string will be accessible. This allows IDEs to provide intelligent code completion as well as visually alert us if we are performing an action that the compiler is going to fail on. Now let's verify that this code compiles and analyze the JavaScript that the compiler outputs.
Tip
Downloading the example code
You can download the example code files for all Packt books you have purchased from your account at http://www.packtpub.com. If you purchased this book elsewhere, you can visit http://www.packtpub.com/support and register to have the files e-mailed directly to you.
Launch an instance of the command prompt and browse to the directory where you created the HelloWorld.ts file. From here, running the compiler is as simple as typing the following:
tsc HelloWorld.ts
This generates the following output:

As you can see, the compiler recognizes that we typed the world variable as string and then tried to assign a numeric value to it. While that would have been legal JavaScript, it could lead to data errors later when another piece of code is expecting world to be string. So let's go back to the TypeScript file and modify the value we are assigning to world and run the compiler again:
var world: string = "World!";
Success! Our code has successfully made it through the TypeScript compiler and it generated a JavaScript file by the name of HelloWorld.js. If you open up this file, you will find the resulting code that will be deployed and run on the client. As you can see, the type annotations were stripped out of the final code, while maintaining a one-to-one mapping between our TypeScript code and the resulting JavaScript code, because they are not actually part of the JavaScript language specification:
  var p = document.createElement('p');
var hello = "Hello";
var world = "World!";
p.textContent = hello + " " + world;

document.body.appendChild(p);
Now that we have our JavaScript generated, we need to test it. The first thing our code is attempting to do is to create a new HTML paragraph element. So we will need to generate an HTML file to load our code and be available for manipulation. Then two parts of a message are concatenated together and assigned to the text value of the paragraph element that has just been created. Finally, the paragraph element is appended to the body of the HTML document. The following HTML code will load our generated JavaScript file:
<html>
<head>
    <title>Hello World</title>
</head>
<body>
    <script src="HelloWorld.js" ></script>
</body>
</html>
Note
In general, script tags should be included within the <head> tag, not in the main <body> tag. In this case, our code is dependent upon the DOM being ready for our code to execute successfully.
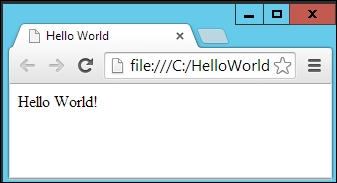
Opening the HTML file in a browser will result in the immediate execution of our code when the document's body loads. As you can see in the following screenshot, our paragraph was added to the HTML on the page and Hello World! is displayed:
So as you can see, creating and compiling TypeScript applications is just as easy as creating a basic JavaScript application. However, running the compiler from the command line will become cumbersome as the applications you develop grow in size and complexity. So let's go over setting up a TypeScript project in Visual Studio and get the Hello World application running in a web-based project.
Now that we have created a simple application and discovered how TypeScript generates JavaScript that can be deployed, let's cover the integration with Visual Studio or Visual Studio Express, which is a free version of Visual Studio available at http://www.visualstudio.com/en-us/products/visual-studio-express-vs.aspx. Once you have the Visual Studio tooling installed for TypeScript, you will be able to create new projects that are set up to use our new language of choice.
To create a new project that includes TypeScript, go to the File menu and navigate to New | Project. In the New Project window, you will see a list of installed templates. There is now a new section named TypeScript; select this section and you will see all of the available project templates that can be used to create TypeScript applications.
Note
The location of this template may vary depending on the version of Visual Studio installed. If the TypeScript section is not available, use the search function of the project template selector.
This does not mean that TypeScript can only be added to these project types—you can add TypeScript files to any existing project. For our examples, we will be using the HTML Application with TypeScript project template, so let's select that and create our new application:

Once the project has been created you will notice a few things right away. First, a default TypeScript file and HTML file have been created to host our new application. There is also a web.config and CSS file to host your application styles. All of these elements should seem pretty familiar to you, except the TypeScript file, which is there in place of a JavaScript file.
Now that our project has been created we need to move our code in. Copy the code from HelloWorld.ts into app.ts and do the same with the HTML that was generated. Change the script tag's source attribute to app.js to reference the new location of our code and run the application. The output displayed should be the same.
Visual Studio has provided a seamless integration with TypeScript and provides a large variety of configuration options. Let's take a look at the project build options first and get a feel for the different things that TypeScript can generate when it is being compiled. To find the build options, right-click on the project in the solution explorer and select Properties from the context menu. As you can see in the following screenshot, we are able to manipulate a large number of the compiler options we saw earlier:

From the build settings you can see that we have the ability to change which version of JavaScript we want to compile our TypeScript into: ECMAScript 5 or ECMAScript 3.
Tip
JavaScript is now formally known as ECMAScript but it is still commonly referred to as its original name.
You also have the option for compiling TypeScript files when you save changes to them. This is a helpful option because when a TypeScript file is compiled so are all other TypeScript files that it references. This is a helpful feature when you have only a few files being referenced, but as your applications grow and the dependency trees become more complex you could run into performance issues. Allowing implicit "any" types tells the compiler not to fail if an object's type is not given or cannot be implied. Unchecking this option is the easiest way to force yourself to fully embrace the type system. Although you may run across some scenarios where an "any" type is inevitable they should be very rare. This can be done by providing a type annotation as shown here:
var explicitAny: any;
We also have the ability to change the module system we want to use when our JavaScript code is generated. We will discuss modules and the differences between each of our available options later on, but it is important to be aware of this option because it could drastically change the way our final code looks.
The output section gives us a variety of options for what the final output from the compiler will be. Commenting code is a very useful way of making it maintainable, but this can bloat the size of a JavaScript file. This could cause performance problems when downloading the code to a remote client over the web. Since Visual Studio gives us the ability to define different compiler options for different build configurations, we could allow the comments to remain in the output for debugging while removing them for release builds. The Combine JavaScript output into file option allows us to combine all of our generated code into a single output file. This becomes incredibly useful as the number of files in our project grows and there are a lot of network calls taking place to get each file one at a time.
We also have the ability to change the output path of the generated JavaScript. This gives us the ability to push changes directly into a test environment upon successful compilation without ever having to bring down the site or manually copy files to the deployment location. The last option in the output section is a very interesting one. Checking the Generate declaration files option will create declaration files for each of the types you create. These declaration files can then be referenced by other TypeScript files to provide a type definition for objects of a specific type. We will discuss declaration files in more depth later on in the book.
The final section is related to how we want to debug our TypeScript code. We have the ability to generate source maps and the directory in which they should be deployed to. Source maps provide a way for debugging combined and minified JavaScript code. They are particularly helpful when debugging code that has been pushed into production by creating a way to make the JavaScript readable, however, in TypeScript they also provide us with a way back to the original TypeScript code. The final option specifies where the TypeScript files are located; this will allow debugging from inside of Visual Studio directly. In most scenarios, the default option here will suffice.