

The best way to present AngularJS is to explore a couple of examples first. I will then introduce the key AngularJS concepts showcased in these examples.
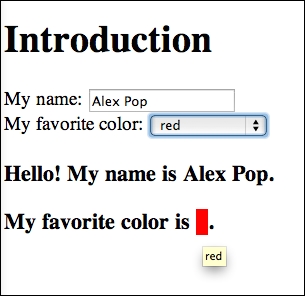
Let's compare and contrast an example of a web page built with jQuery against an example of the same page built with AngularJS. The web page allows the user to enter a name and select a favorite color, and it will display formatted markup that reflects the entered values. The end result is shown in the next screenshot:
The following first code example is jQuery-based, with initial HTML content and additional behavior injected into the $(document).ready() event:
<!DOCTYPE html>
<html>
<head>
<meta charset="utf-8" />
<title>Chapter1 Example1</title>
<script src="http://code.jquery.com/jquery-1.11.0.min.js"></script>
</head>
<body>
<h1>Introduction</h1>
<label>My name:</label>
<input id="input-name" type="text" placeholder="Please enter name" />
<br />
<label>My favorite color:</label>
<select id="select-color">
<option>Please select</option>
<option>red</option>
<option>yellow</option>
<option>magenta</option>
</select>
<h3 id="heading-name" style="display:none">Hello! My name is <span id="span-name"></span>.</h3>
<h3 id="heading-color" style="display:none">
My favorite color is <span id="span-color"> </span>.</h3>
<script>
$(document).ready(function() {
$("#input-name").keyup(function() {
var name = $("#input-name").val();
if (name) {
$("#span-name").text(name);
$("#heading-name").show();
} else {
$("#heading-name").hide();
}
});
$("#select-color").change(function() {
var color = $("#select-color").val();
if (color != "Please select") {
$("#span-color").css('background-color', color);
$("#span-color").attr('title', color);
$("#heading-color").show();
} else {
$("#heading-color").hide();
}
});
});
</script>
</body>
</html>You can view the preceding example either online at http://plnkr.co/edit/6wJ10DpmGhLIyWMxI3eP or in the Example1 folder from the source code for this chapter.
You will notice in the preceding example that we had to prepare the HTML markup for jQuery integration by having the id attributes set for specific elements. The JavaScript code binds to element events and will react to changes in user input, displaying the formatted content for valid entries and hiding it for invalid ones. JavaScript code is separated from HTML content, and the number of lines for each section is comparable.
The second example shown in the following code is based on AngularJS, and the functionality is identical to the previous example (try to ignore the highlighted element attributes for the moment, and the variables surrounded by curly brackets will be discussed later in this book):
<!DOCTYPE html> <html ng-app> <head> <meta charset="utf-8" /> <title>Chapter1 Example2</title> <script src="http://code.angularjs.org/1.2.14/angular.js"></script> </head> <body> <h1>Introduction</h1> <label>My name:</label> <input type="text" placeholder="Please enter name" ng-model="name"> <br/> <label>My favorite color:</label> <select ng-model="color"> <option value="">Please select</option> <option>red</option> <option>yellow</option> <option>magenta</option> </select> <h3 ng-show="name">Hello! My name is {{name}}.</h3> <h3 ng-show="color">My favourite color is <span title="{{color}}" style="background-color:{{color}};"> </span>.</h3> </body> </html>
You can view the preceding example either online at http://plnkr.co/edit/yQ3WAJ8XKwtaFDnKWiCU or in the Example2 folder from the source code for this chapter. If you executed the previous example, you might have noticed a slight delay between when the name was entered and when it was displayed further down the page. This delay disappears in the AngularJS example due to its faster DOM manipulation.
You will notice that the HTML section does not have any id element attribute set, and there is no JavaScript code section. The only JavaScript reference is to the AngularJS core file that links to the current stable version of the framework. There are new element attributes, all prefixed with ng-. This prefix marks the built-in AngularJS extensions to the HTML vocabulary, also known as directives, and this prefix will appear often in the HTML code snippets throughout this book. This approach to extend the HTML markup by defining new element attributes, or even new elements, transforms it into meaningful and expressive markup, which is one of the major differentiating factors from a jQuery-based approach or from other JavaScript frameworks. By removing the boilerplate code from the jQuery example, AngularJS allows the developer to be more productive and use markup instead of code as much as possible. It also enables the sharing of HTML markup with a designer in a collaborative workflow, where HTML markup and JavaScript code are loosely coupled and not linked as tightly together as in the jQuery example through special element identifiers and CSS classes.
The first AngularJS-specific, most distinctive HTML attribute is ng-app. It sets the boundaries of the AngularJS application and can be applied on any HTML element, with the only constraint being that it can appear only once. The HTML element with the ng-app attribute is the AngularJS application root element. AngularJS will parse the markup delimited by the application root element and look for any ng- prefixed elements, attributes, or CSS classes. It will match some regular HTML tags such as input and select if they contain ng- prefixed attributes or CSS classes. These entities will then be mapped to instances of special AngularJS components called directives.
The directives are used to add dynamic behavior to HTML content and introduce a powerful, versatile, and declarative user interface definition language. Even the initial ng-app attribute maps to a directive used to bootstrap the AngularJS application. The next highlighted attribute in the example is ng-model. This attribute introduces the concept of
scope, the fundamental data model in AngularJS.
All HTML elements in an AngularJS application will be associated with at least one instance of an object called scope. Scope is the special ingredient that links the view, as represented by HTML elements, to the code behind the view, represented in this example by directives. The scope object is initialized and owned by AngularJS components, and the view can only reference properties and functions of the scope object.
The application root element will be associated with the initial scope of the application. This initial scope is called the root scope, and any AngularJS application will have at least one scope: the instance of the root scope. Since some directives have their own scope instance created for them implicitly, a typical AngularJS application will have a hierarchy of scopes, with the root scope at the top.
Going back to the AngularJS example, the first ng-model attribute maps the value of the current input element to a property on the current scope instance. In our case, this specific property is the name property of the root scope. The name property is not defined anywhere prior to the ng-model attribute, and it will be created implicitly for the underlying scope instance by AngularJS. The mechanism where the value of a scope property and the value of an HTML element can update each other is called two-way data binding, and its signature in AngularJS is the ng-model attribute.
The next highlighted ng-model attribute maps the value of the select element to a new property of the current scope called color. The attribute is used in two different HTML elements, and its effect is similar—as soon as the user enters their name or selects a color, the changed values get stored as distinct properties on the current scope instance.
This concludes the data entry part of the example. The next part is about data display, and we start with the highlighted ng-show attribute. To understand the functionality introduced here, we have to discuss AngularJS expressions first.
An AngularJS expression is similar to a JavaScript expression used in the eval() function call. It is always evaluated against the current scope, and it can reference a scope property or more scope properties linked by logical operators. An AngularJS expression will ignore null or undefined scope properties, and this is another important difference from an equivalent JavaScript expression. In our example, the ng-show expression would not have generated an exception if the name scope property had not been defined previously.
The directive introduced by the ng-show attribute will show or hide its HTML element depending on the true or false evaluation of the expression from the attribute value. When the name property gets a nonempty value following user text input, then the first h3 element is displayed.
The next highlighted HTML snippet is {{name}}. This represents an interpolation that is based on an AngularJS expression that will be evaluated against the scope object and displayed as text inside the h3 tag. Interpolation is similar to one-way data binding from other templating systems, and it has the same outcome of a code expression being transformed into a string. The difference is that interpolation can use any valid AngularJS expression, and it accepts a value like {{name + ' and I am explaining Example2'}}.
The interpolation expression will reflect a change in the name scope property following user text input. We can start to visualize the flow of data from the input element through AngularJS and back to the h3 element.
The second h3 element is similar to the first one and bound to the color scope property instead. The first binding expression is an attribute value, and the second one is part of an attribute value. The fact that we can have a binding on HTML content—text, attribute, and even element tag—shows the power and versatility of AngularJS.
The following diagram shows the data flow from Example2:
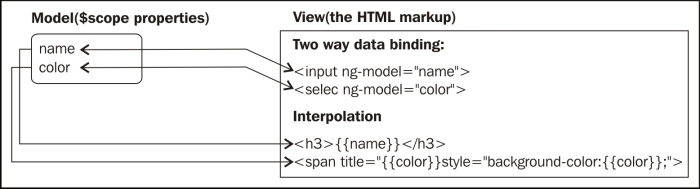
The preceding diagram mentions the model and view as the two distinct concepts associated with the data binding and interpolation mechanism, and they will be explored in detail after we discuss the next AngularJS component.
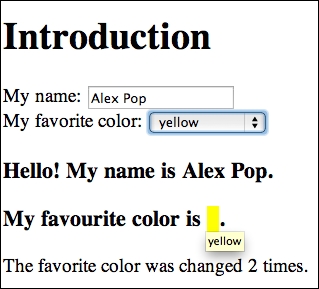
We will expand the previous example to include additional logic. The example will count how many times the color was changed, and it will display the count when it is greater than one, as shown in the following screenshot:
The following example contains new AngularJS directives and components that support the additional logic, as highlighted:
<!DOCTYPE html> <html ng-app> <head> <meta charset="utf-8" /> <title>Chapter1 Example3</title> <script src="http://code.angularjs.org/1.2.14/angular.js"></script> </head> <body ng-controller="ExampleController"> <h1>Introduction</h1> <label>My name:</label> <input type="text" placeholder="Please enter name" ng-model="name"> <br/> <label>My favorite color:</label> <select ng-model="color" ng-change="onColorChanged()"> <option value="">Please select</option> <option>red</option> <option>yellow</option> <option>magenta</option> </select> <h3 ng-show="name">Hello! My name is {{name}}.</h3> <h3 ng-show="color">My favourite color is <span title="{{color}}" style="background-color:{{color}};"> </span>.</h3> <div ng-show="colorChangeCount > 0">The favorite color was changed {{colorChangeCount}} times.</div> <script> function ExampleController($scope) { $scope.colorChangeCount = 0; $scope.onColorChanged = function() { $scope.colorChangeCount++; }; } </script> </body> </html>
You can view the preceding example either online at http://plnkr.co/edit/5xW4MplFbcnTzMeO1jov or in the Example3 folder from the source code for this chapter.
The first highlighted attribute, ng-controller, introduces a directive that maps an AngularJS object called controller to the HTML section delimited by the current element. The controller is defined in the highlighted script tag as a globally accessible function. We call this function the controller constructor function. Note the $scope parameter that represents the current scope instance. This parameter gets initialized automatically by AngularJS, so when the controller constructor function is executed, the scope is available and ready to use. Declaring a parameter in a component definition and expecting AngularJS to automatically provide it is the signature of the dependency injection mechanism, which will be explored in detail in this chapter.
The scope passed to the controller is also attached to the view represented by the HTML element with the ng-controller attribute. The controller and view share data through the model represented by the scope instance. Any property defined on the controller scope will also be visible to the HTML view.
The first scope property is colorChangeCount. The second property is the onColorChanged function, which increments colorChangeCount when called. The two properties are a typical example of the custom logic found in an AngularJS controller.
Going back to the HTML from the previous example, the next highlighted snippet is the attribute, ng-change. This maps to a directive that will evaluate the expression value of the attribute every time the selection changes. This directive can also be used with input elements and requires the existence of the ng-model attribute. In our example, the ng-change attribute value is the onColorChanged() expression. AngularJS expressions might contain function calls, which are convenient when the expression being evaluated is too long or complex to be used as an attribute value.
This wraps up the data entry section of the controller logic. Next, we move on to the data visualization part, and you will notice that the first scope property is referenced by the HTML view in an ng-show attribute and in the {{colorChangeCount}} binding. The directive mapped to ng-show evaluates the property when changed, and a subsequent message is displayed if the property value is greater than zero or otherwise hidden.
I have updated the previous diagram for Example2 to reflect only what has been changed in Example3, as follows:
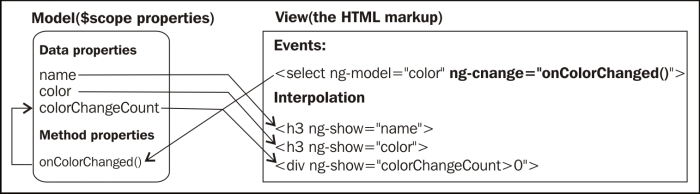
The darker arrows show the flow of data from the view to the model via the onColorChanged() method triggered by the select element change event. The model is updated in this method, and the change flows back to the view again through the colorChangeCount property. Note how the controller is not explicitly mentioned here as it does not have an active role in the data binding mechanism in AngularJS other than initializing the model represented by scope data properties and methods.
Another mechanism worth mentioning is the dirty checking process where AngularJS detects changes triggered by user interaction and propagates them as part of the scope life cycle by calling the scope.$apply method. Changes that occurred in scope properties or that have an effect on any expression are propagated within the scope.$digest method, which is called at the end of the $apply method. Any controller or directive can observe the changes in scope properties using the scope.$watch method, and these changes are propagated when the scope.$digest method is called as part of the scope life cycle.
Note
You can find more information on the scope life cycle and how changes are detected and propagated by AngularJS at http://code.angularjs.org/1.2.15/docs/guide/scope.
We now have a full working example that showcases the key concepts from AngularJS with the controller as the main vehicle to implement business logic and react to user input through the scope methods. It is now time to reveal the concepts underlying the first AngularJS examples in the next section.
The code for Example1 from the previous section was focused on jQuery and is representative of the JavaScript code that was at large when AngularJS was created. The example code has the manipulation of HTML elements intertwined with business logic. This makes it difficult to test the business logic in isolation from the presentation logic. Any change in application data or user input has to be manually propagated back and forth to the view represented by HTML elements. Compared to the AngularJS example, there is a lot more code that needs to be written, and this code might be difficult to scale and reuse.
JavaScript frameworks such as Backbone.js, knockout.js, AngularJS, and others addressed the problems of scalability, reusability, and testability by embracing a design pattern traditionally used by server-side frameworks. This pattern is called Model-View-Controller (MVC), and it is an established pattern that was originally introduced in the 1970s. You should already be familiar with it from the ASP.NET MVC fundamentals, but I will revisit it here for reference.
Note
Technically, AngularJS uses a variant of the MVC, which is closer to the Model-View-ViewModel (MVVM) pattern, but the definition of MVC from the next section still applies to it. One of the core members of the AngularJS team declared the main design pattern behind AngularJS as being "Model-View-Whatever works for you" (MVW or MV*) in this post at http://plus.google.com/+AngularJS/posts/aZNVhj355G2.
The design pattern is specific for applications with user interfaces and introduces a separation between the following aspects:
Model: This is the application data and the business logic associated with it
View: This is the output of the application data in any form that can be consumed or manipulated by a user
Controller: This is the logic to get data from the View to the Model and back, and to manage any interaction with the View or the Model
The Model does not have direct access to the View or Controller. Any change in the Model gets propagated to the View through notifications or polling by the Controller. This allows the Model to be tested in isolation from the View and Controller. It supports the separation of concerns between application layers, which is essential to support code reusability and scalability. You can reuse the same model to power different views or cache model instances between application data requests.
The Controller can be instantiated without requiring the underlying View infrastructure to be active. This ensures Controller testability, and it hides the specifics of the View infrastructure implementation from the Controller. You can reuse the same Controller to power different Views with a similar structure and functionality or to power Views that differ only through the infrastructure implementation.
I mentioned the Model, View, and Controller concepts in the previous section, and I identified them as follows:
Model: This contains the scope properties. Any directive or controller has access to a scope instance.
View: This contains the rendered HTML elements that are enhanced or extended by directives.
Controller: This is a constructor function that has access to a scope instance and uses it to provide data and functions to the View.
The MVC pattern, as used in AngularJS, allows a great degree of flexibility for the application code. It introduces the reusability of Controllers, Models and, Views; you can have the same Controller reused for multiple Views, the same Model reused in multiple Controllers, and the same View reused for multiple Controllers. It also adds testability for Models, Controllers, and even directives. Understanding how the pattern needs to be used in AngularJS is key to organizing your application code.
If we go back to Example3, we will be able to identify the $scope parameter of the ExampleController function with the Model, the markup delimited by the body element and the ng-controller attribute with the View, and the ExampleController function with the Controller.
The examples from the previous section use an implicit application configuration. There are examples when you need to run some configuration before the application starts, or you need to run multiple AngularJS applications from a single JavaScript code base.
The framework allows for an explicit application initialization, as showcased in the next example. I reduced the first AngularJS example, and it now allows only username editing. I added a new attribute, ng-focus, which is a directive that will evaluate an expression when the input element is focused.
The code executed in the following event will show the previously entered username while the new username is being changed:
<!DOCTYPE html>
<html ng-app="myApp">
<head>
  <meta charset="utf-8" />
  <title>Chapter1 Example4</title>
  <script src="http://code.angularjs.org/1.2.14/angular.js"></script>
</head>
<body ng-controller="ExampleController">
  <h1>Introduction</h1>
  <label>My name:</label>
  <input type="text" placeholder="Please enter name" ng-model="name" ng-focus="onNameFocused()">
  <h3 ng-show="name">Hello! My name is {{name}}.</h3>
  <div ng-show="previousName">Previous name was {{previousName}}.</div>
<script>
  var myAppModule = angular.module('myApp', []);
  myAppModule.controller('ExampleController', function ($scope) {
    $scope.name = "Alex Pop";
    $scope.previousName = "";
    $scope.onNameFocused = function() {
      $scope.previousName = $scope.name;
    };
  });
</script>
</body>
</html>
You can view the example either online at http://plnkr.co/edit/dfJKeNwuRMweGveBhErE or in the Example4 folder from the source code for this chapter.
The first highlighted attribute is ng-app, which has a value this time around. The myApp value represents the unique identifier of the current AngularJS application. The next highlighted code initializes a new AngularJS component called module, which will be used via the myApp identifier to bootstrap the AngularJS application.
A module is a container-like object with a unique identifier that groups together the AngularJS components used to build an application: controllers, directives, and others, such as providers, factories, services, values, constants, animations, and filters. The module has methods that are specific to the AngularJS application components I mentioned. You can see one of these methods in the last highlighted code section in the previous example.
The module controller function takes the controller name and controller constructor function as arguments. The constructor function is similar to the one from Example3, and this time around, it is associated with a specific module rather than being standalone. Throughout this chapter, we will explore other module methods when we introduce AngularJS components.
Modules can be used to share AngularJS components between different applications. A module can reference other modules, as in the following example, showing a different module definition:
var myApp1Module = angular.module('myApp1', ['myApp2', 'myApp3']);The second parameter of the module definition is the array of module names that the application depends on. The AngularJS framework itself is organized into different modules. The principal AngularJS module is called ng, and it is loaded into every AngularJS application by default. Other AngularJS modules, such as ngResource, that provide functionality for web services have to be explicitly referenced and declared as a dependency of the application. First, you need to reference the JavaScript file that contains the ngResource module as shown in the following code:
<script src="http://code.angularjs.org/1.2.14/angular-resource.js"></script>
Then, you need to declare a dependency on the module for the AngularJS application using the following code:
var myAppModule = angular.module('myApp', ['ngResource']);A similar procedure has to be implemented if you want to perform the following tasks:
Split your application into different modules. By doing so, you can reuse the modules between different AngularJS applications.
Reference other AngularJS framework modules such as
ngRouteor third-party AngularJS modules such as AngularUI Bootstrapui.bootstrap.
The module dependency array is another signature of the dependency injection mechanism, explored later in this chapter, where the dependency names are declared, and AngularJS ensures that they are located, initialized, and provided to the application module.
A module has two methods that can be used to perform further configuration and initialization outside of individual AngularJS components. The first method is config, which allows you to perform any additional configuration when the module is loading. The second method is run, which allows you to run custom code after all of the module components are loaded.