
If you've used Sass and Compass before, then you already have installed them. However, I'd like to ensure your versions of Ruby, Sass, and Compass are all what they need to be to follow along with the examples I'll use later in the book. Many of the topics will use the very latest features of Sass and Compass.
Sass and Compass run on a language called Ruby. Ruby became very popular in web development by offering clean syntax while still being very powerful. It achieves this power and simplicity by being strictly object oriented. In simple terms, everything from a single letter to a full class is treated as its own object in Ruby, meaning you can treat everything in Ruby much the same way. There are no second class citizens in Ruby.
In this book, we won't be working directly with Ruby; however, you do need it installed for Sass and Compass. So let's look at getting set up.
I'm currently working on Windows. Yes, you read that correctly, I'm one of those weirdos who is actually more productive using Windows than Mac. So, for those of you on Windows, you'll know we don't have Ruby on our systems by default. It's not a big issue. You just go to http://rubyinstaller.org/downloads/ and you'll find a list of all available .exe installers for the stable Ruby versions.
Tip
What version should I use?
I like to always be one step behind on this one. What I mean by that is, at the time of writing, the current stable release of Ruby is 2.2.3. The previous stable release was 2.1.7. So I have 2.1.7 installed. The reason I choose to do this is gems are more likely to have been updated to work with at least 2.1.7.
I also have Ruby 1.9.3p551 installed on my system, and updating wasn't as straightforward a process as installing was. So, let's quickly explain how to install multiple versions of Ruby and switch between them if you need to.
The following method will allow you to have multiple Ruby versions installed but will require editing your PATH manually to switch between versions:
To start with, simply download and run the installer as normal. The RubyInstaller executable creates a separate folder for each Ruby version so you don't have to uninstall or overwrite your current version.
Select your language and read and accept the License Agreement.
Next, you'll be asked what directory to install Ruby into and also whether to Install Td/Tk Support, Add Ruby executables to your PATH, and Associate .rb and .rbw files with this Ruby installation. You can keep the defaults here, as shown in the following screenshot:

Installing Ruby on Windows
Next, you may need to update your system
Pathmanually to use the newer version of Ruby. To check this, simply open the cmd.exe (WinKey + R , then typecmdand hit Enter ). Then, type the following command:ruby -vIf your version is incorrect, you'll need to update your
PATHvariable manually. I'll also explain why this happens, seeing as it's actually a common problem with some applications.To update your PATH you'll need to open up your System Properties. You can do this by going to your Windows start screen and typing
System Environment Variablesand selecting the first option, Edit your system's Environment Variables.Next, select Environment Variables.
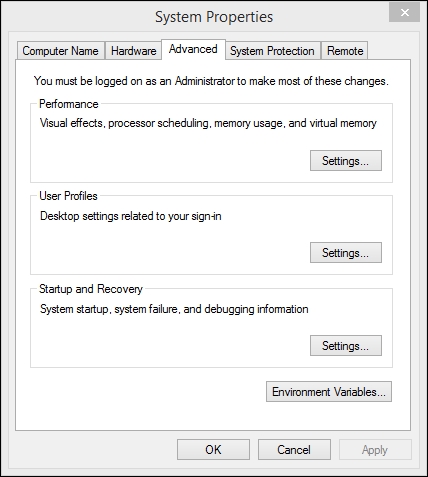 System properties
Then you'll need to set your System variables | Path value. The installation process will update the PATH variable for the user account but not the global path variable.
 Setting the System Variables path
Replace the incorrect version of Ruby with the newer version you wish to use.
To check everything is working, open
cmdagain and typeruby -v. You should see the correct version.
There are many more options for installing/updating Ruby for Mac. Depending on your OS version, you'll already have either 1.8.x or 2.0.x installed on your system by default. However, if you haven't updated, you may want to update to 2.1.7 or later. To do this, you can use Homebrew to easily update to the latest release with the following command:
brew install ruby
If you wish to have multiple version of Ruby on your system, you may want to look into a package manager such as Ruby Package Manager (RVM). You can learn more about RVM from their website at http://rvm.io/.
This one is easy. I'm using the most up-to-date versions of Sass and Compass, Sass 3.4.19 (Selective Steve) and Compass 1.0.3 (Polaris). If this is your first time installing Sass and Compass or you recently upgraded your version of Ruby, then the easiest way to install both is to simply install Compass using the following command:
gem install compass
Again, you can check everything is working by running the following command:
sass -v && compass -v
This will run each command one after the other.